

This is a companion post to our protein design pipeline blog post. While the previous post covers the science and the pipeline itself, this one walks through the infrastructure side: how we set up Nebius AI Cloud to run GPU-accelerated Nextflow workflows at production scale using managed Kubernetes and Seqera. We’ll show you how to deploy an autoscaling K8s cluster with Terraform and launch our nf-proteindesign pipeline on Seqera.
Nebius AI Cloud: Built for GPU Workloads
Learn about Nebius AI Cloud
Nebius AI Cloud is a cloud platform built specifically for GPU-intensive workloads, with data centers in Europe and the US. We chose it for this project for a few practical reasons:
GPU Availability
For protein design workflows like ours (e.g. where processes like BoltzGen and Boltz2 need GPU acceleration but don't require the interconnect bandwidth of distributed training) you don't necessarily need the latest and greatest hardware. Nebius offers on-demand access to a range of NVIDIA GPUs from L40s and RTX6000s, H100s, H200s and B200s, B300s to GB300s at competitive prices, and we can spin up instances without long wait times or reservation commitments.
Managed Kubernetes with GPU Support
Second, Nebius provides managed Kubernetes with GPU support and observability out of the box. Nebius provides a fully managed Kubernetes service (MK8s) where GPU node groups come with pre-installed NVIDIA drivers, device plugins and connected Grafana performance dashboards, so we didn't have to deal with GPU operator setup ourselves. The control plane is managed at no cost, and you only pay for worker nodes when they're actually running, which matters a lot when you're autoscaling expensive GPU nodes.
Terraform-Native
Third, everything is Terraform-native. All Nebius resources can be managed as code through their Terraform provider, which meant we could version-control our entire cluster configuration and share it as a companion repo to this blog post. Anyone can recreate the same environment setup we used.
💡Note: Nebius also offers Soperator (an open-source Kubernetes operator for Slurm) if you prefer HPC-style job submission. We covered that approach in a previous blog post. Here, we'll focus on the managed Kubernetes path, which integrates natively with Nextflow's k8s executor.
Setting up a Managed Kubernetes Cluster in Nebius
For our large scale pipeline run, we deployed a managed Kubernetes cluster on Nebius using Terraform. In this section, we’ll walk through the key components of the setup. The full Terraform configuration is available in our companion repository, for you to adapt for your own setup.
Prerequisites
Before getting started, you'll need:
- →A Nebius AI Cloud account with billing enabled
- →The Nebius CLI installed and configured (
nebius profile create) - →Terraform installed (v1.5+)
- →
kubectlinstalled
Cluster architecture
Our cluster for the nf-proteindesign production run consisted of:
- →Control plane: Managed by Nebius (no cost, no maintenance on our end).
- →CPU node group: 3 nodes running
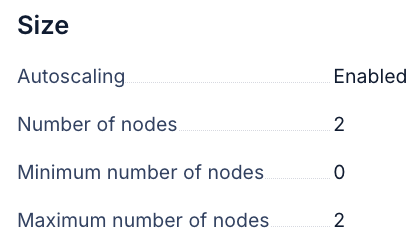
cpu-e2instances (16vcpu-64gb preset) — these handle the Nextflow head job, CPU-bound pipeline steps, and cluster services. - →GPU node group: Autoscaling from 1–2 nodes running
gpu-h100-sxminstances (8gpu-128vcpu-1600gb preset) with CUDA 12 drivers pre-installed.
The autoscaling GPU node group is really the key to keeping costs under control. During the BoltzGen and Boltz2 stages of our pipeline, multiple GPU tasks run in parallel and the cluster scales up automatically. During CPU-only stages (ranking, ProteinMPNN sequence redesign, analysis) the GPU nodes scale back down to the minimum.
Terraform configuration
Let’s walk through the core Terraform resources for the cluster. For this walkthrough, we assume that you already have a network and VPC setup in your Nebius tenant. Nebius by default sets up a standard network for you when you create your tenant. We will set up the Kubernetes cluster, a shared file system to mount, as well the cpu and gpu nodes. The settings described below can all be added to a file called file: `/nebius/terraform.tfvars` to be applied with terraform.
1. Kubernetes Cluster
The first step is to create our managed Kubernetes cluster. We're using Kubernetes 1.32 and enabling a public endpoint so that both kubectl and Seqera can reach the cluster API from the internet. If you need tighter security, you can use a private endpoint with VPN access instead.
2. Shared file system
Nextflow's Kubernetes executor requires a shared storage volume for the Nextflow work directory. We set up a new shared filesystem and will pre-populate it with databases and model checkpoints we will need for the nf-proteindesign.
3. CPU Node Group
The CPU node group handles the Nextflow head job and all CPU-bound work. We're using a fixed count of 3 nodes here. These are relatively inexpensive (~ 1$ / hour depending on setup) and stay up throughout the run.
4. GPU Node Group with Autoscaling
This is the interesting part. The GPU node group uses the autoscaling block with min_node_count = 0, which means the cluster can scale all the way down to zero GPU nodes when no GPU work is queued: no idle GPU costs. When Nextflow submits GPU tasks, the Kubernetes autoscaler provides new nodes within a few minutes.
Deploying the Kubernetes cluster
Edit the environment.sh file and set your values:
With the Terraform files and configuration for our specific setup in place, deploying the infrastructure is extremely simple:
Terraform is crucial for this infrastructure setup because it implements Infrastructure as Code (IaC), allowing the entire desired cluster state to be defined in configuration files. It uses a state file to continuously track the actual state of the resources deployed on Nebius AI, such as VPCs and Kubernetes clusters. This tracking allows Terraform to calculate exactly what changes are needed before execution (planning), prevent undocumented manual modifications (drift), and ensure the complex environment remains fully reproducible and shareable.
Preparing Nebius Kubernetes for Seqera
Discover Seqera for Scalable Bioinformatics
With the Kubernetes cluster up and running, the next step is connecting it to Seqera so we can launch, monitor, and manage pipeline runs from an intuitive UI interface or via Seqera AI and get observability and traceability for our Nextflow runs. For convenience, we have prepared a single setup.sh script that prepares everything for seamless integration with Seqera (see detailed documentation on Kubernetes setup with Seqera).
The script performs three key operations:
1. Setting up Permissions (Service Account and Namespace)
The script creates a dedicated isolated workspace (a "namespace") within your cluster. It then establishes a service account with minimal, required permissions. This service account acts as the dedicated "user" that Seqera will use to securely submit and monitor your pipeline jobs.
2. Enabling shared storage (scratch space)
Bioinformatics pipelines often involve numerous small, parallel tasks that require concurrent read and write access to the same data. The script installs a storage driver that makes the Nebius shared filesystem (pre-attached to your nodes by Terraform) available to every pipeline task. This provides the essential shared scratch space that allows Nextflow to efficiently coordinate work across all running pods.
3. Extracting credentials (authentication token)
Finally, the script extracts the authentication token associated with the newly created service account and saves it directly to your Terraform configuration. This token is the credential Seqera will use to securely communicate with your cluster when you register it as a compute environment in the following setup step.
The entire preparation process is fast, typically taking under a minute, and is only required once. Following this configuration of the Nebius cluster, we will use terraform again, this time with the Seqera provider, to generate entities on Seqera.
Connecting Nebius Kubernetes Cluster to Seqera
💡Note: We are working on cloud.seqera.io in a private workspace called seqerlabs/webinar. Any steps we describe also work on Seqera Enterprise, simply update your deployment URL and your workspace name.
The Terraform configuration for Seqera performs three main actions:
1. Registers a Kubernetes Credential
It registers a Kubernetes credential containing the service account token extracted by the setup script to the workspace. This token is how Seqera authenticates and communicates with your Nebius cluster.
2. Creates a Compute Environment
This environment informs Seqera of all necessary details to run pipelines on your cluster: the API endpoint, the CA certificate for secure communication, the namespace, the service account to use (via the credentials on Seqera), and the mounted location of the shared storage for pipeline data.
3. Adds nf-proteindesign to the Launchpad
This step registers the nf-proteindesign pipeline in Seqera's Launchpad so it can be launched with a single click or programmatically. The pipeline resource points to the GitHub repository, pins a specific revision, and pre-configures the compute environment and work directory - so anyone in the workspace can launch a run without needing to know the infrastructure details.
Once this process is complete, your new compute environment will show as "Available" in the Seqera UI and the nf-proteindesign pipeline will be pre-configured on the workspace Launchpad. With the current setup, the pipeline will download boltzgen caches and checkpoints on every pod and won’t be able to use foldseek due to missing databases. For testing the setup, you can disable foldseek and let boltzgen download the caches on the fly. For larger production runs, we highly recommend pre-downloading the boltzgen cache and foldseek databases and pointing to them on the shared file system via the pipeline parameters cache_dir and foldseek_database + foldseek_database_name.
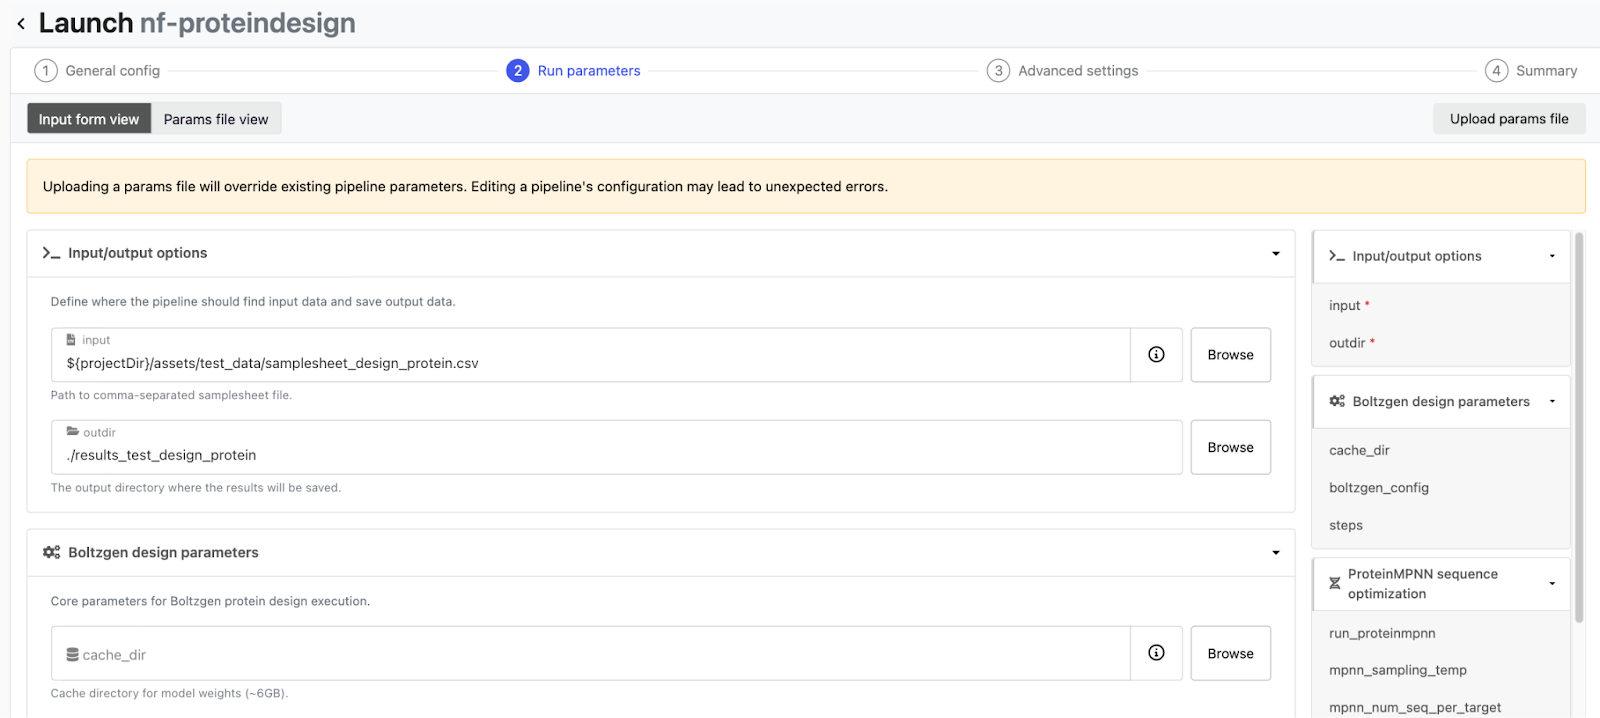
Testing nf-proteindesign
Before launching a full production run with thousands of protein designs, it's worth validating the whole infrastructure with a quick test. We will use the small test_protein_design profile from nf-proteindesign for exactly this purpose - quick execution of the entire end-to-end pipeline flow. This ensures the references and databases we have set up work with our Kubernetes cluster and that auto-scaling of GPUs is functional.
Launching the test run from Seqera
We will now launch our nf-proteindesign pipeline we have added to the launchpad on Seqera via Seqera AI. Simply open Seqera AI CLI and ask it to launch nf-proteindesign on your kubernetes cluster with the test_protein_design profile in your workspace. Seqera AI communicates with Seqera Platform on your behalf and submits the Nextflow head job to the Kubernetes cluster, which then orchestrates the individual pipeline tasks via K8s pods. You can watch the whole thing in real time from the Seqera dashboard - tasks moving from submitted to running to completed. You can also ask Seqera AI about the current status of your pipeline or debug any issues that might come up.
What to check during the test
There are a few things worth keeping an eye on during this first run:
GPU scheduling
Watch the first BoltzGen task closely. The Kubernetes autoscaler should provision a GPU node within a few minutes of the task being submitted. If GPU tasks are stuck in a pending state, double-check that the node group autoscaling is configured correctly and that the GPU tolerations are set.

Storage access
Make sure both the head pod and worker pods can read and write to the shared storage. Issues here usually show up as "file not found" errors in downstream tasks that expect output from upstream ones.
Container pulls
The first run will need to pull container images for each tool — BoltzGen, ProteinMPNN, Boltz2, and so on. These can be several gigabytes each. If pull times are really slowing things down, consider using the Nebius Container Registry to host images closer to your cluster.
Resource allocation
Check that CPU and memory requests match what each tool actually needs. Over-requesting wastes resources and prevents task parallelization; under-requesting leads to OOM kills. The Seqera resource monitoring dashboards can be really helpful for dialing in the right sizing.
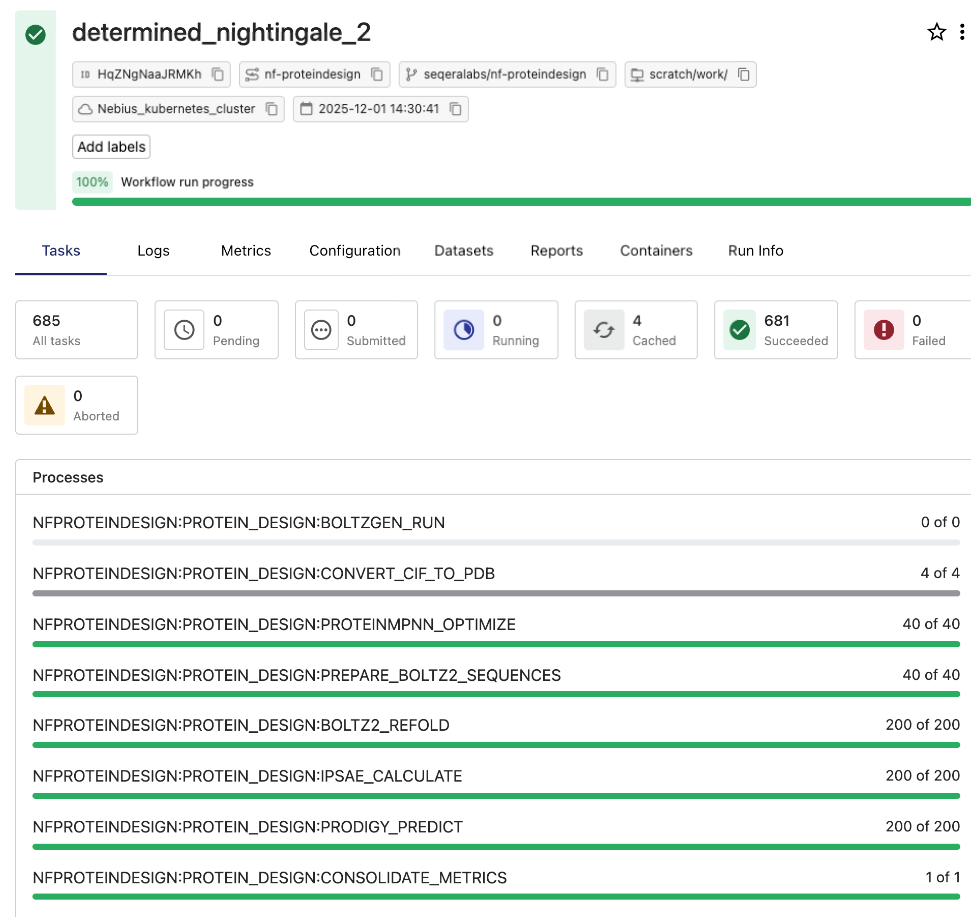
Once the test run completes successfully with all tasks passing, you can be confident the full pipeline will run correctly at scale.
Launching a Large-Scale Seqera Workflow
With the test run working, launching the production pipeline is really just a matter of adjusting the parameters. For our Adaptyv Bio Nipah Binder Competition submission, we configured the pipeline to generate 500 initial BoltzGen designs across four design templates, select the top 10 designs, and produce 200 final redesigned candidates. The four design templates correspond to different targeting strategies - unconstrained (no residue constraints, letting BoltzGen explore freely), and three targeted regions on the Nipah Glycoprotein G that we identified using Pesto binding site predictions. The full details on how we picked these regions are in our main blog post.
Dynamic Cluster Scaling
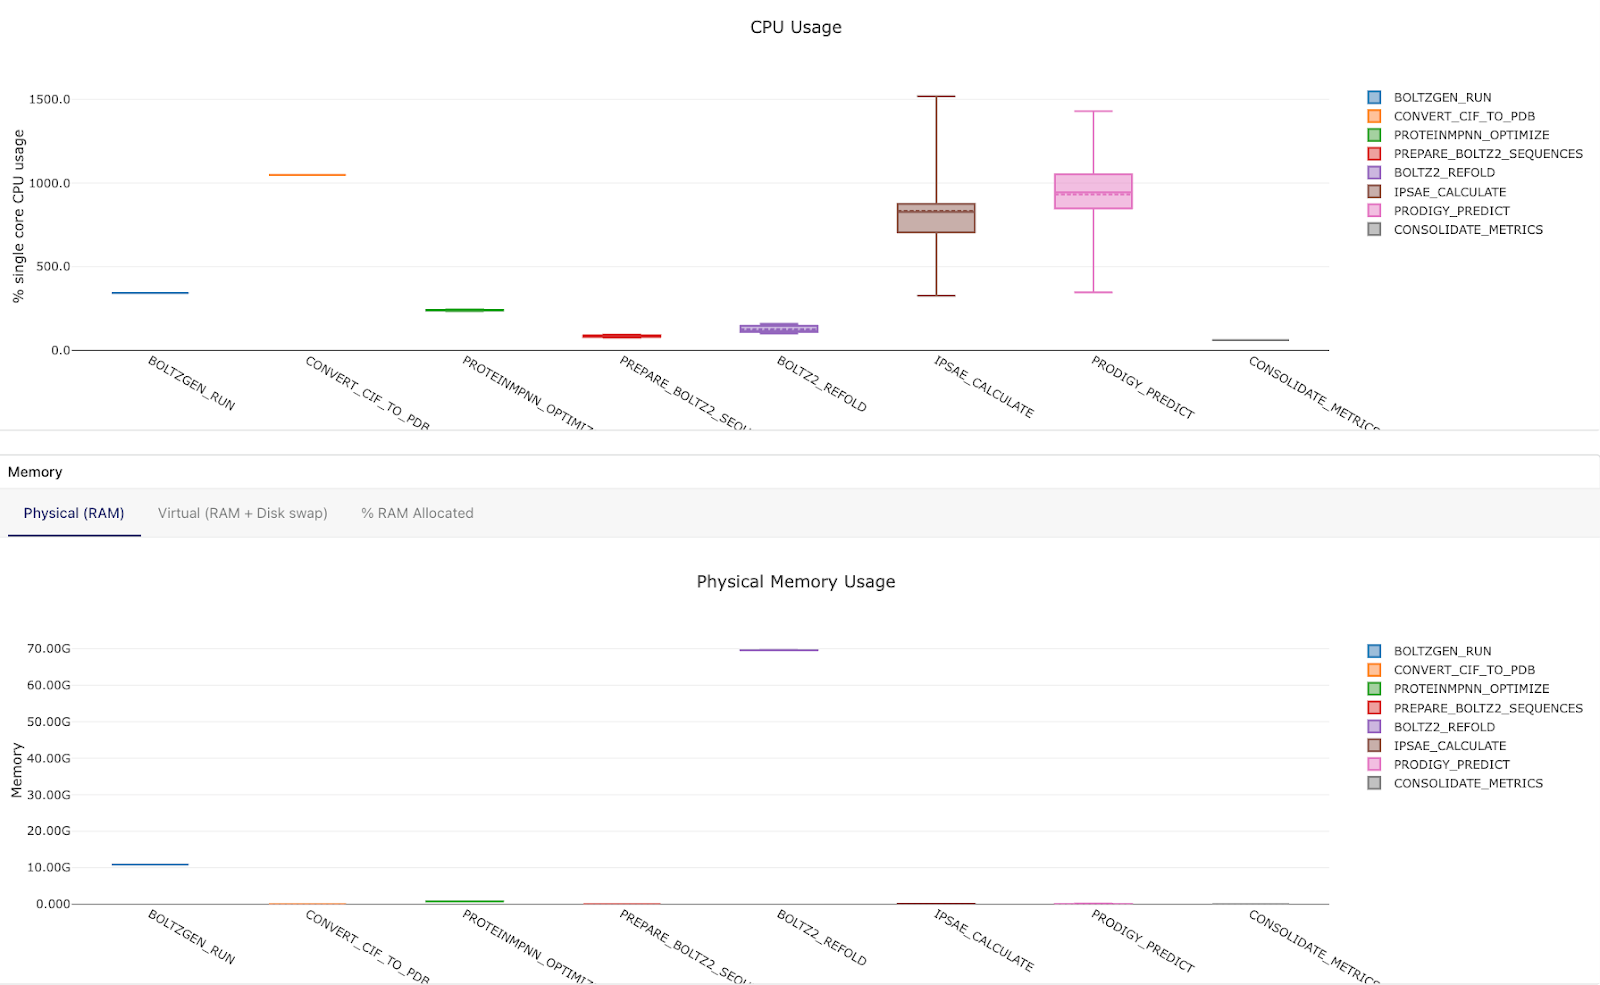
During our final production run, the Kubernetes cluster autoscaler did its thing - dynamically adjusting the number of GPU nodes based on what the pipeline needed at each stage. During the BoltzGen phase, 4 Boltzgen design templates against different Nipah Glycoprotein G target regions (each performing 500 total designs) were distributed across 8 GPUs on one node, scaling up from zero nodes. During CPU-only stages like ranking and ProteinMPNN sequence redesign, GPU nodes scale back down. When Boltz2 validation kicked in, the cluster scaled back up for structure re-folding with 2 GPU nodes and 16 H100 GPUs, performing 16 tasks of Boltz2 target-candidate binder foldings in parallel. And during the final analysis to compile a report, GPU nodes scaled to zero again.
This all happens automatically - Nextflow submits pods with the appropriate resource requests, and the Kubernetes autoscaler provisions or decommissions nodes as needed. You end up paying for GPU time only when GPU work is actually running.
Monitoring Nextflow runs with Seqera
Seqera provides critical operational visibility and traceability for pipeline execution. The Seqera dashboard offers a clear, real-time view of every task, including execution times, resource utilization, and logs, which helps proactively identify and resolve performance issues and track compute costs. The entire workflow, 2000 initial designs, ranking, and 200 final candidates subjected to redesign and validation, finished in a few hours.
Conclusion
The infrastructure for running GPU-accelerated Nextflow pipelines doesn't need to be complicated. With Nebius AI Cloud's managed Kubernetes and Seqera, the path from pipeline development to production runs can look like this:
- Develop and debug on a single GPU VM — fast iteration, with minimal cost.
- Deploy a managed K8s cluster with Terraform — reproducible, version-controlled infrastructure.
- Connect to Seqera — launch, monitor, and manage pipelines through a unified interface.
- Autoscale GPU resources — pay only for what you use, when you use it.
This approach isn't limited to protein design. Any Nextflow pipeline that requires GPU acceleration (whether for deep learning inference, molecular dynamics, image processing, GPU accelerated genomics or LLM fine-tuning) can follow the same pattern. The pipeline code doesn't change; only the infrastructure configuration does.
All the Terraform configurations described in this post are available in our companion repository: https://github.com/seqeralabs/seqera-nebius-kubernetes-tf. The nf-proteindesign pipeline POC is publicly available and fully open source.
Ready to get started?
- →Sign up for Seqera Cloud: free tier available.
- →Create a Nebius AI Cloud account: affordable GPU access.
- →Try Seqera AI: build Nextflow pipelines with natural language.
- →Read the protein design blog post: the full story behind the pipeline.