In the first article in this series, we looked at AWS Batch, described some key concepts, and explained the Nextflow execution model.
In the second article, we provided a step-by-step guide explaining how to set up AWS Batch for use with open source Nextflow. We also took a deep dive into the integration.
In this final article, we will look at Nextflow Tower - a collaborative command post for Nextflow pipelines.
While AWS Batch provides many benefits for Nextflow users, there are still some challenges:
- →The integration involves multiple steps and can be tedious to set up.
- →It can be challenging to monitor and manage pipelines from the command line.
- →Users need access to AWS credentials to launch pipelines.
- →There are no mechanisms to collaborate on datasets and share results.
- →Configuring cloud storage environments can be difficult and time-consuming.
This article introduces a more straightforward integration approach using Nextflow Tower and Tower Forge. Tower provides a fully automated solution for working with AWS Batch enabling users to be up and running in a matter of minutes.
The article will cover:
- →Nextflow Tower
- →Tower and AWS Batch
- →Configuring an AWS Batch compute environment Using Tower Forge
- →Launching a pipeline in Tower
- →How Tower works with AWS Batch
- →Working with existing AWS Batch environments
- →Using high-performance cloud storage
This article assumes that readers are already familiar with AWS Batch and Nextflow.
Nextflow Tower
Nextflow Tower is an intuitive centralized command post that enables collaborative data analysis at scale. Tower enables users to easily launch, manage, and monitor Nextflow data analysis pipelines and compute environments. With Tower, organizations can:
- →Collaborate and share data among local and remote teams
- →Share pipelines and on-prem or cloud-based compute resources
- →Enable non-technical users to run pipelines via an intuitive interface
- →Automatically tap cloud-based compute environments such as AWS Batch
Tower can be deployed on-premises or in the cloud. It is also offered as a fully-managed service at tower.nf. Users can try Tower for free using credentials from GitHub or Google or by simply supplying their e-mail address and creating an account. Tower can be used with multiple compute environments, including HPC workload managers, Kubernetes, and other cloud batch services.
A Batch Forge facility in Tower fully automates the setup and configuration of the AWS Batch environment. All that is required is for users to supply their AWS Identity and Access Management (IAM) Credentials to Tower with appropriate AWS permissions enabled.
Tower automatically sets up appropriate IAM roles, attaches policies, and creates AWS Batch computing environments, queues, and S3 buckets. Better yet, it deploys AWS Batch based on best practices taking the guesswork out of AWS Batch configuration.
Tower and AWS Batch
The high-level diagram below illustrates how Tower works with AWS Batch. Users interact with the Tower web UI to manage compute environments, datasets, and workflows. Tower can support multiple compute environments, and different users and project teams can share these environments enabling hybrid and multi-cloud Nextflow deployments.

Configuring a new compute environment is done entirely through the Tower web interface. Even non-technical users can configure an AWS Batch environment with their preferred storage technology and be up and running in minutes.
Before we discuss how Tower works, it is helpful to walk through the process of configuring an AWS Batch environment Tower. The step-by-step example below uses the hosted version of Tower at tower.nf. For organizations hosting Tower themselves, the process steps are identical.
Configuring AWS Batch with Tower Forge
The high-level steps involved in configuring AWS Batch with Tower Forge are as follows:
- →Obtain a Nextflow Tower account at tower.nf (or login with existing credentials).
- →Navigate to the Tower launchpad (by selecting the down arrow beside community showcase and selecting your user ID).
- →Select the Compute Environments tab, and follow the guided instructions to add an AWS Batch compute environment, being sure to select Batch Forge as the configuration method.
- →Once the Compute Environment is added, test it by navigating to the Launchpad and running a pipeline.
For readers new to AWS Batch, it is worth mentioning that both Nextflow and AWS Batch use the term “compute environment,” but they refer to different things. In AWS Batch, compute environments are the collection of AWS resources available to the batch service. For example, EC2, EC2 Spot, Fargate, or Fargate Spot instances. Nextflow works with either EC2 (on-demand) or EC2 spot instances. One or more AWS compute environments are associated with an AWS Batch job queue.
In Tower, the meaning of a compute environment is more expansive. Tower compute environments include AWS Batch, Azure Batch, Google Life Sciences, Kubernetes, and most HPC workload managers. Tower compute environments include everything needed to access (and sometimes provision) compute services, including credentials, configuration details, storage, job submission details, and more.
Step-by-Step Instructions
- →Provide a name for the compute environment – Select the Compute Environments tab and add a new compute environment.


If you are new to AWS and do not already have IAM credentials, follow the instructions in Creating an IAM user in your AWS account. You will need to set up a new IAM user with programmatic access and ensure the IAM user has appropriate permissions in the AWS environment. For convenience, Seqera supplies a JSON policy file containing the permissions needed to use AWS Batch with Tower Forge. You can attach this policy file to your AWS account by following the Tower Forge for AWS Batch readme instructions.
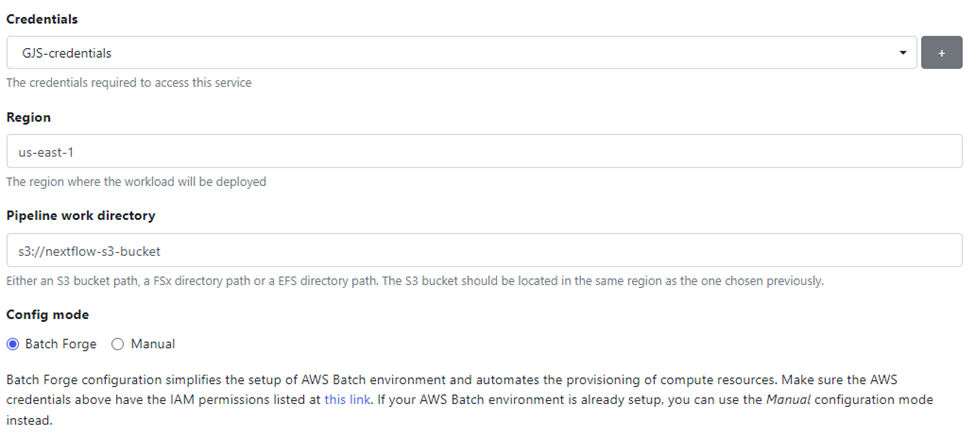
Enable EBS Auto-scale so that Tower can automatically scale elastic block storage (EBS) resources attached to the EC2 instances underlying the compute environment. Pipelines may deal with large files, and container images used by Nextflow are cached in the EBS volumes attached to the EC2 instances. Allowing EBS to auto-scale will help ensure you do not run out of room for temporary files and container images.

You should see Tower begin creating the AWS Batch compute environment using the supplied credentials. Tower uses multiple AWS Java APIs to configure the various AWS services needed for the compute environment to function. Items configured include role definitions, VPCs, AWS Batch compute environments, queue definitions, and storage environments.
Once the environment is ready for use, the status will change to available. You can associate multiple compute environments with your Tower account, and depending on your privileges in Tower, you can share these environments with others.

Launching a Pipeline in Tower
To verify that the new AWS Batch compute environment is working, navigate to the Launchpad tab and select Start Quick Launch to run a pipeline:

You can launch any pipeline you choose from a local, public or private Git repository. In this example, we have selected the same proof of concept RNASeq pipeline from the nextflow.io GitHub repo used in earlier articles. Once you have entered the details necessary to launch the pipeline, including the new compute environment, click the Launch button.
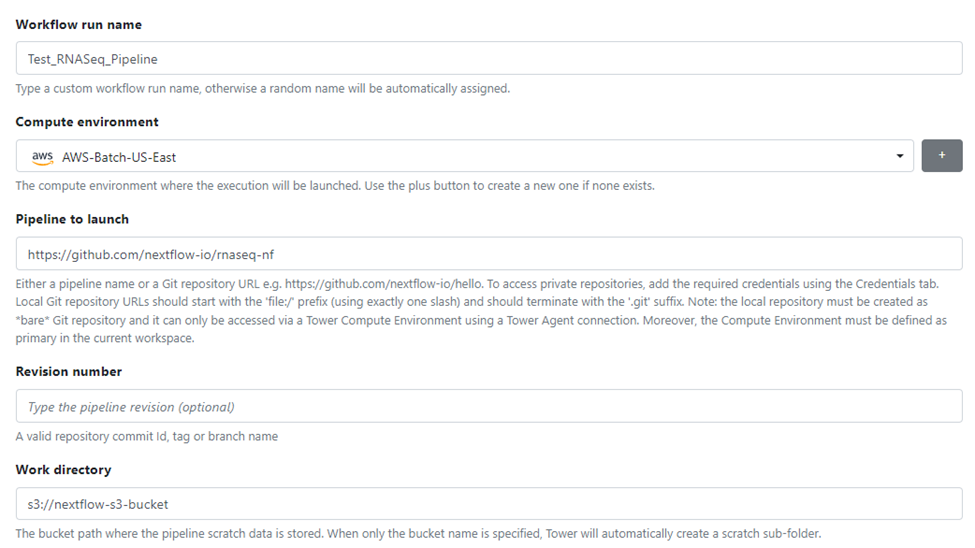
You should now see the pipeline begin to run. You can monitor progress through the Tower interface. The first time a pipeline runs, there will be delays as AWS Batch needs to start compute environments. Monitor pipeline execution by clicking on the pipeline's name.

Tower provides details about pipeline execution as illustrated below, including the command line and parameters used to submit the job, execution logs, and detailed resource usage accounting.
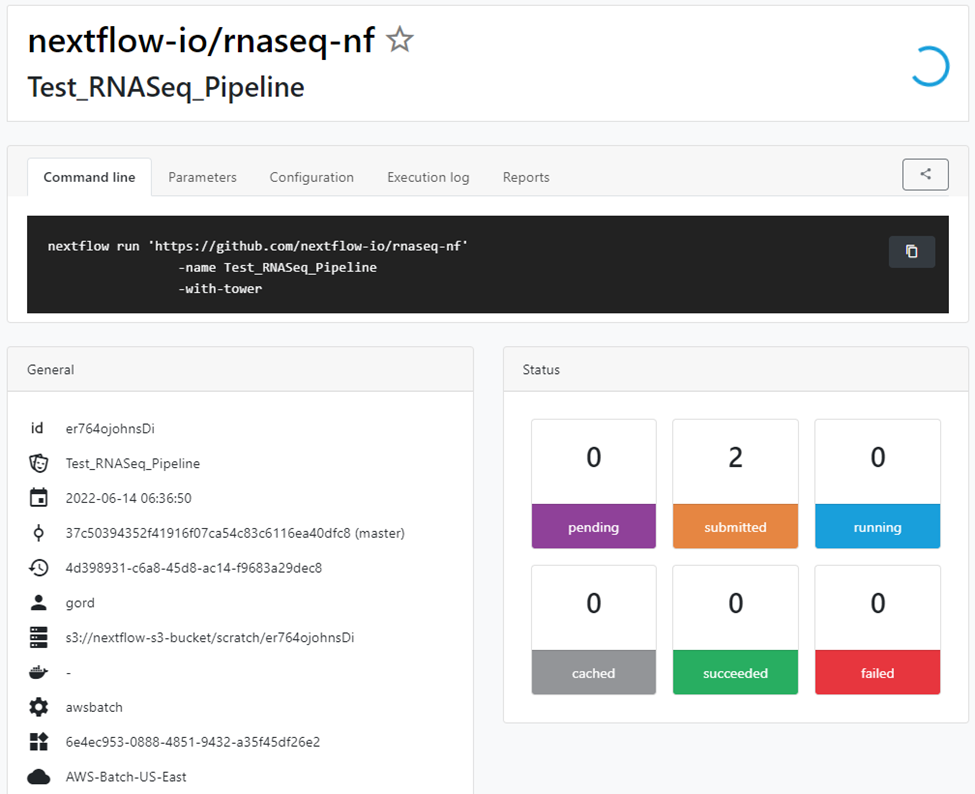
Tower helps users understand exactly how pipelines consume resources. With this knowledge, users and administrators can use resources more efficiently to help reduce cloud spending.
How Tower Works with AWS Batch
The illustration below shows how Tower interacts with AWS to provision compute environments and launch and manage pipelines:
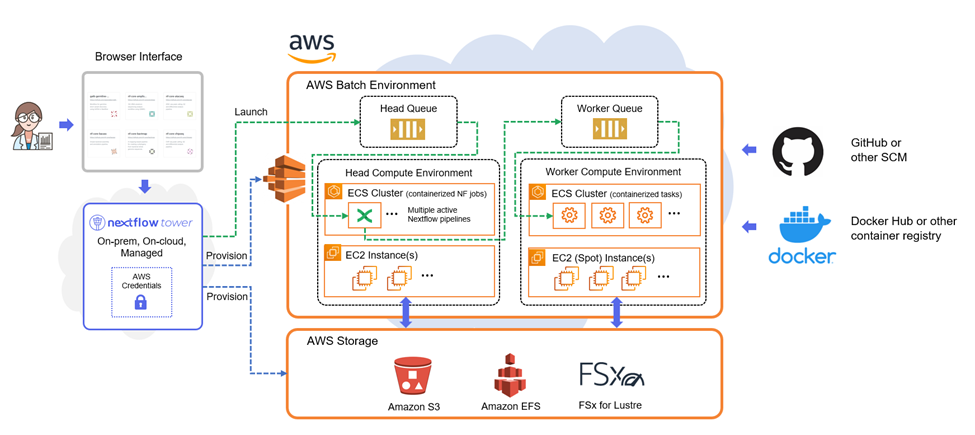
The AWS Batch environment provisioned by Tower Forge comprises two computing environments. A “head” environment executes the Nextflow pipelines, and a “worker” environment supports individual pipeline tasks. Each compute environment is underpinned by a separate Amazon ECS cluster, supported by appropriate EC2 instances.
Tower provisions separate compute environments because AWS Batch requires all instances within a compute environment to have the same provisioning model. A compute environment can contain either on-demand distances or Spot instances, but not both. Most users prefer to use lower-cost EC2 Spot instances to execute Nextflow tasks. The Nextflow pipeline itself runs on on-demand instances in the head environment that are not subject to being reclaimed.
Tower Forge can automatically provision different AWS storage environments depending on a user's preference and configure them for use with Nextflow. Choices include:
- →Amazon Simple Storage Service (S3)
- →Amazon Elastic File System (EFS)
- →Amazon Lustre for FSx
The ability to choose storage environments is advantageous because different pipelines can benefit from different storage technologies. In a GATK benchmark conducted by Diamond Age Data Science and Amazon, running Nextflow on FSx for Lustre rather than EBS resulted in workflows running 2.7x faster and being up to 27% more cost-efficient.
By accessing the AWS Batch service through the AWS console, we can see the compute environments automatically created by Tower Forge behind the scenes:
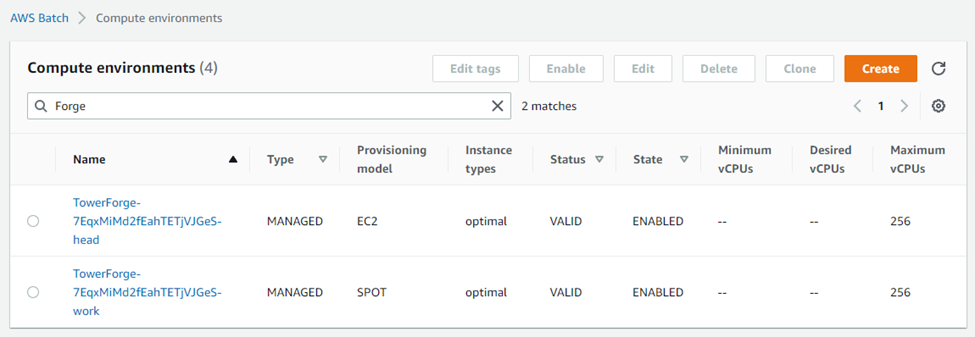
Tower Forge creates two “managed” compute environments. In AWS Batch, the term managed means that AWS automatically provisions resources based on workload demand, starting instances as necessary. The head compute environment serves the function of a head node or job submission host in a traditional cluster. Tower automatically starts each Nextflow pipeline inside a container with Nextflow and prerequisite software pre-installed. In Tower, multiple pipelines can execute in the head compute environment simultaneously. The Tower integration with AWS Batch is designed so that the head environment can scale to support multiple simultaneous pipelines.
Users can optionally specify the number of vCPUs and the amount of memory to allocate to each pipeline, referred to as the Nextflow runner job, when they set up the compute environment. These settings are found under Advanced options when configuring the compute environment:

Depending on resource requirements, multiple containerized workflows typically share an EC2 instance and run in separate containers. AWS Batch will automatically scale up the size of the ECS cluster and add EC2 nodes to the compute environment based on workload demand.
A second work compute environment is where the Nextflow process steps execute. Since we selected a spot provisioning model when setting up the environment, this compute environment uses spot instances. Resource requirements for individual tasks (CPU and memory) are embedded in Nextflow workflow steps. The integration will use these resource requirements when placing containers in the work environment.
Tower automatically provisions two AWS Batch queues. The head queue dispatches work to the on-demand head compute environment. The work queue dispatches process steps to containers running in the work environment. The two queue definitions configured by Tower are visible through the AWS console.

To understand what is happening behind the scenes, we can monitor execution in AWS Batch. A total of five jobs were submitted to AWS Batch. An initial job submitted to the TowerForge head queue is responsible for executing the Nextflow pipeline. When the pipeline starts execution in the head environment, it submits jobs to the TowerForge work queue for each of the four steps that comprise the RNASeq pipeline, as shown below:
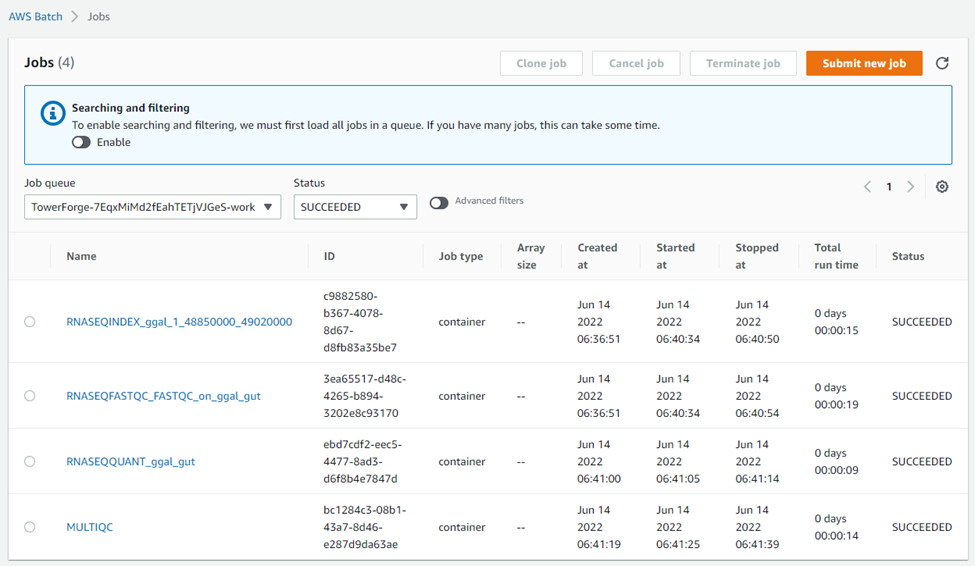
Users of the integration don’t need to know these details. The Nextflow integration automatically handles setting up job definitions to support containerized execution.
We can also view activity at the level of ECS Clusters through the AWS Console and monitor execution by filtering the term on the term “Forge”, as shown below. Recall that AWS Batch provisions a separate ECS cluster for each compute environment as shown:
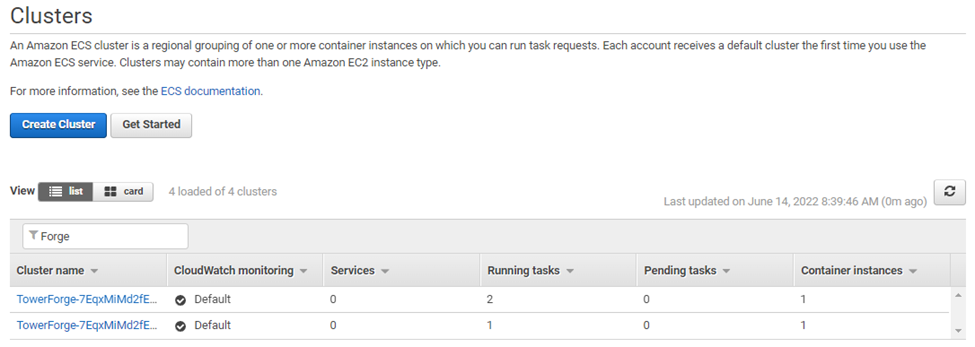
We can monitor execution as a container is started on the head ECS cluster. As the pipeline executes, we can monitor the work cluster and see container instances supporting individual workflow steps.
Users configuring AWS Batch manually with Nextflow may recall that the AWS CLI must be accessible to scripts running in the Nextflow environment. Tower handles this and other details automatically. Tower automatically selects appropriate Amazon Machine Images (AMIs) for both the head and work compute environments, and automatically installs the AWS CLI on underlying EC2 instances.
Leveraging Existing AWS Batch Environments
Some organizations may have established practices and policies that govern how they use cloud services. They may prefer to use other provisioning tools such as AWS CloudFormation, Terraform, or other solutions.
Some IT organizations have understandable concerns related to security and managing cloud spending. In this case, they may be uncomfortable providing end-users with IAM credentials having the relatively expansive set of privileges required to use Tower Forge.
In cases where a central IT organization wishes to retain more control, Tower users can configure compute environments to use AWS Batch environments previously set up by IT.
Creating a compute environment that uses an existing AWS Batch environment follows the same process as described in the second article in this series. The main difference is that when creating the compute environment, users should select Manual under the Config mode. In this case, users can select the compute environments and queue definitions already set up in the AWS Batch environment:

When users select manual configuration, cloud administrators must also take responsibility for provisioning AWS storage required by Nextflow.
Taking Advantage of High-Performance Cloud Storage
Above, we touched on support for AWS EFS and Amazon FSx for Lustre, but we skipped over the details. Seqera offers an optional Nextflow plug-in called xpack-amzn (XPACK). This package is an enhanced version of the AWS Batch executor that supports both FSx for Lustre and the Amazon EFS filesystems when running Nextflow pipelines with AWS Batch.
This functionality is included with Nextflow Tower but is not part of the open-source Nextflow distribution. Open source Nextflow users who wish to use this plug-in must request a license and follow this documentation to configure and use it.
By default, the AWS Batch integration with Nextflow uses Amazon S3 to share data between pipeline steps. While this works well, it requires that data be copied from S3 to EBS storage in a directory mounted by the running container. After completing each task, results need to be moved back to S3. The Nextflow / AWS Batch integration makes this efficient using parallel copy techniques, but there is still overhead and delays associated with this data movement.
Using Fusion Mounts
One solution is using Fusion mounts to make S3 storage buckets accessible to containerized tasks.
To enable this functionality in Tower, select Enable Fusion Mounts when provisioning a compute environment using Tower Forge. The shared S3-based pipeline work directory will be accessible at the path /fusion/s3/<BUCKET_NAME>. This avoids the need for the integration to shuffle data to and from EBS internally.

Fusion mounts is convenient, and provides the benefit that the tasks can access the input data without having to download it ahead of the task execution. The execution throughput can be further improved using a high-performance shared file system such as AWS FSx.
Using Tower with FSx for Lustre Storage
Lustre is an open-source distributed file system widely used in high-performance computing (HPC). Lustre can support tens of petabytes (PB) of storage, hundreds of servers, and over a terabyte per second of aggregate I/O throughput in large-scale environments.
While Lustre may be overkill for smaller bioinformatics pipelines, for I/O intensive applications, Lustre can deliver significant throughput gains. Open source Lustre has the reputation of being difficult to install and configure. However, Amazon changed this in 2019 with the announcement of FSx for Lustre – a fully managed Lustre file system offering.
Tower Forge makes it exceptionally easy to create FSx for Lustre storage or use a previously existing FSx for Lustre environment, as shown:
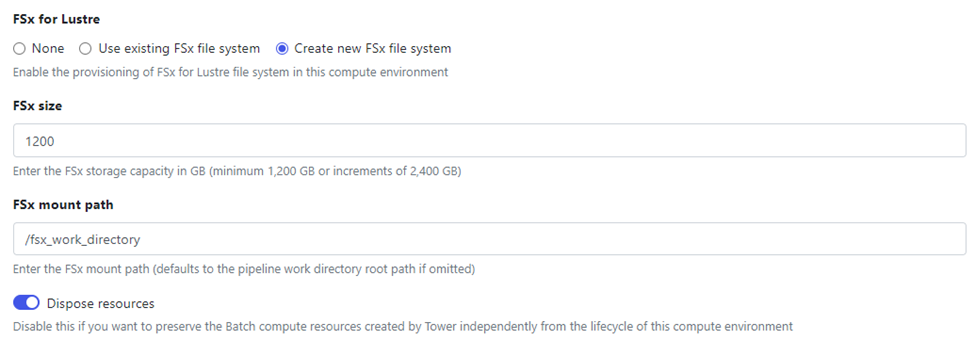
As illustrated above, users enable FSx for Lustre through the Tower Web UI and specify the size of the file system and the FSx mount path (typically the same path as the pipeline working directory).
After creating a new AWS Batch compute environment configured to use FSx for Lustre, users can navigate to FSx for Lustre within the AWS console and see that the Lustre environment has been created automatically as shown:
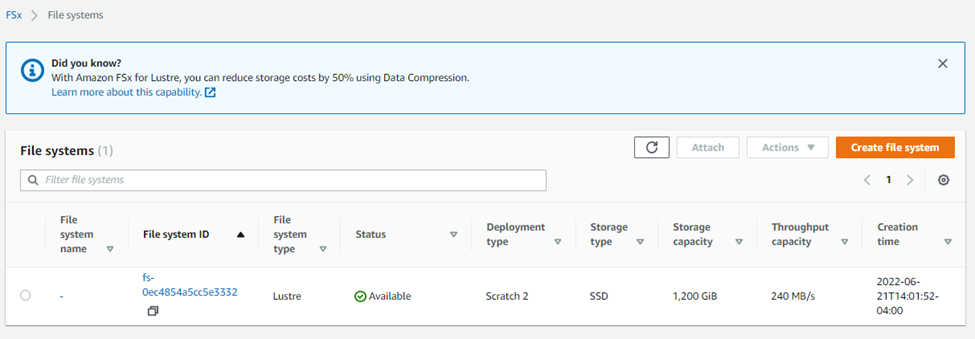
FSx for Lustre supports two different deployment options – scratch and persistent. By default, Tower provisions FSx file systems as scratch deployments. With a scratch file system, file servers are not replaced if they fail, and data is not replicated. This is typically not a problem since a Lustre file system on AWS is comprised of a cluster with at least two nodes. The minimum Lustre file system size is 1.2 terabytes.
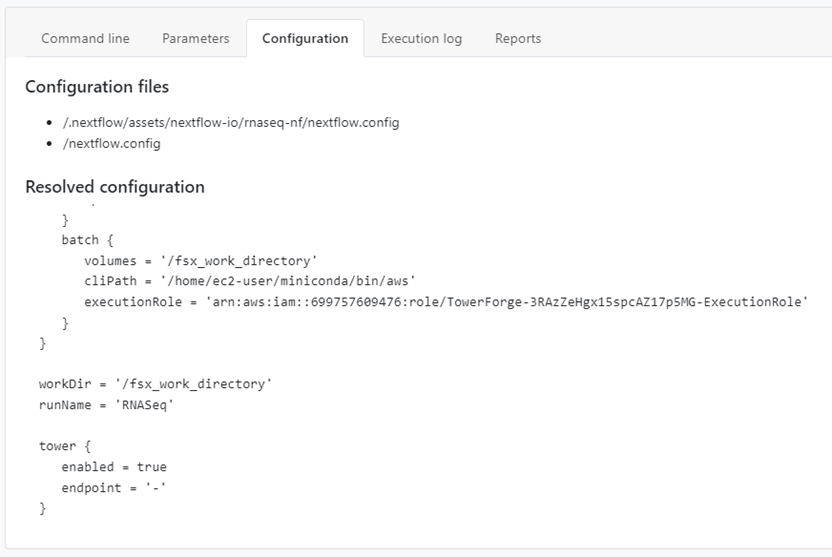
When a Tower compute environment is created using FSx for Lustre, Nextflow automatically uses Lustre to share intermediate files between pipeline steps. Users can inspect the Configuration tab in the Tower Web UI as pipelines execute. Note in the example below that Tower is using the /fsx_work_directory as the mount point for the filesystem as specified when we configured Lustre.
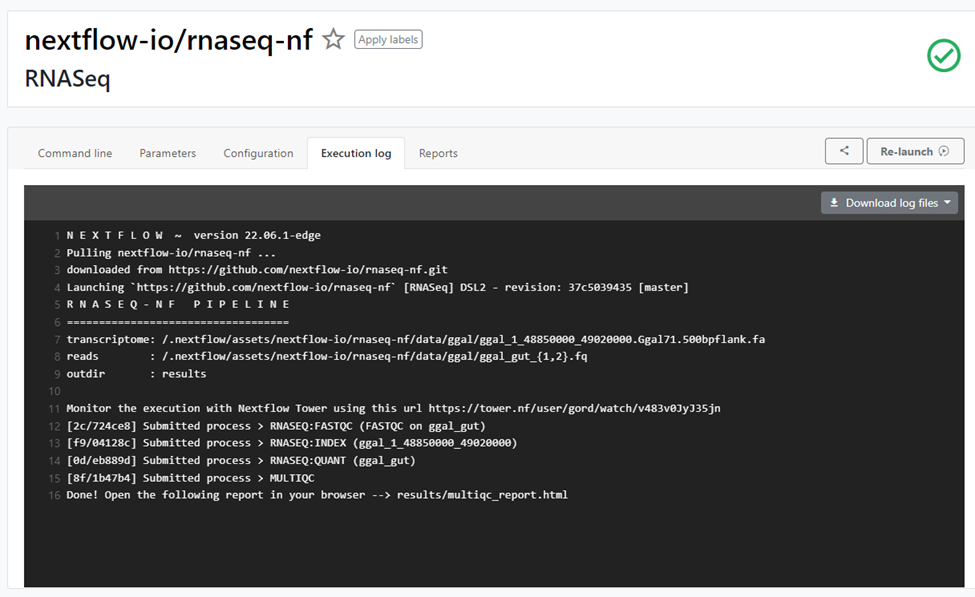
We can monitor the execution of the pipeline through the Tower Web UI or by monitoring the Execution log as shown:
While the example above illustrates the use of FSx for Lustre with Tower, the process for creating AWS Batch compute environments with Amazon EFS is nearly identical.
Summary
We hope you’ve enjoyed this series of articles on Nextflow and AWS Batch and found them helpful. AWS Batch with Nextflow provides an excellent way for organizations to tap virtually unlimited amounts of on-demand storage and compute capacity in the cloud. The AWS Batch service can augment on-premises capacity or serve as an alternative to on-premises infrastructure.
While the integration can be tedious to configure with open-source Nextflow, Nextflow Tower offers several advantages. With Tower, organizations can:
- →Automatically deploy AWS Batch and other compute environments using Tower ForgeShare pipelines and compute resources among multiple usersEnable non-technical users to run pipelines via an intuitive interfaceCollaborate and share data among local and remote teamsSimplify configuration of additional storage types on AWS, including FSx for Lustre and Amazon EFS
To learn more about Nextflow Tower, visit https://tower.nf.
For more information about the AWS Batch Integration with Nextflow and Tower, reach out to us and book a demo.
