
In the first of this series of articles on Nextflow and AWS Batch, we looked at AWS Batch, describe some key concepts and explained the Nextflow execution model and user experience.
In this article second article, we provide a step-by-step guide explaining how to setup AWS Batch for use with open source Nextflow. We also take a deep-dive and explore some details of the integration.
In the third and final article in our series, we will look at Nextflow Tower - a collaborative command-post for Nextflow pipelines. We will show how Tower can fully automate the deployment of AWS Batch compute environments using Tower Forge.
Setting up AWS Batch for Use with Open Source Nextflow
There are several excellent guides that describe how to set up Nextflow to run with AWS Batch. A detailed step-by-step guide with screenshots along the way is offered by the State Public Health BioInformatics Group. Rather than reinvent the wheel we describe the high-level steps involved in configuring AWS Batch below. Additional details can be found by consulting the guide above or reviewing the Nextflow AWS Batch documentation.
- →Setup an AWS IAM user with programmatic access. You will need to define an AWS Identity and Access Management (IAM) user with appropriate credentials to connect to AWS Batch in the AWS web console. In our example, we created a user called "nextflow-user".
- →Create a Nextflow IAM User Group. Next, create an IAM User Group ("nextflow-group") and add the "nextflow-user" created above to the group. Attach the security policies to the group necessary to use AWS Batch with Nextflow as described in the Nextflow documentation. Some of the internet guides and tutorials suggest enabling "full access". While this is OK to get things working initially, it is a better practice to circle back once the integration is working and adjust security policies attached to the group, and grant only the minimum set of permissions required to run a Nextflow pipeline.
- →Download and save the IAM Secret Access Key. After creating the IAM credentials, you can download a CSV file containing a confidential Access key ID and a Secret access key. Save these credentials in a safe place, because you will need to use them later – either placing them in the
nextflow.configfile, or better, using the aws configure command to configure your client environment. Using aws configure is better because it avoids having credentials appear in the nextflow.config file in plaintext where they may be visible to others. - →Create a Role for running EC2 Spot Instances. Most users will want to use EC2 Spot Instances to save compute costs. You can create an
AmazonEC2SpotFleetrole and attach the permission policyAmazonEC2SpotFleetTaggingRoleas explained in the Nextflow documentation. - →Create a custom AMI for use with AWS Batch. Nextflow tasks submitted to AWS Batch will run under the Amazon Elastic Container Service (ECS). ECS needs a base EC2 image that includes Docker to support the containerized workloads. ECS uses an Amazon ECS-Optimized Amazon Linux AMI with Docker pre-installed by default. The Nextflow integration requires that the AWS CLI be accessible from within containers running on ECS to facilitate data movement to and from Amazon S3 buckets. While it is possible to install the AWS CLI in the containers used in the workflow, this can create extra work and inhibit portability. Most containers used in Nextflow pipelines won't have the AWS CLI preinstalled. it is a better idea to create a custom AMI based on the default Amazon ECS-Optimized image that includes the AWS CLI. You can install the AWS CLI in the machine image using miniconda as explained in the Nextflow documentation. You will need to record the path to the aws command since this path needs to be specified in the
nextflow.configfile so that Nextflow knows where to find the AWS command to stage data.
The 22 GB default volume size for the Elastic Block Storage (EBS) attached to the default Amazon ECS-Optimized Amazon Linux AMI is a little small, so it is a good idea to also customize the image to include 100 GB of EBS storage in the custom image and configure docker storage so that the full 100 GB is usable. Once the image has been customized, you can save the image as a custom AMI and record the ID. You will need this custom AMI ID for when you configure the AWS Batch compute environment. - →Define the AWS Batch Compute Environment. Create a managed compute environment by following the AWS Batch Create compute environment dialog in the AWS console. You can provide details for the compute environment including the provisioning model (Spot or OnDemand) and the type of EC2 compute instances that will underpin the ECS cluster. For the
ecsInstanceRoleyou will need to add a security policy that allows ECS to access S3. This is where you can set the minimum, desired and maximum vCPUs for the compute environment. Most administrators set the minimum vCPUs to zero so that no charges are incurred when the service is not in use, even though this adds some start-up latency. 256 is a good starting point for the maximum vCPUs and this value can be adjusted based on workload demand. Finally, enable a user-specified AMI, and provide the ID of the custom AMI image containing the AWS CLI created in the previous step. - →Define an AWS Batch queue and associate it with the AWS Batch Compute Environment. Give the queue a name such as
aws-batch-nextflow, enable the job queue, and connect it to the compute environment created in the previous step. You will need to configure this queue name in thenextflow.configfile as explained earlier. - →Setup an S3 bucket to stage data. You will need to create an S3 bucket that can store files needed by containerized process steps. In our example, we configured an S3 bucket called nextflow-s3-bucket and created a nextflow_env directory inside the bucket (s3://nextflow-s3-bucket/nextflow_env/). You will need to specify this S3 working directory (workDir) in the
nextflow.configfile as shown earlier. - →Optionally create an EC2 client instance to launch Nextflow. You can launch pipelines from a laptop or desktop, but for long-running workflows, it is better to launch pipelines from a shared cloud instance. You will need to configure a suitable instance, install Java and Nextflow on the VM and install the AWS CLI using miniconda using the same method that was used to install the AWS CLI in the custom AMI above.
The AWS Batch Integration Under the Covers
Once setup, the Nextflow - AWS Batch integration, makes it exceptionally easy to execute Nextflow pipelines. Tedious details such as creating AWS Batch job definitions and making sure that container images are available on cloud execution nodes are handled transparently by the integration.
To understand what is happening behind the scenes, consider the same example we showed earlier:
It is instructive to view the .nextflow.log file, placed by default in the user's home directory. When nextflow executes a GitHub resident pipeline with the awsbatch executor specified in the nextflow.config file, Nextflow performs the following steps:
- →Nextflow parses the nextflow command line used to submit the pipeline.
- →Nextflow detects that the repository is on GitHub, and invokes the scmAssetManager to retrieve pipeline repo and associated files into a local ~/.assets/nextflow directory.
- →Nextflow parses the supplied
nextflow.configfile and realizes that the nf-amazon plug-in is required to implement the AWS Batch integration. - →Nextflow invokes its PluginUpdater, and if the nf-amazon plugin is not already available in ~/.nextflow/plugins, it is automatically downloaded and started.
- →Nextflow starts a session to execute the workflow.
- →Nextflow retrieves the AWS credentials defined in
nextflow.configfile or as defined via aws config and uses them to open a connection to the working S3 bucket configured specified by the workDir parameter innextflow.config. - →Nextflow begins execution of the pipeline and configures the AWS executor.
- →For each task in the pipeline(configured to use the AWS Batch executor), the Nextflow/AWS Batch integration performs several steps:
- →For each task, Nextflow gathers details such as task resource requirements, the container, volume mounts, and the IAM job role.
- →If an appropriate job definition does not already exist to support task execution, the integration uses the Java AWS Batch API to create a new AWS Batch job definition for each unique combination of a container image, job role, and volume mount points.
- →If the awscli path parameter is defined, the directory that includes the AWS CLI in the underlying image is included as one of the volume mount points in the job definition.
- →Resource requirements of 1 CPU and 1 GB of memory are configured by default in the job definition as a placeholder.
- →Once the job definition is configured, the integration submits the task to AWS Batch referencing the job definition and providing the actual resource requirements along with the command to execute within the ECS managed container.
- →AWS Batch starts the ECS container defined by the job definition and begins task execution. If insufficient resources are available in the ECS cluster to start the container, AWS Batch will automatically start additional EC2 instances as defined in the AWS Batch compute environment.
- →Files associated with each step in the workflow are stored in a directory in the S3 “workDir” corresponding to the Nextflow process ID
- →For each job step, the integration uses the AWS CLI (accessible within the ECS container) to manage moving data to and from S3 as necessary to execute the task
- →The integration monitors the execution of each task and makes sure it is successful, retrying tasks as necessary
- →Once execution is complete, Nextflow retrieves the results from S3 and stores them in the local ~/results directory.
- →Nextflow shuts down the nf-amazon plugin and the S3 downloader.
The amount of detail in the Nextflow log file, can be daunting but you can filter it from the command line to gain insights into what is happening under the covers as below:
You can also use the AWS console to monitor the individual Batch job IDs corresponding to each Nextflow process step as explained earlier.
Another useful way to understand what is happening inside the integration is to explore the files associated with each Nextflow process step dispatched to AWS Batch in the S3 bucket. For the workload above, a directory is created in S3 for each task corresponding to the two-part hexadecimal directories as shown:
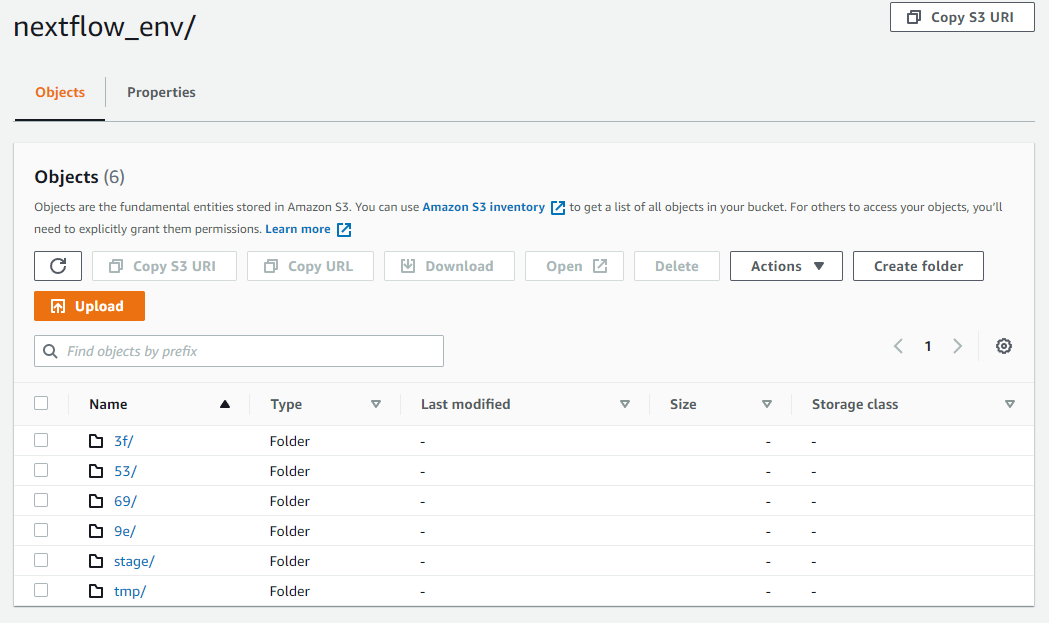
Data is staged in the S3 stage folder, and binaries are moved into the tmp folder. By drilling into the directories corresponding to each job step you can inspect the "command.sh" and associated log files and understand exactly what happened at every step during the execution. This can be very useful for troubleshooting runtime execution issues.
Summary
While using AWS Batch with Nextflow requires some initial setup, once configured, it provides an excellent way for Nextflow users to tap virtually unlimited amounts of on-demand storage and compute capacity in the cloud. AWS Batch can be used to augment on-premises capacity, or as an alternative to operating local infrastructure.
In a follow up to this article, we'll learn an even easier method to integrate with AWS Batch using Nextflow Tower. We will explain how organizations can collaborate more effectively, share pipelines and results, leverage additional AWS storage options, and further reduce AWS Batch spending by using compute resources more efficiently.
In the final article in our series, we’ll look at Nextflow Tower, and demonstrate an even easier way to integration with AWS Batch using Tower Forge.
For more information about the AWS Batch Integration with Nextflow and Tower, reach out to us and book a demo.