This post has been written by our valued community members.
Bioinformaticians often run their Nextflow workflows on internal HPC clusters, typically using job schedulers like Slurm to manage tasks. However, as the need for scalability and flexibility grows, many are making the shift to public cloud platforms. In these scenarios, platforms like Google Cloud Platform (GCP), with services such as Cloud Storage and the Google Batch API, become key to enabling this transition. The process of adapting workflows from HPC to the cloud involves a series of essential steps that are applicable not just to GCP, but to other cloud providers as well, making it a valuable transformation blueprint for the broader bioinformatics community.
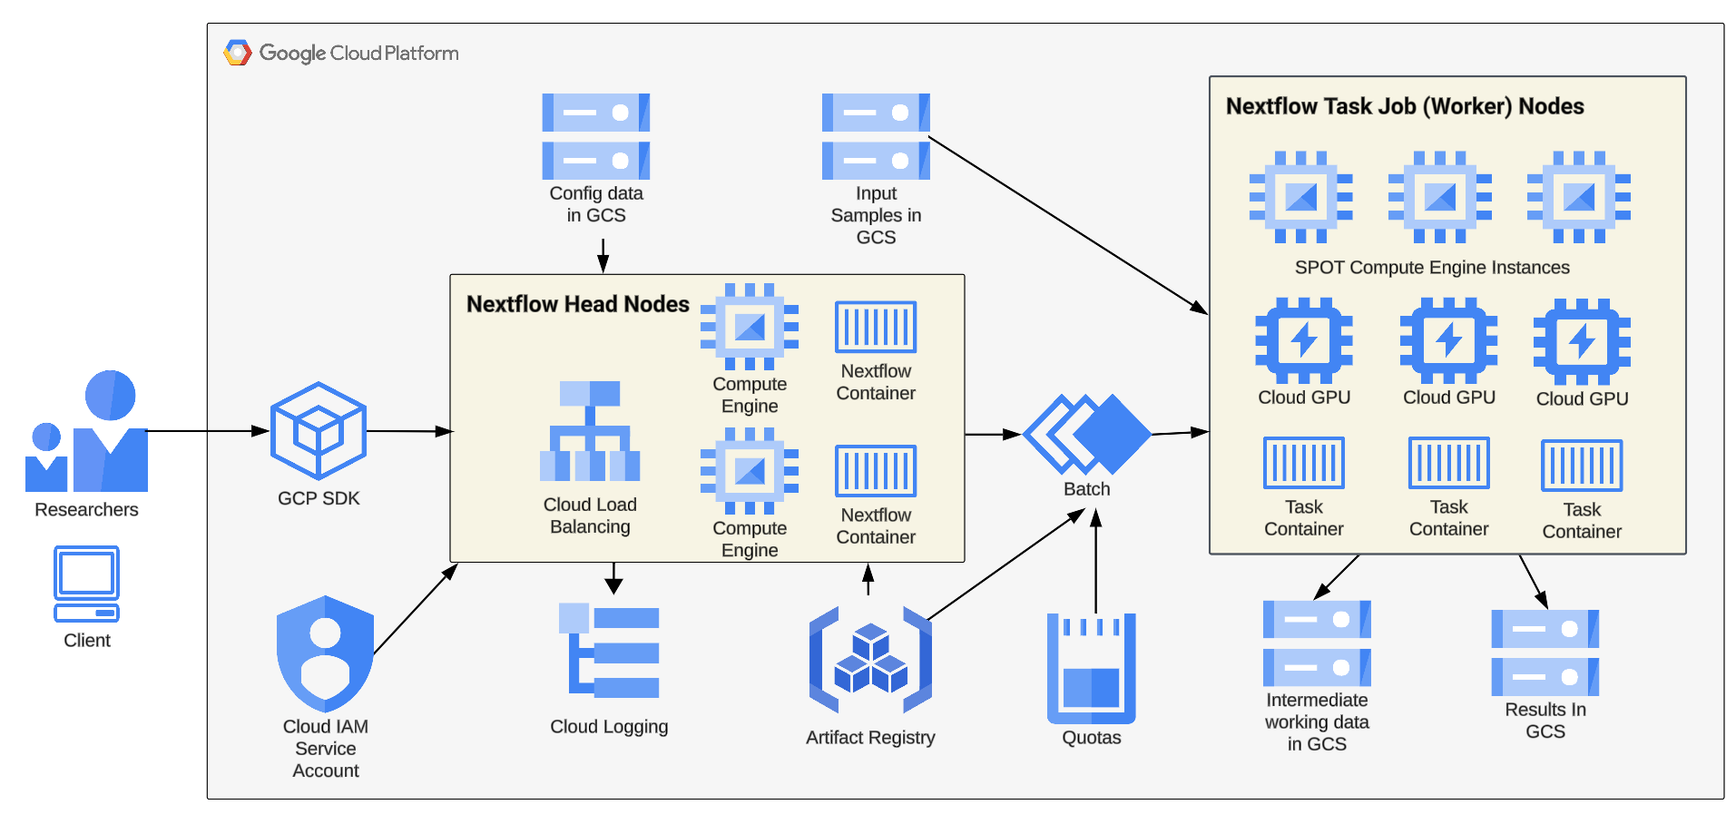
In this post, we'll highlight key details from a recent real-world example to demonstrate details about this process. Our task is to collaborate with a bioinformatician to enable her to run her HPC-based Nextflow workflow at scale on GCP. Below is a reference architecture for running Nextflow workflow jobs on GCP.
Key Steps
There are a number of key steps in this process, those steps are outlined and then detailed in this post.
- Prepare
- →Assess Current State
- →Setup & Verify Target Cloud Environment
- →Select and Configure Development Environment
- Build
- →Review (or create) base Nextflow Configuration File
- →Build and Test a Docker Container for Nextflow
- Configure
- →Update Existing Nextflow Files
- Run
- →Run job(s) Google Cloud Project using Google Batch
- →Verify, monitor and further optimize
Step Details
Each step in the conversion process includes a number of critical activities. These activities are described in the sections below.
Prepare
Due to the complexity of migration, it's best practice to thoroughly prepare all environments before we start building and testing the conversion. This includes reviewing the Nextflow pipeline subway map and source code so that we understand the use case in detail.
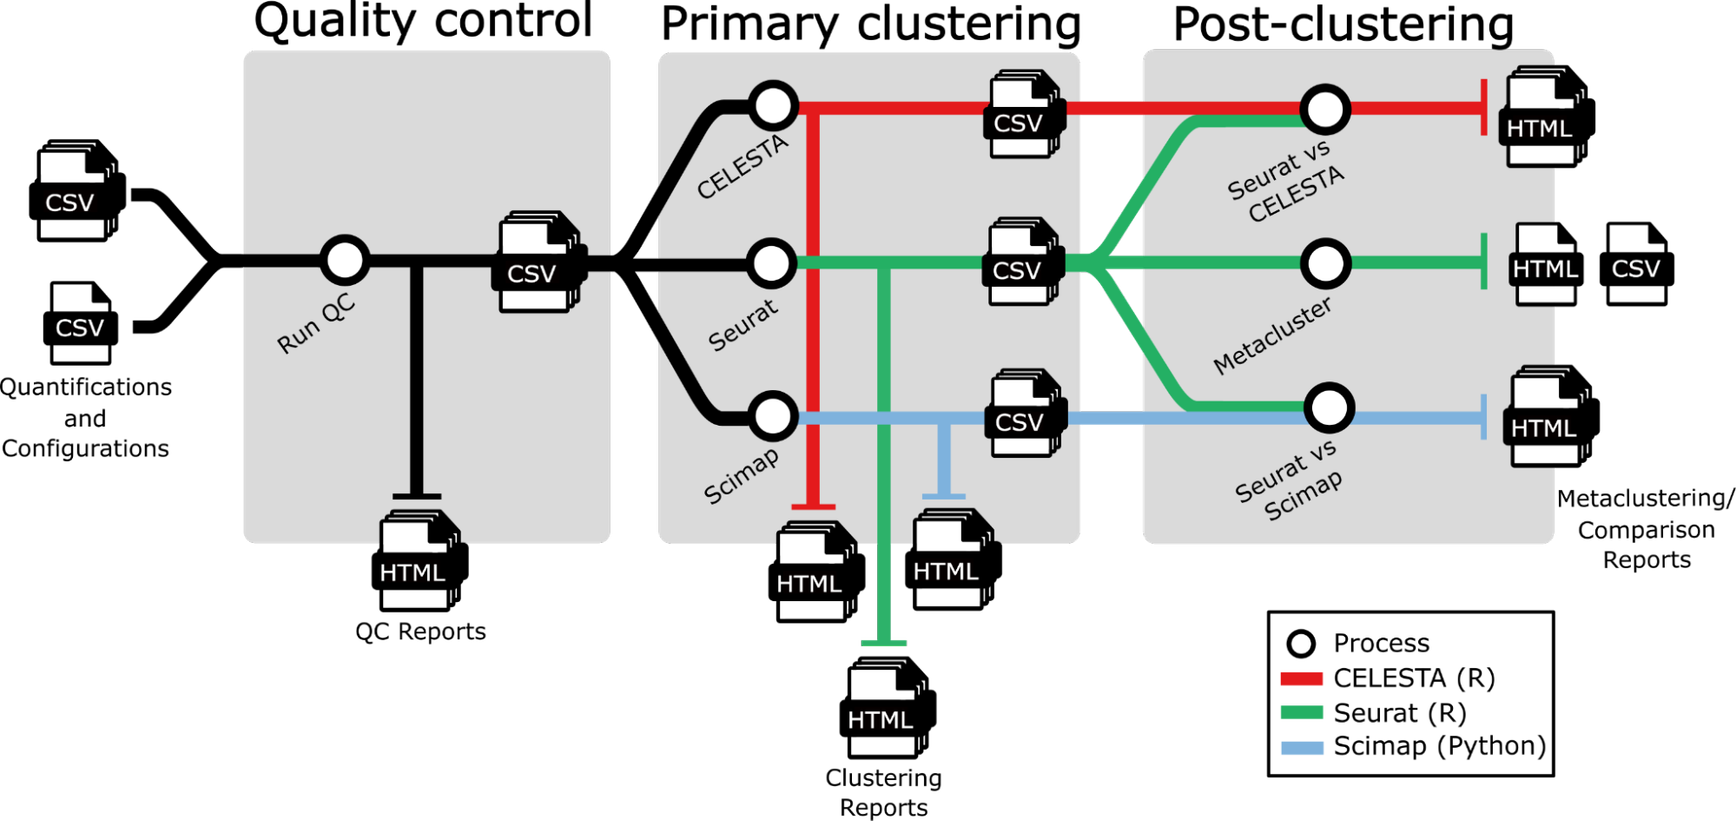
Assess the current state of the Nextflow pipeline to be migrated to the cloud. Our pipeline spaFlow (subway map shown above) is a Nextflow pipeline for QC and clustering of MXIF images.
Verify the existing pipeline configuration by reviewing the latest job results from the current environment (in this case HPC). Note metrics, i.e., runtime, sample size, and run resources (# CPU cores, amount of memory, use of GPUs, if any).
Verify the location of Nextflow workflow source code and sample input files (in this case, a GitHub Repo and small-sized public datasets). If needed, downsample input files for rapid feedback during dev/test.
Verify that the code running in the development environment (local laptop here) matches the code that is running in production (here in GitHub, main branch).
Verify the list of required language runtimes and libraries (including versions and dependencies) installed to run in the current environment.
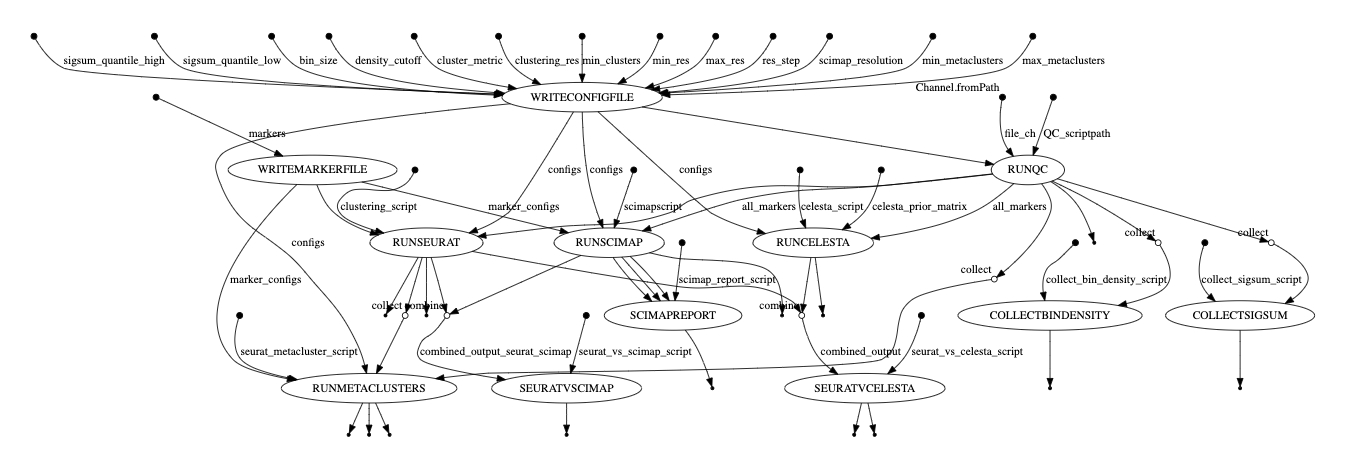
Verify the Nextflow code flow and structure. For spaFlow it's main.nf --> module1.nf --> script1a.py and script1b.py, and so on, and the same for module 2, 3.... + nextflow.config. The workflow diagram below was generated using the Nexflow workflow diagram functionality (as a .dot file and rendered with Graphviz).
Setup and verify target cloud environment
Set up a dedicated GCP project for testing. Enable all required cloud APIs (i.e., Batch, Cloud Storage, Compute Engine and Logging). Select (or create) a service account (SA) and set up the necessary IAM permissions. We found that our SA needed the documented IAM permissions and also the "Batch Reporting Agent" permission. Run a couple of test Nextflow / Google Batch jobs to validate the correct environment setup. we can test using the rnaSeq workflow - see the GCP Quickstart "Orchestrate Jobs by running Nextflow on Batch" and the Nextflow blog post "Get Started with Nextflow on Google Batch."
Tip: We can use the GCP cloud shell for quick testing and validation of our GCP project configuration for Nextflow on Cloud Batch. Cloud Shell includes the Google Cloud SDK, Docker tools, and Java, so it requires less manual client setup than using a local terminal to run test Nextflow jobs on Cloud Batch. For an example, see my Medium article "Real-World Nextflow on GCP."
Select and configure the development environment
We used a Mac laptop, the VSCode IDE, the Google Cloud SDK, Docker tools, Java, and Nextflow. We tested our development environment setup by running a Nextflow workflow job on our GCP project with Google Batch from our development laptop (use rnaSeq from nf-core). Here, we are testing both the setup of our dev environment and the configuration of our GCP project.
Build
Now that we've completed the key preparation steps, we are ready to build the artifacts needed to enable our Nextflow pipeline to run on the cloud. In some cases, we will already have a Docker container and we can simply try to run the existing container on the cloud. In our case, no container existed, so we had to build one. For expediency, we built a single container. Eventually, we will modularize our container building (i.e., build multiple, smaller containers).
Build a Docker container
If the Nextflow workflow is currently script-based (i.e. no container is used), plan to build one or more containers. For testing, we built one container and did initial testing locally. We can split into task-specific containers later during optimization. In particular, we benefited from speeding up the dev-test cycle using Docker's build cache feature. See more container building tips in this blog post which describes our container building process in more detail. You can also easily obtain ready-to-use container images on Seqera Containers or use Wave for more customized container images.
Build a Nextflow Config File
Review (or create) our nextflow.config file. We added a custom gcb profile section with Google Cloud Batch settings. See the Nextflow documentation on supported directives for Cloud Batch.TIP: Specify SPOT Compute Engine instance to save ~90% over using on-demand VM instances when configuring resource usage for our workflow.
The Profile section of our nextflow.config file is shown below:
We reviewed the main.nf and the module files for spaFlow. We removed HPC/Slurm specific configurations such as maxForks 40 and replaced them with Cloud Batch configurations such as specific compute instance (VM) sizing in main.nf and modules, i.e. cpus 8, memory '24', etc.
Run on GCP
We set up our GCP environment by creating a Cloud Storage bucket and uploading the sample input files. Next create an Artifact Registry in our GCP Project. Set the IAM permissions as required for the Cloud Build service account. Build, tag and push the image from our locally-created custom Dockerfile to our Artifact Registry.
Push to Artifact Registry and run on Batch
To push our container to GCP, we used a cloud-build.yaml file (example shown below) with the Cloud Build service to build, tag and push our docker image to the Google Cloud Artifact Registry.
Build, tag and push with this command:
Set our nextflow.config Google Batch container value to the name of the container we just pushed. The value will look like the string below:
Run with our custom container on Google Batch using the gcp profile. Review the output to confirm the workflow runs as expected.
We viewed the job in progress in the Google Cloud Console Cloud Batch section as shown below. Note that the configuration spawns multiple Batch jobs, each with its own configuration (Cores, machine types, etc) as needed by the particular task (or process) running in the workflow at that point. As noted previously, we've used SPOT VMs for all processes to optimize for cost and scalability.
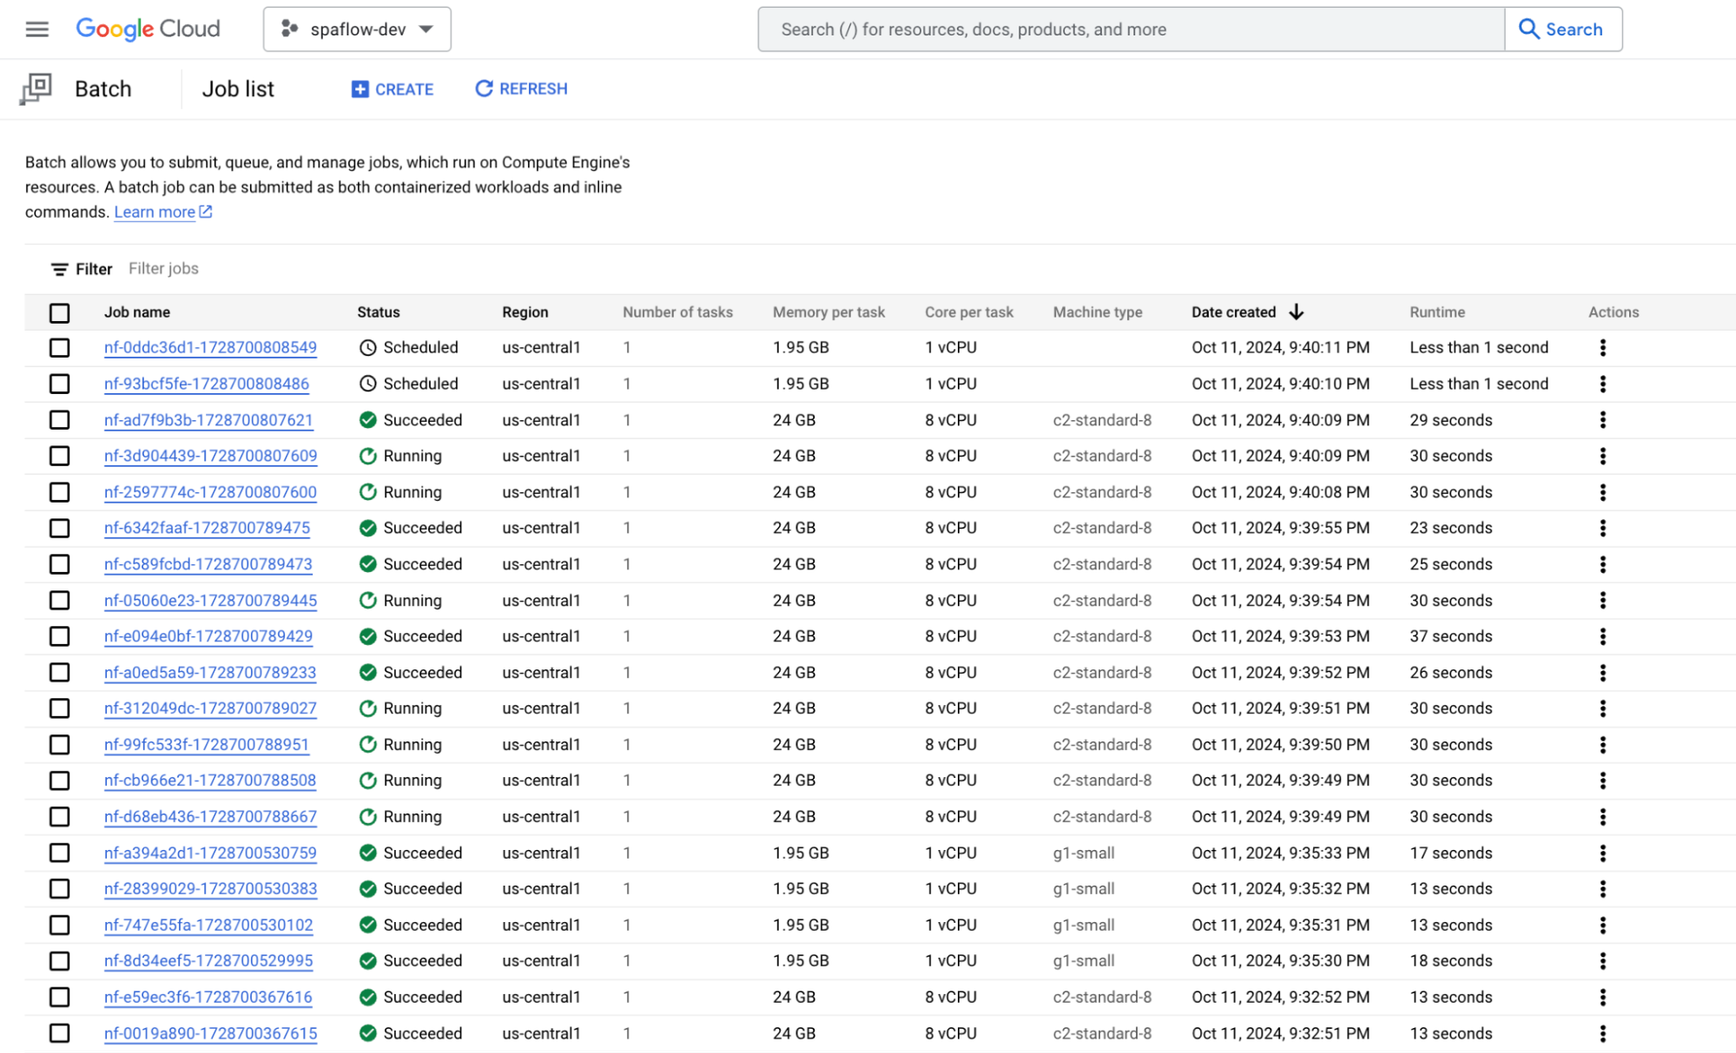
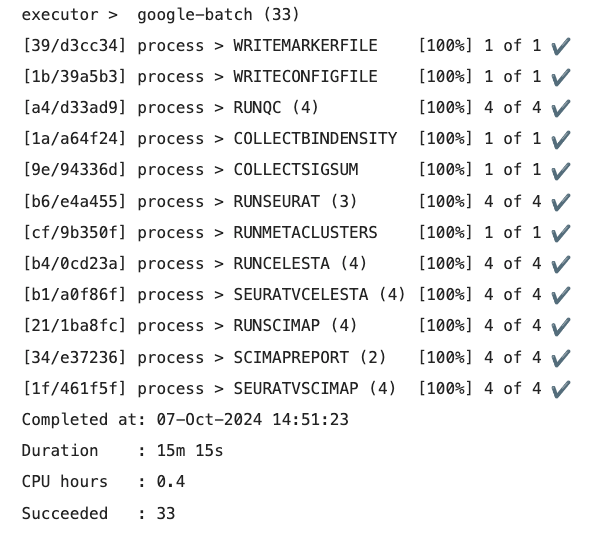
Shown below is the console output for a successful spaFlow job run on Google Cloud Batch.
Further Optimization
We completed the work to be able to run spaFlow successfully on Google Cloud using Cloud Batch. However, as we move to production, there are additional considerations for enterprise use on the cloud. These are shown below.
- →Contained security: Turn on container image vulnerability scanning in our Artifact Registry, note the vulnerabilities found in our container and remediate by performing tasks listed in linked CVEs for each vulnerability.
- →Performance: Test at scale on the Google Batch and adjust the CPU and Memory settings in our main.nf to match our workflow and/or task requirements based on sample input sizes. Consider sharding or splitting oversized and/or long-running tasks in our workflow to reduce bottlenecks and minimize preemptions (if using SPOT instances). Set the number of retries if SPOT, default is 3, can go up to 10. We'll use the Nextflow -with-report feature to produce a detailed set of pipeline job run metrics here as well.
- →Scaling: Verify our production GCP project has appropriate instance quotas for our production workflow, i.e. CPUs, GPUs, etc.
- →Performance: Use GCP Compute Engine instance templates to further refine the selected Compute Engine (VM) instance families (i.e. compute- or memory- optimized, etc..) based on our runtime requirements.
- →Verification: Review the Cloud Logging Batch Log and Batch Agent Log output after each test job run to confirm the expected runtime behavior and output(s), including verifying the use of SPOT GCE instances and acceptable levels of preemption for our use case.
- →Enterprise security: Update nextflow.config settings for common Enterprise requirements as we move to production. These include specifying the network, subnetwork, service account, custom job run labels and restricting externalIpAddresses (for worker nodes).
In summary, we found that migrating a Nextflow workflow from an internal HPC cluster to the public cloud is a multi-step process that opens new possibilities for scalability, flexibility, and efficiency. While this post focused on the specific steps and challenges of transitioning to the Google Cloud Platform, many of the strategies and lessons learned here can be applied across different cloud environments. With careful planning, testing, and optimization, bioinformaticians can leverage the cloud's full potential to enhance their research workflows, ultimately achieving greater computational power and faster results.
This post was contributed by a Nextflow Ambassador. Ambassadors are passionate individuals who support the Nextflow community. Interested in becoming an ambassador? Read more about it here.

