
In the first article in this series, we looked at Azure Batch, described some key concepts, and provided a step-by-step to using Azure Batch with open source Nextflow.
This article will discuss Azure Batch and how it works with Nextflow Tower - a collaborative command post for running Nextflow pipelines.
The article will cover:
- →Nextflow Tower
- →Tower and Azure Batch
- →Configuring Azure Batch compute environments with Tower Forge
- →Launching a pipeline in Tower
- →Working with existing Azure Batch Resource Pools and Spot VMs
This article assumes that readers are already familiar with Azure Batch and Nextflow.
Nextflow Tower
Nextflow Tower is an intuitive, centralized command post designed for large-scale collaborative data analysis. Tower enables users to quickly launch, manage, and monitor Nextflow data analysis pipelines across a number of compute environments. With Tower, organizations can:
- →Collaborate and share data among local and remote teams
- →Share pipelines and on-prem or cloud-based compute resources
- →Enable non-technical users to run pipelines via an intuitive interface
- →Automatically tap cloud-based compute environments such as Azure Batch
Tower can be deployed on-premises or in cloud infrastructure. It is also offered as a fully-managed service at tower.nf. Users can try Tower for free by logging in using their GitHub or Google account or by simply supplying their e-mail address and creating an account. Tower supports multiple compute environments for launching pipelines, including HPC workload managers, Kubernetes, and other cloud batch services.
Tower and Azure Batch
The diagram below illustrates how Tower works with Azure Batch. Users interact with the Tower web UI to manage compute environments, datasets, and workflows. Tower can support multiple compute environments simultaneously. Multiple users and project teams can share these environments enabling hybrid and multi-cloud Nextflow pipeline deployments.
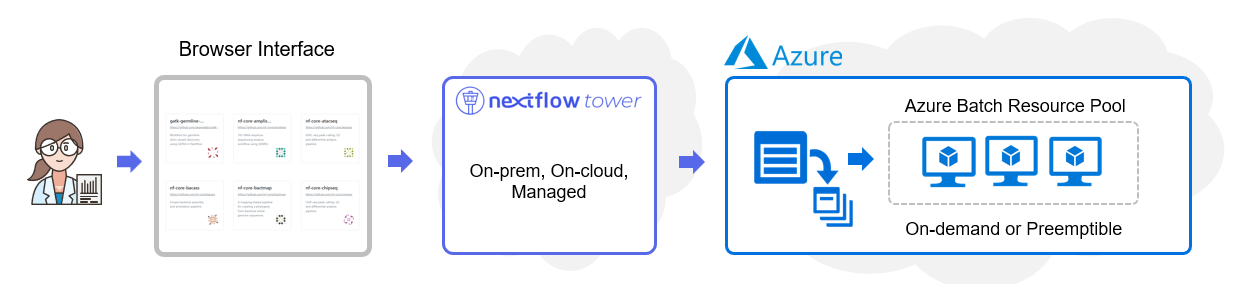
Configuring a new compute environment is done entirely through the Tower web interface. Even non-technical users can easily configure an Azure Batch environment assuming they have the required credentials and be up and running in a matter of minutes.
Before we discuss the integration's finer points, it is helpful to walk through the process of configuring an Azure Batch environment in Tower. The step-by-step example below uses the hosted version of Tower at tower.nf. For organizations hosting Tower themselves, the process steps are identical.
There are two approaches to configuring Azure Batch for use with Tower. Both assume that Azure Batch and corresponding storage accounts have already been set up using the Azure Console.
The most straightforward approach involves using Tower Forge. When Tower Forge is selected, Tower takes responsibility for creating a resource pool in the Azure Batch environment and managing it automatically.
Organizations that use Azure Batch for other purposes, or have specialized requirements, may already have resource pools defined. In this case, users can elect to use existing resource pools when configuring the Azure Batch environment. This article will cover both of these scenarios.
Configuring an Azure Batch compute environment with Tower Forge
Before configuring an Azure Batch compute environment in Tower, you will need Azure Batch and Storage account credentials. If you have access to the Azure Portal, you can obtain these credentials, as explained below. If someone else manages your Azure cloud environment, you will need to ask them to obtain these credentials on your behalf.
Obtaining Azure Batch and Storage Credentials
- Login into the Azure Portal.
- Access the Batch account service if you already have an Azure Batch account setup. If you do not have a Batch account setup, follow the instructions in part 1 of this article to create a Batch and storage account.
- After selecting your Batch account, select Keys under Settings in the left panel.
Azure Batch conveniently groups your Batch and Storage account credentials on the same screen as shown below. Both sets of credentials are required to run Nextflow jobs on Azure Batch through the Tower interface.
Primary and secondary access keys are provided for the batch and storage accounts. This is to allow for key rotation. When pasting credentials into Nextflow Tower in the next step, use the Primary access key in the batch account credentials and Key1 in the storage credentials.

Create a Compute Environment in Tower
Now that we have our Azure credentials, we can create a compute environment in Tower. Login into tower.nf using your GitHub or Google credentials. You can optionally supply your e-mail address to create an account. Perform the following steps within the Tower environment:
- Select the Community / showcase pulldown at the top of the screen, and change the view to your Personal workspace.
- From within your Personal workspace, select the Compute Environments tab.
- Create a new compute environment by clicking Add Compute Environment.
- Create a new Azure Batch compute environment.
- Under Credentials, click on the + symbol to specify Azure Batch and Azure storage credentials obtained in the previous step.
- The Batch account key corresponds to the Primary access key in the Azure portal, and the Storage Key corresponds to Key1 in the storage credentials in the portal.
- Click Add to add the credentials to Tower securely.
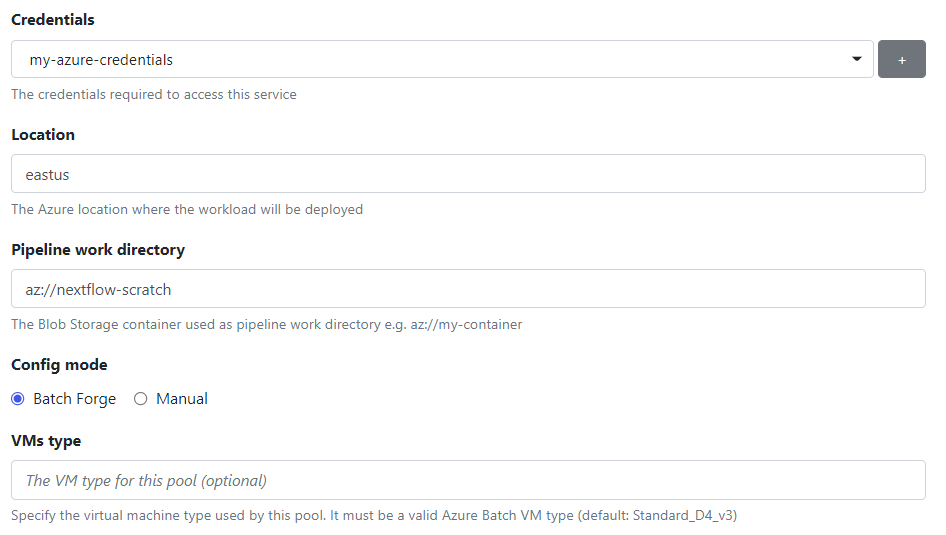
- Next, select the cloud Location.
- You should have already created a container in your Azure storage account to serve as your Pipeline work directory when you set up your Batch account. Provide the container name.
- Select Batch Forge to have Tower provision a resource pool on your behalf.
- Optionally specify a VM type. If you leave this field blank, Tower will use the Standard_D4_v3 VM type by default, which has 4 CPUs and 16 GB memory. You can specify any of the VM types supported by Azure Batch.
Continue defining the compute environment by following these steps:
- Enter the number of VMs that storage pool can grow to in the VMs count field. Choose a relatively small number like ten while experimenting to avoid costs getting out of control.
- Make sure that the Autoscale and Dispose resources are both enabled.
- You can ignore the other advanced settings for now unless you choose to override the defaults.
Click Add at the bottom of the screen to add the compute environment. After a few moments, the compute environment will show as AVAILABLE.
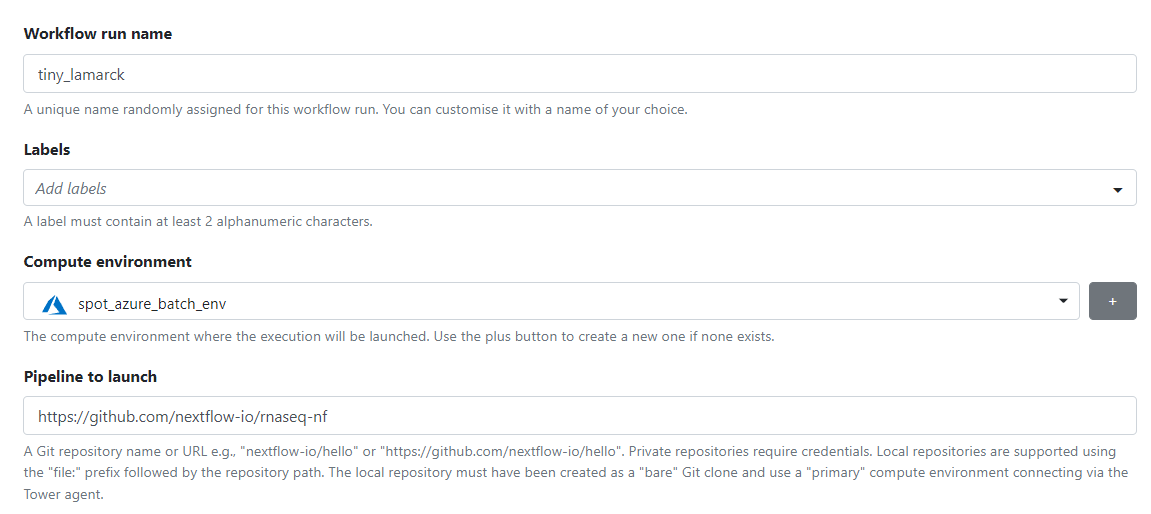
Launching a Pipeline in Tower
From the Tower interface, navigate to the Launchpad tab in your personal workspace. Select Start Quick Launch to launch a new pipeline. We will use the same sample RNA Seq pipeline as in part 1 of this article.
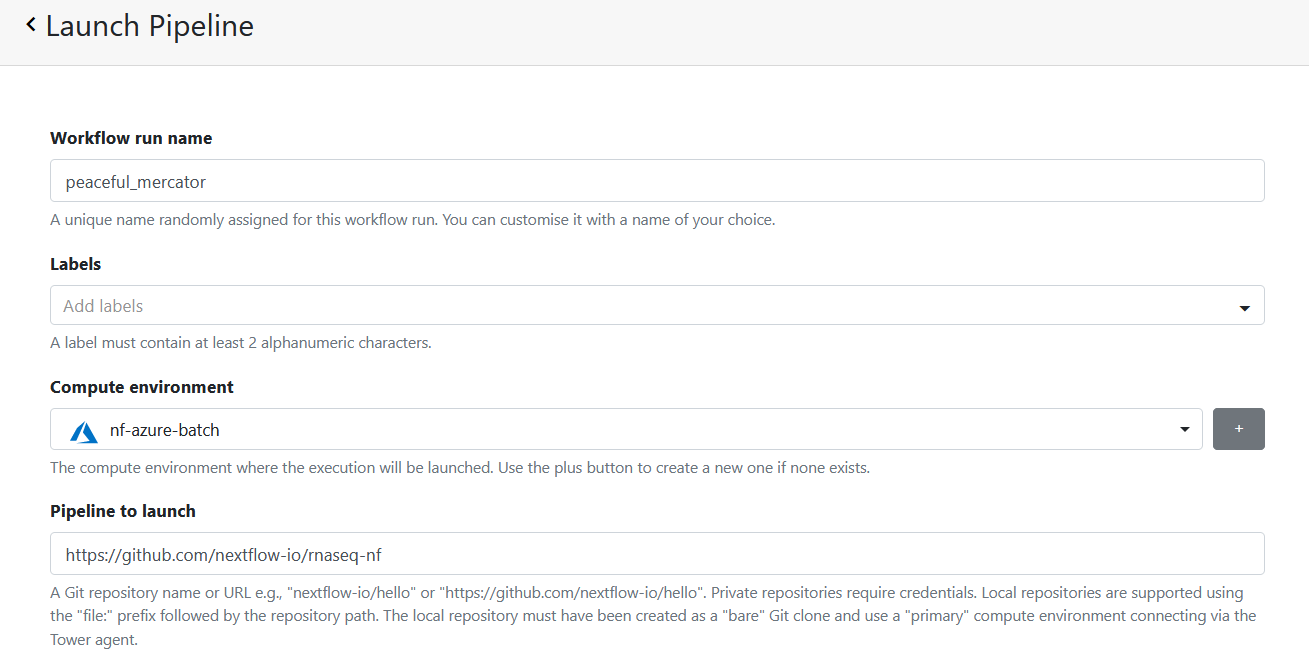
Tower will automatically provide a Workflow run name that you can optionally override. Users can optionally add Labels, a handy feature for categorizing and reporting on your workflows within the Tower interface.
If you have more than one compute environment, select the Azure Batch compute environment we created above (nf-azure-batch in our example).
Provide the URL for the pipeline to launch (https://github.com/nextflow-io/rnaseq-nf).
The Work directory should be populated with the Azure Blob container specified when you set up the account (az://nextflow-scratch). If you enter a different path here, ensure that a corresponding Blob container exists in the Azure storage account.
Accept the defaults for the other parameters or adjust them to your preference. Since we enabled Tower Forge when we set up the compute environment, Tower will manage the lifecycle of the Azure Batch pool on our behalf.
Click Launch to launch the pipeline into Azure Batch.
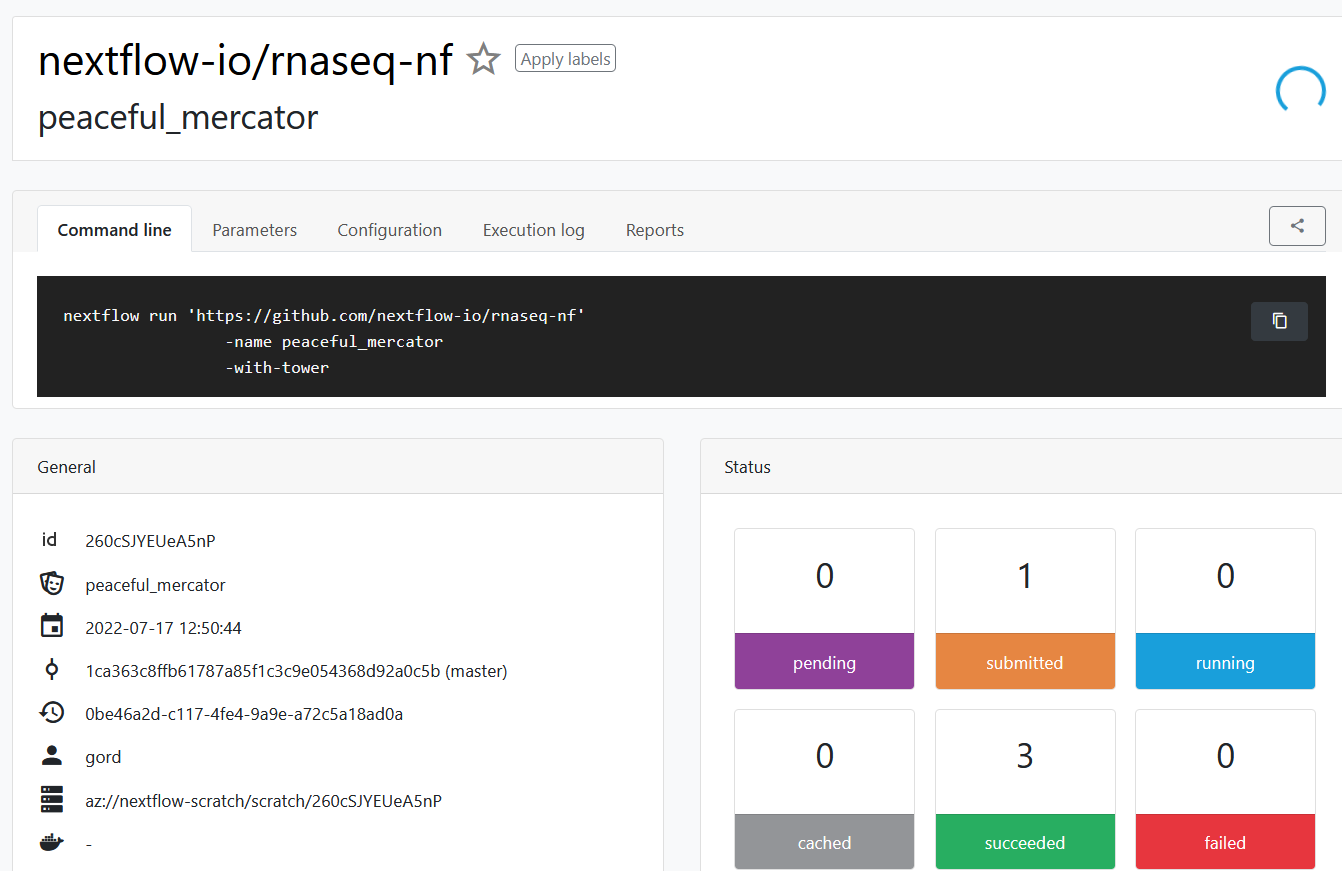
The pipeline will start executing. You can monitor execution under the Runs tab in the Tower UI.
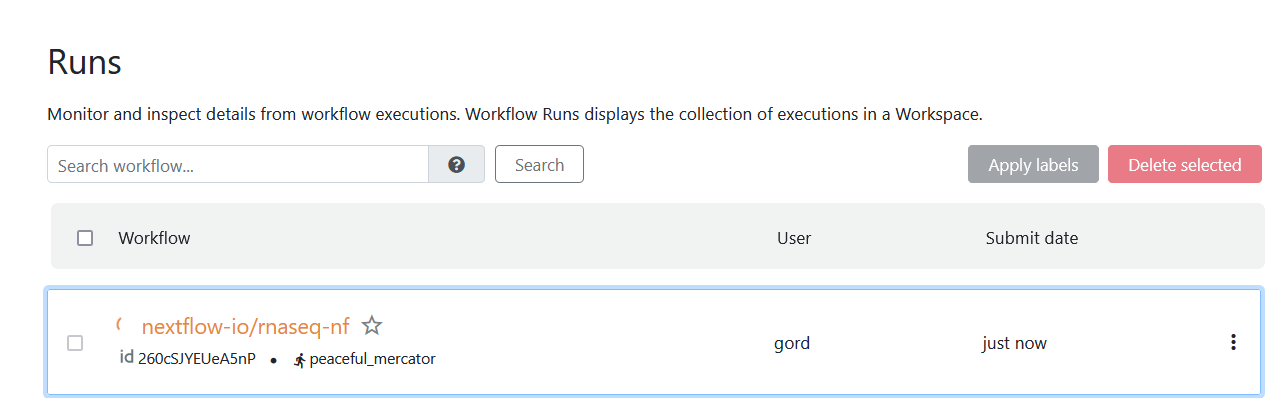
Click on the workflow's name to monitor details as the pipeline runs.
We can select Pools under the Azure Batch account in the Azure Web portal and monitor resources assigned to the pool.
To minimize costs, VMs are not started until there is demand for resources. Resources are scaled according to the Azure Scaling formula configurable via the Tower UI.

We can monitor the execution of the job in Tower. The web interface exposes all details about pipeline execution. This makes it much easier to troubleshoot pipeline execution.
- →The Command line is visible as shown below
- →Selecting Parameters provides a list of all the file paths specified in the Nextflow pipeline.
- →Selecting Configuration shows the final resolved configuration.
- →The Execution log provides access to console output (as if you were running the job interactively) and allows downloading the Nextflow log file, console output, and the graphical execution timeline.
- →The results of pipeline runs are presented under the Reports tab. Users can quickly review the results of past pipeline runs and share results with colleagues.
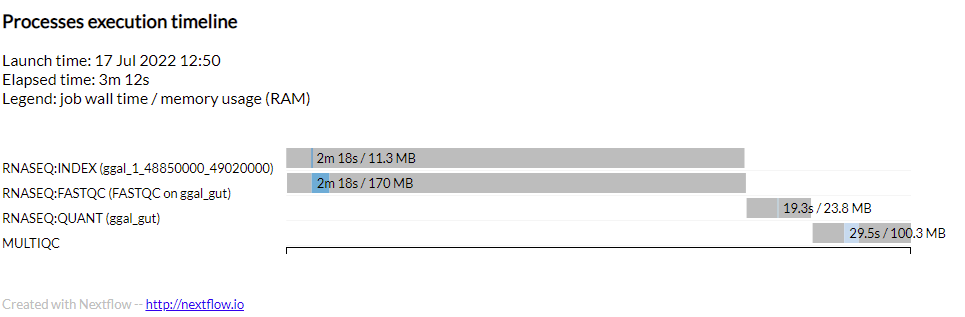
A sample of the timeline report available from the Execution log is provided below. Users can see the elapsed time for each task (the wall time) and the total amount of memory consumed. This information can help optimize the selection of VM types in different compute environments depending on pipeline requirements.
Tower also details the various tasks comprising pipeline execution. For each task, Tower displays the task_id, the process, and other details such as job status and the container used to execute the task. Users can drill down to task-level details and see the command executed, the working directory, and the PATH settings. Users can also access stdout, stderr, and the logfile associated with each task to aid in troubleshooting.
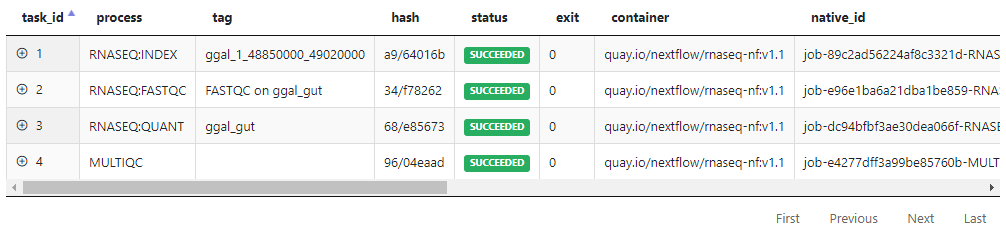
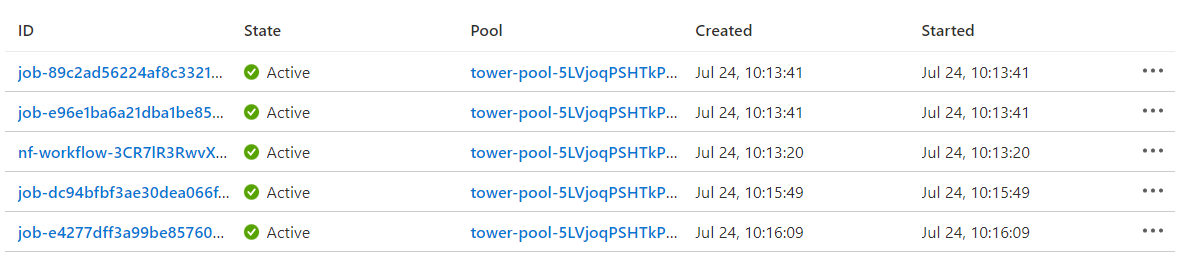
The Jobs view within the Azure Batch console shows how the Nextflow tasks map to Azure Batch jobs. The Azure Batch integration submits the pipeline itself as a batch job (head job). The pipeline job is shown as "nf-workflow-..." in the job listing below. The pipeline job submits additional batch jobs (child jobs) for each task in the Azure pipeline as tasks become ready to run. The Azure batch job IDs (below) correspond to the native_id visible from within the Tower interface above.
Working with Existing Pools and Spot VMs
Sophisticated Azure Batch users may want to manage the composition of their resource pools rather than have Tower Forge create a pool automatically. A good reason to do this is to take advantage of specialized VM types and scaling formulas that can be specified in a custom pool definition. Also, in some organizations, cloud administrators may prefer to control the size and composition of resource pools themselves using some Infrastructure-as-Code solution.
A second way to use Tower with Azure Batch is to configure Batch pools in advance and reference them when setting up an Azure Batch compute environment. This procedure is described below.
Set up a Resource Pool in Azure with Spot VMs
Azure batch resource pools can be comprised of both dedicated and Spot VMs. The number of each type of VM can be specified when the pool is created. More information about using Spot VMs with Azure Batch is available in the Azure Batch documentation.
In the example below, we manually configure a pool of Spot VMs and create a second compute environment in Tower that will dispatch pipeline tasks to this pool.
In the Azure console, select the Batch service configured earlier (nf-batch in our example) and select Pool from the left menu. Proceed to Add a new resource pool.
Give the pool a meaningful Pool ID and Display name as shown:

Azure Batch has the notion of managed identities for Azure resources to optionally eliminate the need to provide credentials when accessing Azure batch resources. Leave this feature set to None when using Azure Batch with Tower.
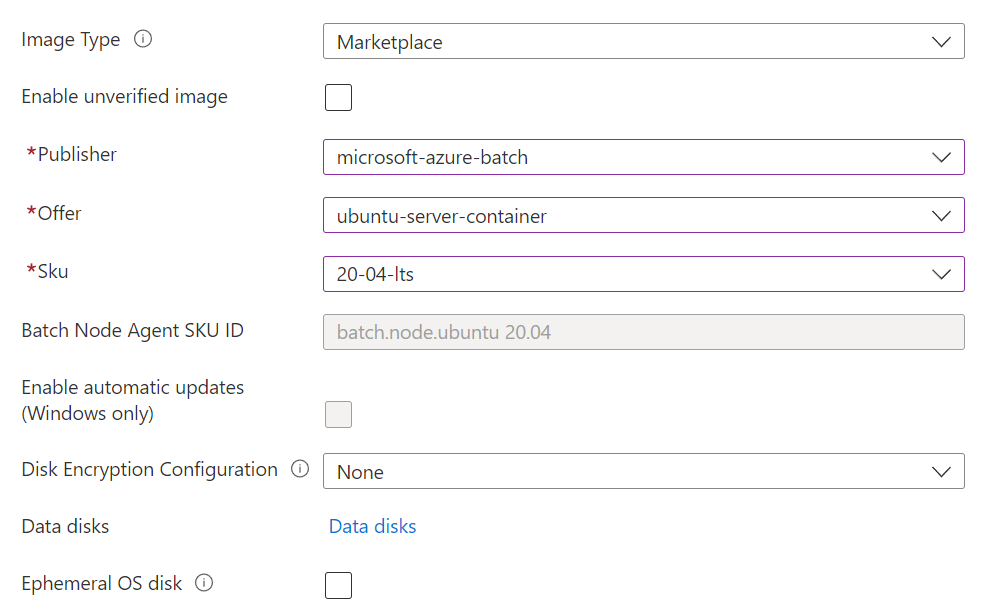
Next, provide details about the type of instances the pool should contain. Note that the image details apply to both dedicated and Spot/low-priority nodes. Be sure to select an Azure image supporting Docker containers, as shown.
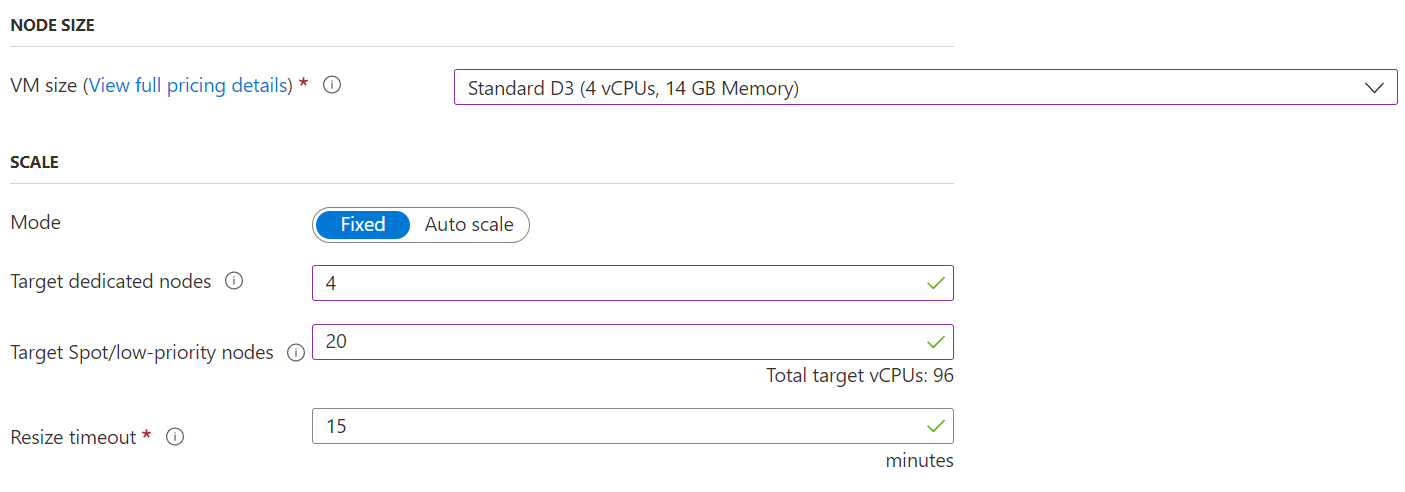
Finally, select the size of virtual machines in the Batch pool. For a summary of the available Azure virtual machines, see Linux Virtual Machines Pricing.
Azure Batch supports the notion of Fixed or variable-sized resource pools that Auto scale based on a user-supplied scaling formula. You can learn more about Auto-scaling resources based on user-supplied formulas in the Azure Batch documentation.
In this example, we have allocated four dedicated nodes to the pool and 20 Spot VMs, each with a total of 4 vCPUs for a total of 96 vCPUs. Azure Batch will attempt to maintain this level of resource in the pool. Note that if Nextflow tasks are preempted because a Spot VM becomes unavailable, jobs will be automatically re-queued.
Azure Batch also allows the number of task slots per node to be specified. By default, there is a single task slot per node. Recall that the Nextflow integration assumes a single task per batch job. Suppose you are using VM sizes with many vCPUs. In that case, users can tune this number upwards to allow more tasks to execute concurrently on each node. However, the downside of doing this is that if a node is preempted, it will impact pipeline runtime since additional tasks will need to be rescheduled to a different node in the pool.
Pools with Spot VMs and Quotas
After creating a pool with Dedicated or Spot VMs, you may encounter an error like the one below in the Azure Portal.

This means that your Batch account has quota limits that do not allow it to run spot instances. To verify the resources available, visit the Quotas tab in the left panel of the Azure console. You may see that your account has no Spot/low-priority instances available for use as shown:

If this is the case, click Request quota increase to log a support request with Microsoft to request additional Spot/low-priority vCPUs. At this time, Microsoft is not allowing Spot/low-priority vCPUs to be used without an increased quota. Depending on your billing preferences with Microsoft, you may have limitations placed on your use of Spot VMs. Please see the Azure documentation for details.
After defining a new pool and ensuring that you have a sufficient quota for Spot VMs, proceed to configure a new compute environment in Tower that uses the new resource pool.
Create a Spot Resource Compute Environment in Tower
Now that we have a resource pool configured to use Spot VMs, we can define a second Azure Batch compute environment in Tower. Log in to Tower, navigate to your workspace, and select the Compute Environments tab to create a new compute environment as shown:
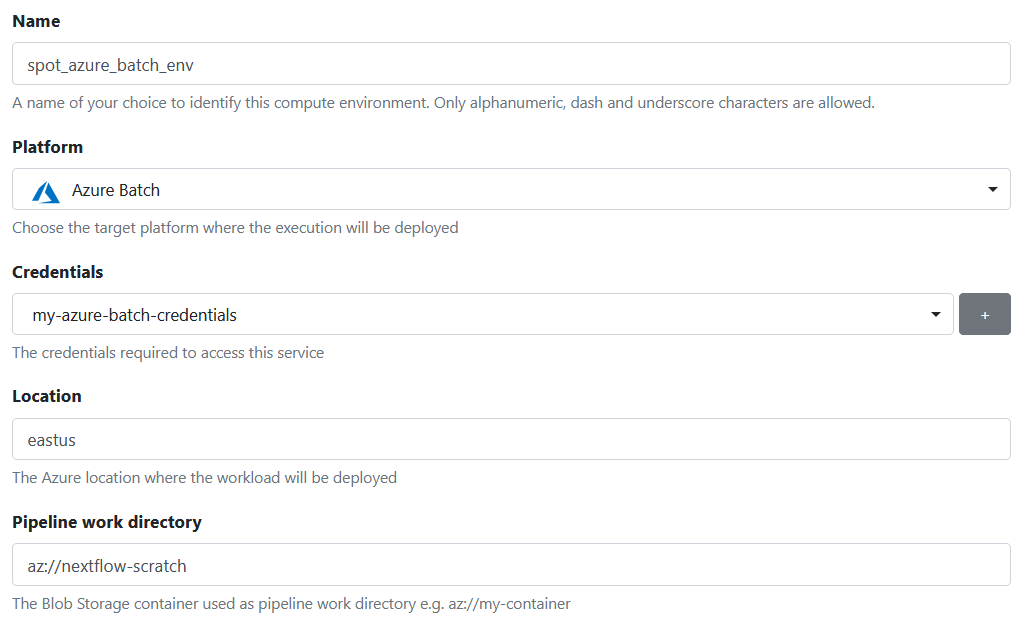
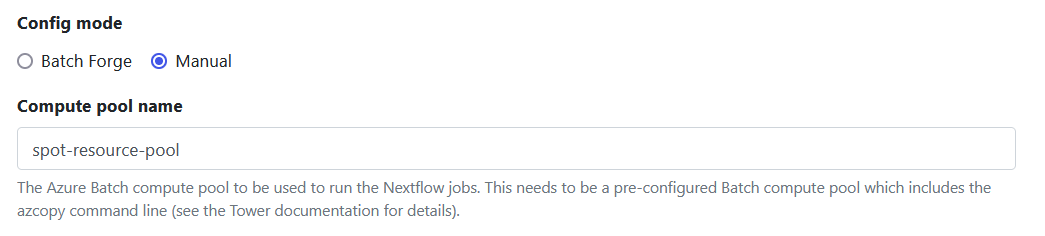
Select Manual as shown below and specify the name of the resource pool created in the previous step. (spot-resource-pool)
Accept the defaults for the remaining settings to finish creating the new Spot compute environments. After a few seconds, the new compute environment should be ready for use.
Run a Pipeline on the New Spot Instance Pool
Navigate to the Launchpad tab and select Start Quick Launch to launch a new pipeline. Select the name of the newly created Azure Batch compute environment (spot_azure_batch_env).
After providing details about the pipeline above, click on Launch to launch the pipeline into Azure Batch. We can monitor pipeline execution in Tower and the Azure portal.
Summary
Tower makes it exceptionally easy for users to share and access Azure Batch compute environments. Tower Forge makes this process seamless, automatically deploying a resource pool and associated VMs on the fly when pipelines are launched.
Azure Batch users can also dispatch Tower jobs to resource pools already configured in Azure. These pools can be of a fixed size or auto-scale based on user-specified formulas. These capabilities allow Tower users to set up different compute environments and leverage Azure Batch effectively, depending on their unique workloads.
To get started with Tower and Azure Batch, visit tower.nf and create a free account.
For more information about the Azure Batch Integration with Nextflow and Tower, reach out to us and book a demo.