
In a recent article, we looked at AWS Batch and provided details about the inner workings of the integration. In this article, we do a similar deep-dive on Azure Batch, explaining how to set up the integration and how it works under the covers. The article will cover:
- →Azure Batch
- →Important Concepts
- →Integration Overview
- →Configuring the Azure Batch Environment
- →Deploy a Head node VM to run Nextflow
- →Installing and Configuring Nextflow
- →Launching a Pipeline
- →The Integration Behind the Scenes
- →Summary
About Azure Batch
Azure Batch is a cloud-scale managed service for job scheduling and compute resource management. It allows resource-intensive applications to schedule tasks and automatically provision compute capacity without worrying about details like clusters, storage, networking infrastructure, or workload management software.
Azure Batch has been available since July 2015, and Nextflow support for Azure Batch was introduced in February of 2021. Azure Batch is an attractive platform for Nextflow users because it provides seamless access to elastic cloud resources and users pay for only the resources they use.
Azure Batch Concepts
Like other modern cloud services, Azure Batch is feature-rich with many configuration options. Below are some terms and concepts that you will need to be familiar with:
Batch Account – A batch account is required to use the Azure Batch service. Before using Nextflow with Azure Batch, users must create a batch account and obtain their private batch credentials. Credentials consist of an account name and a primary access key required to access the service. As with other Azure services, there are limits on certain resources associated with Azure Batch. The Azure Batch documentation has a good explanation of batch services quotas and limits. For production scale pipelines, you will likely need to request an increase in quota.
Storage Account – A corresponding storage account should be set up and associated with the batch account in the same cloud region for each batch account. Azure supports multiple storage services. These include the file service, queue service, table service, and Blob service. For Nextflow, the Azure Blob storage service (as in binary large object) is most commonly used, followed closely by the Azure File Share service where a proper high performance file system is needed. Users will need to set up a container in Blob storage to act as a working directory for pipeline execution. Like the batch account, users need to obtain and record their access keys so Nextflow can securely access the container.
Nodes – In Azure Batch, a node is an Azure virtual machine (VM) dedicated to processing a portion of an application's workload. The size of a node (specified using a vm_type setting) determines the number of CPU cores, memory capacity, and local disk size allocated to the node.
Pools – A pool in Azure Batch refers to a collection of nodes of a specific size. Multiple named pools can be associated with a batch account, and Azure cloud administrators can specify the types of nodes and images associated with each pool. Pools can be created in advance or created dynamically in response to workload demand. Unlike traditional workload managers, Azure Batch does not explicitly have the notion of queues, but pools provide similar functionality. They manage dispatching tasks to nodes, implementing scheduling policies, auto-scaling resources, managing start tasks, and more.
Jobs and tasks – In Azure Batch, a task represents a unit of work, and a job is a collection of tasks. The way Nextflow and Azure Batch define tasks can lead to confusion. In Nextflow, the term task describes a process step in a Nextflow pipeline. A Nextflow task corresponds to an Azure Batch job given how the integration is architected.
About the Integration
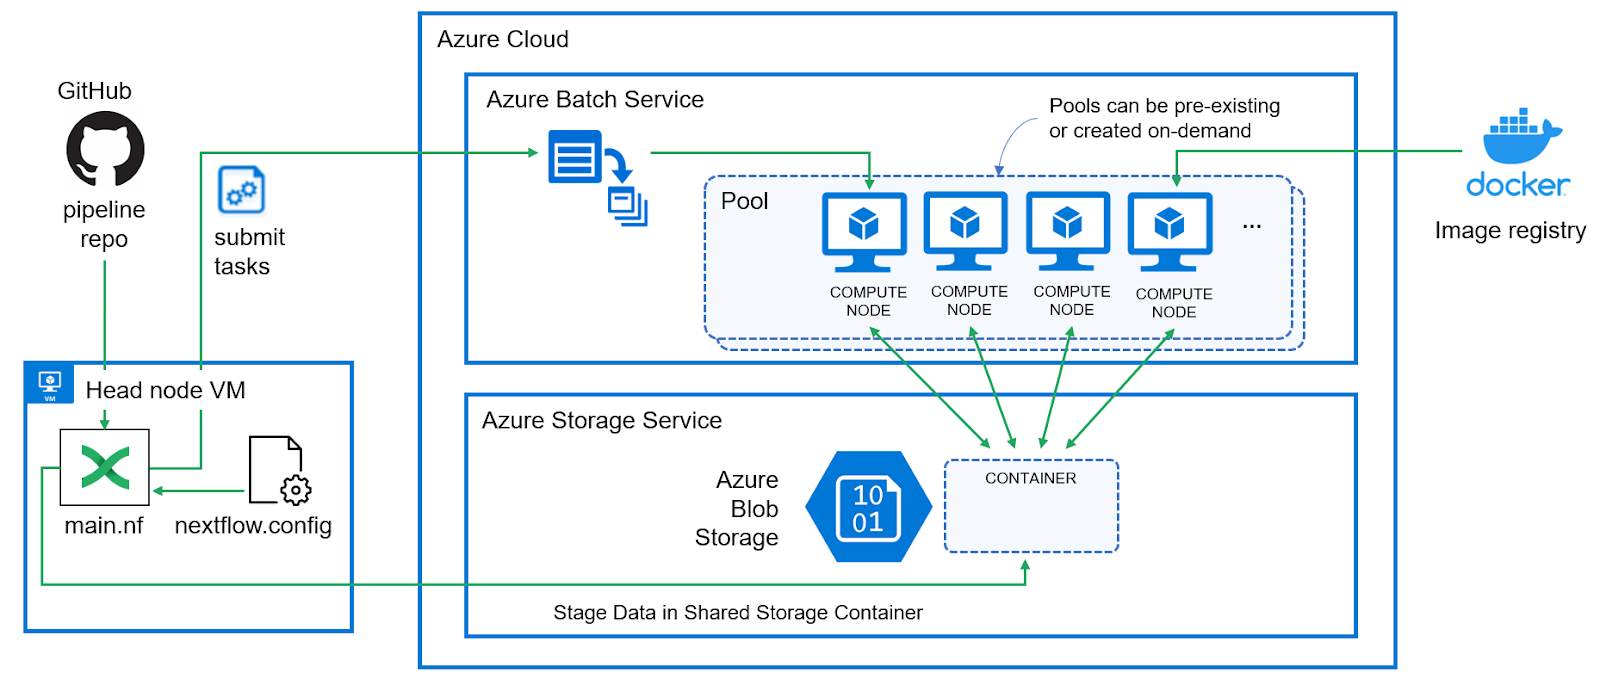
The diagram below illustrates how the Nextflow – Azure Batch integration works. Nextflow users or Azure administrators begin by setting up a storage service and a batch environment in the Azure cloud, recording the credentials for both services. While tasks can be dispatched to Azure Batch from a local laptop or PC, launching jobs from a VM within the Azure cloud is better.
The Nextflow configuration file is updated with details about the Azure Batch and Storage environments, and users run pipelines as usual. The only difference is that the path to a shared Azure storage container, which serves as a work directory, must be specified on the Nextflow command line.
Nextflow recognizes that the Azure Batch integration is needed when the azurebatch executor is specified in the Nextflow configuration file. Nextflow is flexible in this regard and clients can optionally choose to run some process steps in Azure and others locally or in other compute environments.
When Nextflow detects that the azurebatch executor is to be used, Nextflow automatically installs and configures the nf-azure plug-in. Source code for the plug-in is available on GitHub. The plug-in implements all the details associated with interacting with Azure Blob storage and managing resources and task execution in the Azure Batch environment.
Users can either configure the Azure Batch pools in advance or optionally let Nextflow interact with the Azure Batch API to create resources on the fly using specified VM types and virtual machine images.
Configuring the Azure Batch Environment
To configure Azure Batch, you can follow the steps below. These instructions assume that you have a Microsoft Azure account.
Setup an Azure Storage Account
Before configuring Azure Batch, it is helpful to create a storage account first. The Batch account will need an associated storage account to function.
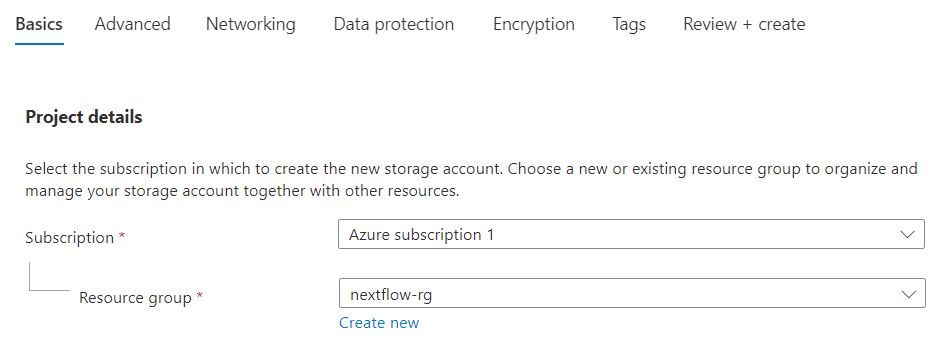
- →From the Azure console, select Storage Account followed by Create. Azure uses the term Project to refer to a resource deployment.
- →Select the name of your Subscription from the pull-down list.
- →If you do not already have a Resource group to associate the Project with, you can create one on the fly.
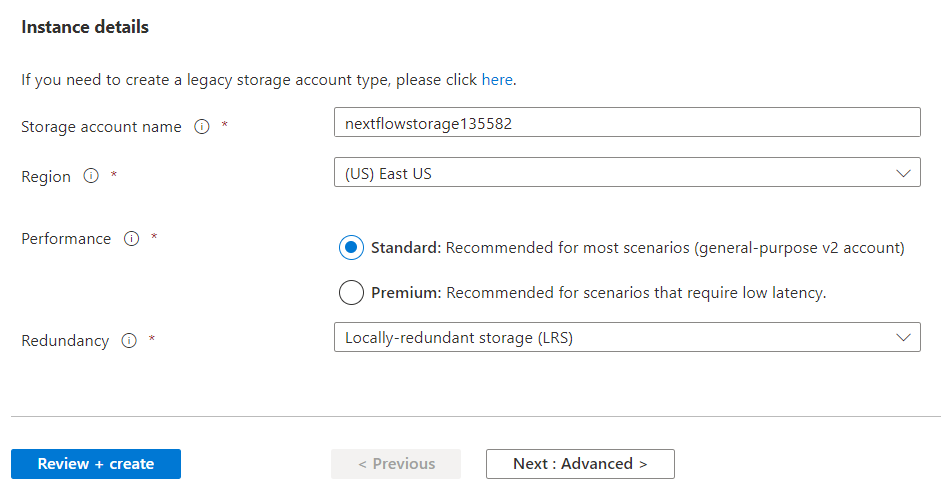
2. Next, provide a unique storage account name and the region where the storage will be located. You can select different performance levels for the storage and different redundancy levels. Azure defaults to Geo-redundant storage (GRS), enabling failover to a separate region. Since Nextflow uses storage for scratch purposes during pipeline execution, Locally-redundant storage (LRS) is fine.
Users can review configuration screens and configure options related to storage and networking. However, the defaults are acceptable for the integration to work. Click "Review + create" to create the storage account.
3. Azure will verify the configuration and make sure there are no errors. Assuming it passes validation, Azure will show the settings selected for review. Assuming the settings are correct, click on Create. 4. You will see a message indicating that “Your deployment is in progress”. After a moment, this will change to “Your deployment is complete”.

When the deployment is complete select Go to resource.
5. The next step is to create a blob storage container inside the Storage account to be used by Nextflow. Select Containers from the storage account screen from the left side panel under Data storage. Don't confuse the term container here with a Docker container. Azure uses the term container to refer to a bucket in Azure Blob storage.
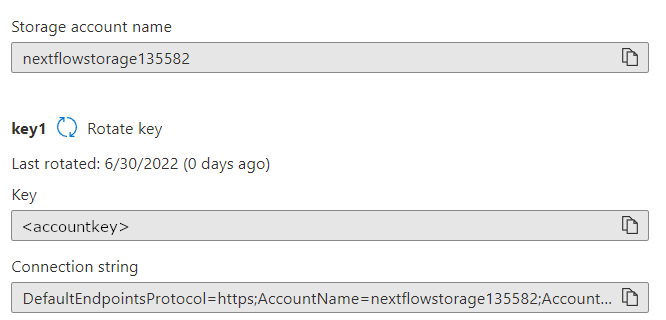
6. Now that we have a storage account, we need to record the Access keys required by Nextflow. Select Access keys from the left panel under Security + networking under the storage account setup screen.
7. On the Access keys screen, keys are hidden by default. Select Show keys to make them visible. The storage service provides two keys for each account. This is useful for rotating keys while avoiding any interruption in service.
Copy and paste the Key and Connect string as shown and store them in a safe place. These are your storage credentials. You will need them when you set up the Nextflow config file.
The nf-azure plug-in that implements the Batch integration also provides support for Azure Files, a serverless file sharing service. Files available in Azure File shares can be mounted on the nodes in a pool executing a pipeline. Details on how to use Azure File Shares are available in the Nextflow documentation.
Setup an Azure Batch Account
- →Return to the Azure console home screen and select Create a resource.
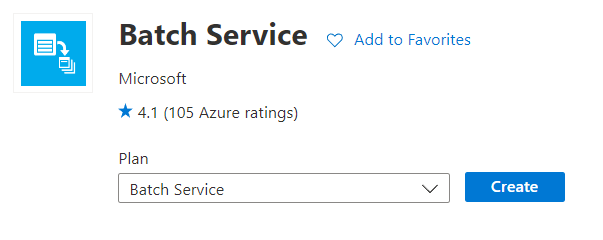
- →Search the available Azure services and marketplace products by searching for the Batch Service. Do not select Azure Batch Rendering. This service is meant for a different purpose.
- →Confirm that you want to create a Batch Service and click the Create button.
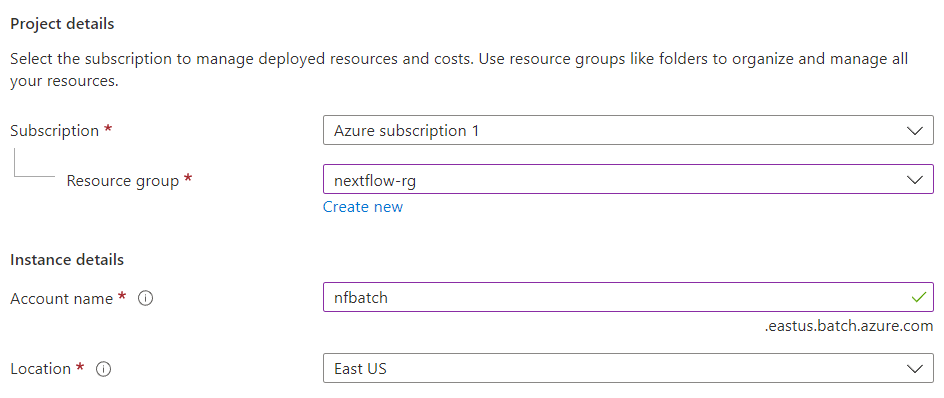
4. Azure uses the term "Project" to describe a new deployment of the Batch Service. Enter details about your project as shown. If you don’t have an Azure resource group to associate the service with, you can create one on the fly.
Give the batch instance a name, and specify the Azure region where it resides. This should be the same region used when creating the storage account.
5. Storage accounts are optional in Azure Batch, but they are required with Nextflow. Click on Select a storage account under the Storage account settings to select the storage account configured in the previous section (nextflowstorage135582 in this example).
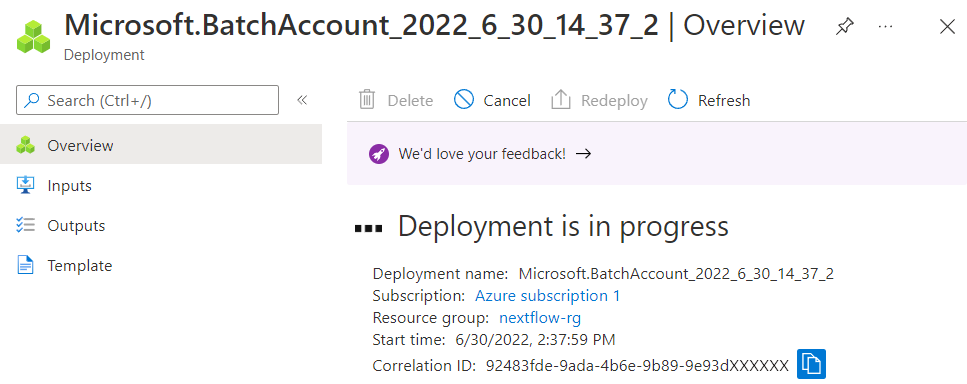
6. Select Review + create to review and validate your Azure Batch environment. Assuming your selected options pass the validation tests, click on Create to finish creating the Azure Batch account.
As with the storage account, you will see a message that “your deployment is in progress” followed by a message that “your deployment is complete”. Select Go to resource to see details of the newly created Azure Batch account. 7. Select Keys under Settings from the left panel. Using the same procedure as above, copy the BATCH ACCOUNT CREDENTIALS and record them. You will need the Batch account (name) and the Primary access key. As with storage accounts, Azure Batch provides two keys so that keys can be re-generated independently without interrupting service.
Navigate back to the Azure home screen. You should see your newly created resources including the batch service and storage service available for use.

Assuming you’ve properly recorded your access credentials and the names of the relevant services and container name, you are ready to proceed to the next step.
Deploy a Head node VM to run Nextflow
Technically, this step is optional, but it’s a good practice to launch pipelines from a VM in the cloud rather than a desktop or laptop. This is especially true for long-running flows. Although this VM is not strictly a cluster head node, it plays a similar role in marshaling Azure Batch resources and submitting and managing workflows.
Running pipelines from a cloud-resident head node helps minimize data movement. It also allows users to shut down their local computers while pipelines are running and protects them from transient network issues that could interrupt their workflow.
Create a new VM
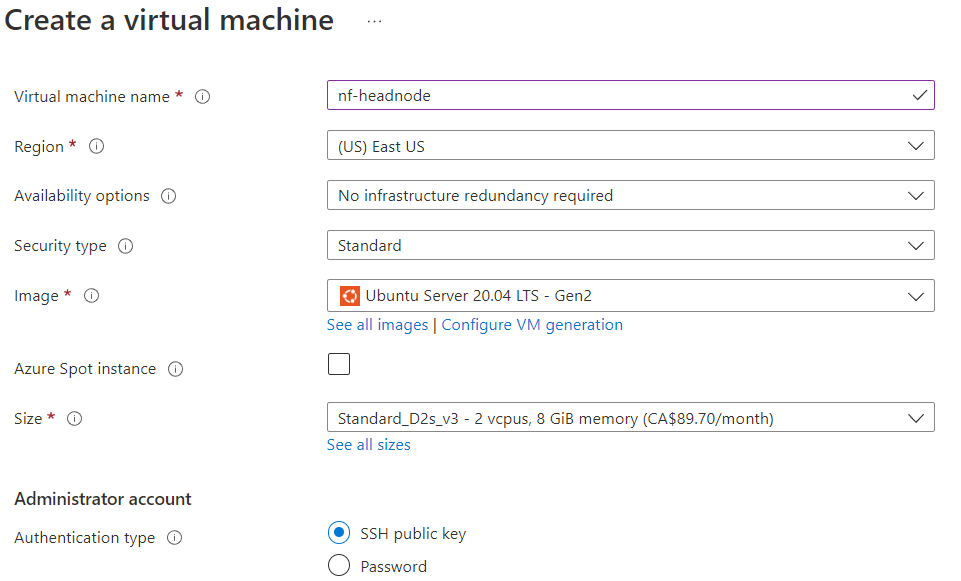
Navigate to the Azure portal home page, select Create a resource, and follow the dialog to create a Virtual machine as shown below.
Give the VM a name (nf-headnode in our example), and select the same region where you’ve installed Azure Batch and your storage account. You can select your preferred operating environment to run on this cloud instance. Ubuntu Server 20.04 LTS is a good choice. You can also select an appropriately sized VM. For testing, we can use a small VM with 2 vCPUs as shown. For a larger environment, where multiple users may share the same VM to execute pipelines, select a VM with more resources.
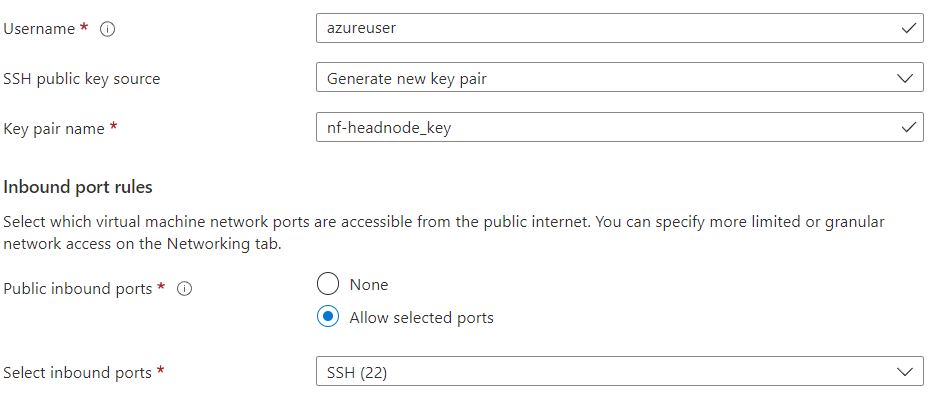
Azure allows password authentication to the VM, but it is a better idea to have Azure generate an SSH key pair.
If you already have key pairs you’ve created for previous Azure VM deployments you can re-use them. The default username to login to the VM is azureuser, but this can be overridden.
The next step is to create Inbound port rules. You will need to allow access on port 22 as shown so that a client can open an SSH connection to the VM. By default, Azure configures firewall rules so that all external IP addresses can connect to your VM’s public IP address. While this is fine for testing, once the environment is working, it is a good idea to revisit the VM configuration, select the Networking tab, and create a firewall rule that only allows access from known IP addresses.
You can click the “Next: Disks >“ button to select storage options. The size of the Azure managed disk associated with the instance depends on the instance type. You can read the Azure Managed Disks Documentation for an explanation. You can accept the defaults for disk options. You can optionally explore other screens to configure Networking and Management options, but the defaults are fine to get Nextflow working.
Select Review + create to validate your VM. Assuming the configuration passes, click on Create to provision the new VM.
If you selected “Generate new key pair” for the SSH public key source as in the example above, you will be invited to download the private key required to access the new cloud VM. Download the key and save it in your local machine’s .ssh directory with a meaningful name such as ~/.ssh/azureuser.pem.
Change the permissions on the private key file as shown:
Once the VM is provisioned and its status is running as shown in the Azure console, obtain the instance’s public IP address by clicking on the name of the newly provisioned VM. You can then log in to the VM via ssh from your local machine as shown:
For the newly provisioned Ubuntu VM, you can do some housekeeping such as updating the apt package index. Install Java since a JVM is required in order to run Nextflow. After installing Java, verify that it runs by running the java from the command line.
Install and Configure Nextflow
Install Nextflow as shown below or follow the installation instructions in the Nextflow documentation.
Nextflow is installed by default in your local path. You should move it to a directory included in your shell’s $PATH such as /usr/bin.
By default, Nextflow has 755 file permissions and is owned by the user that installed it, in this case, azureuser.
Nextflow process steps are typically containerized. Even though Azure Batch will be used as our execution environment, it is a good idea to install Docker on the head node as well in case we want to run workflows locally. The installation command can vary depending on your OS version, but for Ubuntu 20.4, Docker can be installed and verified as shown:
If you attempt to run Docker without the sudo command you will receive the error message “permission defined while trying to connect to the Docker daemon socket”. This is a well-known feature of Docker. By default, the Docker daemon runs as the root user, so the UNIX socket that accepts commands from the client requires root privileges. You can follow the steps in the Docker documentation to manage Docker as a non-root user.
Next, we can verify that Nextflow is working properly by executing the popular “hello” pipeline directly from the Nextflow GitHub repo.
Configure Nextflow to Use the Azure Batch
At this point our Azure Batch environment is set up, and we have a functional Nextflow environment in Azure. The next step is to configure Nextflow to dispatch work to Azure Batch.
Details about the Azure Batch and storage settings need to be specified in the Nextflow configuration file. Configuration settings can exist in multiple locations as described in the Nextflow documentation. In this example, we will configure settings in $HOME/nextflow/config and make Azure Batch our default execution environment.
You will need to retrieve the Azure Batch and storage account credentials that you recorded in previous steps and enter them in $HOME/.nextflow/config (or another Nextflow configuration file) as shown:
Run the command nextflow config to verify that the settings have been resolved properly into Nextflow.
A nice feature of the Azure Batch integration is that Azure Batch pools can be configured automatically and the number of nodes in each pool can scale dynamically. Nextflow users or administrators can specify the minimum and maximum number of nodes per pool.
One thing to watch out for is that Azure has the notion of display names and actual symbolic names for its various cloud regions. Examples of display names are East US, North Europe, and Sweden Central. When entering region names in the Nextflow configuration file, name sure that you use the corresponding symbolic name for the region – eastus, northeurope, or swedencentral. Otherwise, your workflow will terminate with an error that Azure was unable to locate the required VM type. You can check the current Azure region names reference to make sure you have the correct name.
Nextflow users may want to take advantage of Azure Spot VMs. You can check the documentation for details about using Spot VMs with Batch. There are a few limitations on the types of instances supported. Check the Azure Batch documentation for details on available VM sizes.
With details about the Azure Batch configuration present in the Nextflow config file, we can run one of the sample Nextflow workflows. You will need to supply the name of the Azure storage container (bucket) that you specified when you set up the Azure BLOB storage account on the command line as shown:
Assuming that all of the credentials have been entered correctly, you should see the pipeline execute as normal. The only difference is that the Nextflow Azure integration is transparently shifting execution to a dynamically provisioned resources pool managed by Azure Batch.
Execution will typically take a minute or two the first time a pipeline is run, because Azure needs to dynamically create a resource pool and start VMs to handle the pipeline tasks.
As the pipeline executes, you can monitor Azure Batch through the console as it creates a new resource pool automatically to run the pipeline. Select the batch service you configured earlier through the Azure console and select Pools from the left panel:
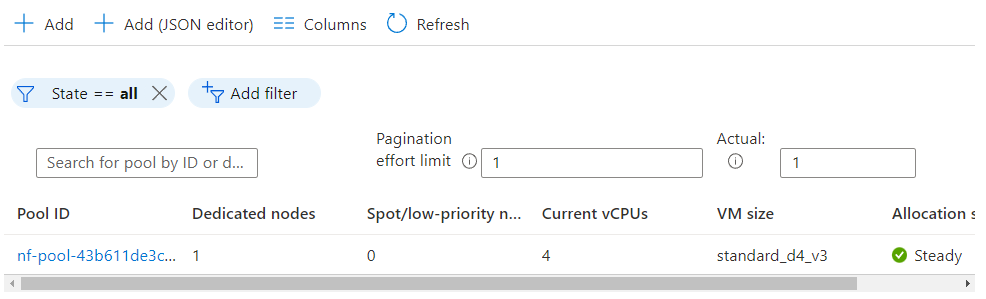
Nextflow automatically assigns a Pool ID and starts nodes. By default, Nextflow will use a standard_d4_v3 VM, however, users can override this setting in the Nextflow config file using the vmType setting.
You can also override the image used by nodes started in the Azure Batch pool. By default, Nextflow will use the “microsoft-azure-batch ubuntu-server-container 20-04-lts (latest)” image. You can tailor these settings as well using the publisher, sku, and offer settings in the Nextflow configuration file. If you stray from the defaults, make sure that the image you select has Docker pre-installed so that it can support containerized execution.
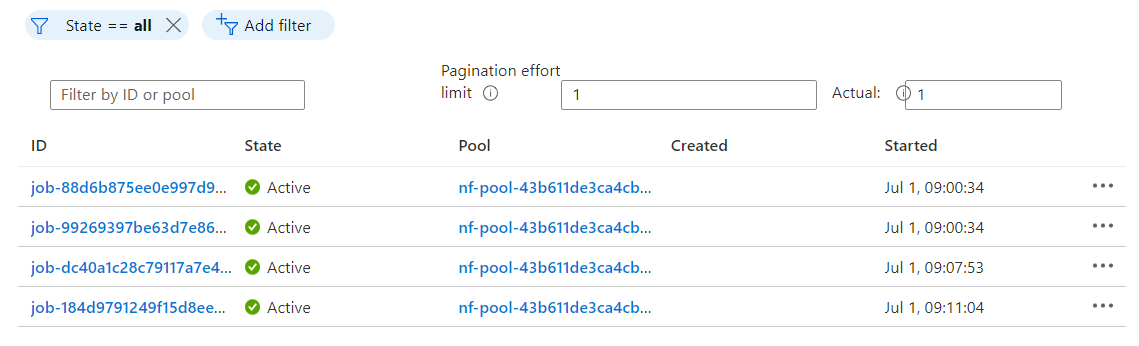
In the Nextflow – Azure Batch integration, tasks in the pipeline manifest on Azure Batch as discrete jobs. In our RNA Seq example pipeline, the first two tasks in the workflow execute simultaneously. Selecting Jobs from the left panel in the Azure console, we can monitor these jobs and dig into details if we are interested.
The Integration Behind the Scenes
As we’ve seen in the example above, assuming the Azure Batch and storage settings are entered correctly in the Nextflow configuration file, pipeline execution is transparent to Nextflow users. The only detail users need to remember is to provide a path to the Azure storage container shared by nodes in the Azure Batch resource pool, which serves as a work directory.
Checking the Log file
Checking the .nextflow.log while the flow is executing is a good way to understand the integration and troubleshoot any issues that may occur.
The following steps occur when running a Nextflow pipeline using the Azure Batch executor:
- →Nextflow parses the command line and retrieves the pipeline (in this case from GitHub) as usual.
- →Nextflow checks that various locations that configuration files can exist (in our case _$HOME/.nextflow.config_) and applies its precedence rules to determine the configuration.
- →Nextflow launches the pipeline (which runs on the head node VM).
- →Nextflow installs and starts the _nf-azure_ plug-in automatically after parsing the configuration file and seeing that the azure batch executor is selected.
- →Nextflow internally activates the integration with the appropriate Azure Storage service based on the Azure storage credentials supplied.
- →Nextflow transfers local files associated with the pipeline to the associated Azure storage container.
- →Nextflow configures each task as it normally would identifying the executor for each. In this case the tasks are RNASEQ: Index, RNASEQ: FastQC, RNASEQ: Quant, and MULTIQC and they will all execute in Azure Batch executor.
- →Nextflow sets up a TaskPollingMonitor so that it can keep track of job execution in Azure, polling job status every 10 seconds by default.
- →Nextflow uses a “FilePorter” class to move data files (In this case the _.fa and _.fq files from the local pipeline directory to the shared storage container).
- →For each Workflow step, Nextflow connects to the Azure Batch API and submits a Nextflow task as an Azure Batch job, passing a path to the execution script mounted by the container.
- →As with Nextflow jobs that execute locally, tasks are reactive and execute asynchronously as their inputs become available.
- →Azure Batch infers details about the VM required based on resource requirements for each task, and settings in the Nextflow configuration file. If a VM type is not specified, Nextflow uses a _Standard_D4_v3_ VM.
- →Azure Batch checks the pool to see what nodes are presently running and starts new nodes as necessary if resources are not sufficient.
- →As nodes come online in the Azure Batch resource pool, jobs are dispatched for execution in containers on nodes within the resource pool writing their output to the appropriate directory in the shared storage container.
- →On successful completion of the MULTIQC task in the sample RNA Seq pipeline, files are transferred back to the head node from which the pipeline was launched as specified by the publishDir directive. You can learn more about _publishDir_ in the Nextflow documentation. In this case files, are transferred to the results directory defined by params.outdir in the nextflow.config file.
- →When all tasks and file transfers are completed, Nextflow closes connections to Azure, stops the _nf-azure_ plug-in, and terminates the workflow.
“Grepping” for Details
By default, Nextflow provides debug-level detail in the Nextflow log. This is useful for troubleshooting, but the amount of detail can be overwhelming, however this can be customized using the NXF_DEBUG environment variable. Users can use grep selectively to filter what they are interested in seeing from the log.
For example, to check the log for Azure Batch job submissions, use a command like the following:
To understand file transfer activity, search the logs for file transfer activity conducted by the FilterPorter service.
Examining Job Staging Files
A good way to dig into individual task steps which are under execution at every stage, is to look at the task level files created in the work directory within the shared Azure BLOB container. For example, for the FASTQC task, we know from the logs that the working directory for the task is at the path az://nextflow-scratch/work/9f/e3c81d4411ed96ff523ccf2d2bdb85
We can inspect the contents of this directory in the container using the Azure CLI, Web interface, or File browser as illustrated below.
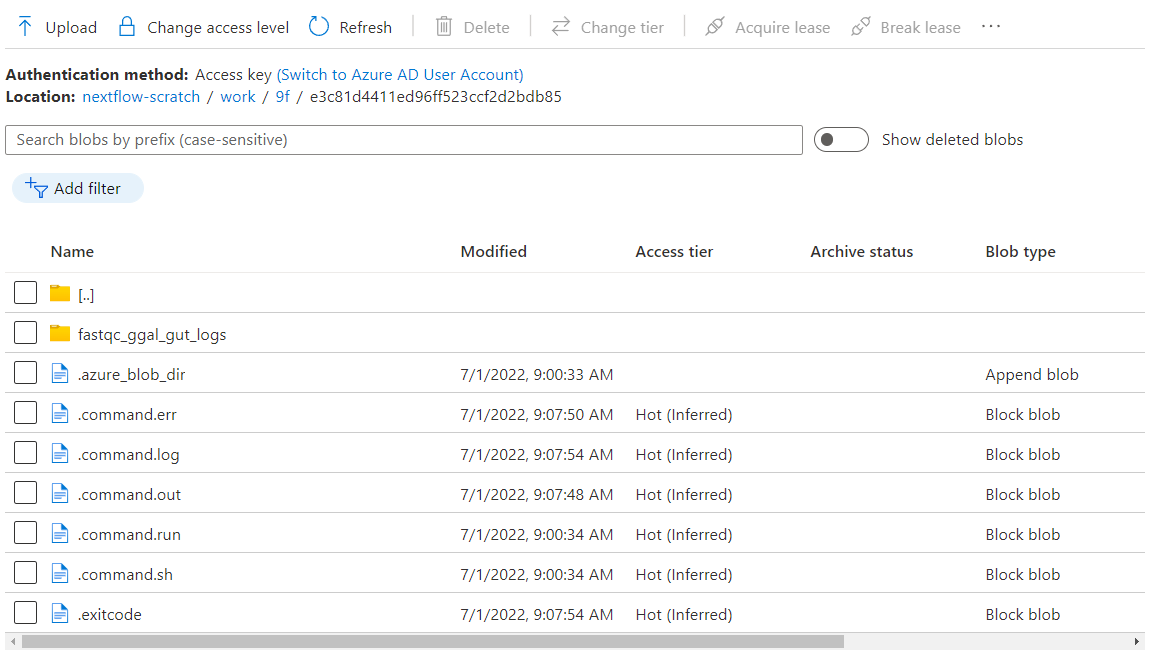
The .command.run script in the directory corresponding to each workflow step is the actual bash script launched in the Azure Batch managed container for each batch job. It includes various helper functions such as nxf_cp_retry(), nfx_az_upload(), nfx_az_download() to monitor execution and move files using the azcopy command. These helper functions are called by nfx_main() in the same script. The .command.run script launched for each Azure batch job acts as a wrapper to facilitate the execution of the actual task-level command stored in command.sh in each task directory.
The .command.log file traces all of the details of the execution of the .command.run script so that users troubleshooting pipeline execution can understand what happened at runtime inside each container.
Summary
For Nextflow users that need capacity on-demand and don’t want to manage local clusters or HPC infrastructure, Azure Batch is an excellent solution. Following the instructions in this guide, most users can be up and running with scalable pipelines in the Azure cloud in a matter of an hour or two.
While it will no doubt take longer to harden the environments and deploy Nextflow pipelines in accordance with your organization’s IT and security policies, deploying pipelines in Azure Batch is almost certainly a lot easier than procuring, deploying, and managing local infrastructure.
Organizations looking for an easier way to collaborate on Nextflow workflows running in Azure Batch and other compute environments can try Nextflow Tower – an easy-to-use hosted service and centralized command post for Nextflow pipelines available at https://cloud.tower.nf/.
For more information about the Azure Batch Integration with Nextflow and Tower, reach out to us and book a demo.