


Update: Studio environment variables are now released. See the documentation for more information.
Creating the tools you need, when you need them
Studios, a feature of Seqera Platform, lets you run interactive analysis applications on the same infrastructure as your Nextflow workflows, enabling rapid insights from workflow results. Studios already provides pre-built, version-controlled container template images (namely Jupyter, R IDE, VS Code, and Xpra).
But what if you need an application we don’t offer? The solution: add your own. In this blog post, we’ll demonstrate how to build custom Docker images for Studios and highlight useful examples.
New to Studios? To learn the basics of Studios operations, see our documentation
Read the Studios documentation
Requirements
You’ll just need to make sure your application meets a few basic requirements to make it available in Studios:
• It must be possible to install the application in a container (something that should apply to most, if not all, applications).
• It must serve its graphical interface over an HTTP port, and it must be possible to configure that port when the application is started.
If you have a graphical application that doesn’t provide its interface via an HTTP port and is a Linux application, we encourage you to check out our Xpra template. You can treat Xpra instances just like a Linux desktop, which will allow you to run those applications.
How to build your custom application
Option 1: Extending existing Studios templates via Conda and Wave
Sometimes, you don’t need a completely different tool than the templates Seqera provides, but you want to add some functionality to the base application. Studios provides you with the option to supply additional software via a Conda environment specification when you create a Studio, for exactly this purpose.
For example, you might want to use the Integrative Genomics Viewer (IGV) desktop application to view your genomic output files from your pipeline runs on Seqera, stored on S3. This can easily be achieved by using the Xpra base image, supplying IGV as additional software. You’ll see this as the second screen when you create a Studio, with the option to provide a Conda definition:
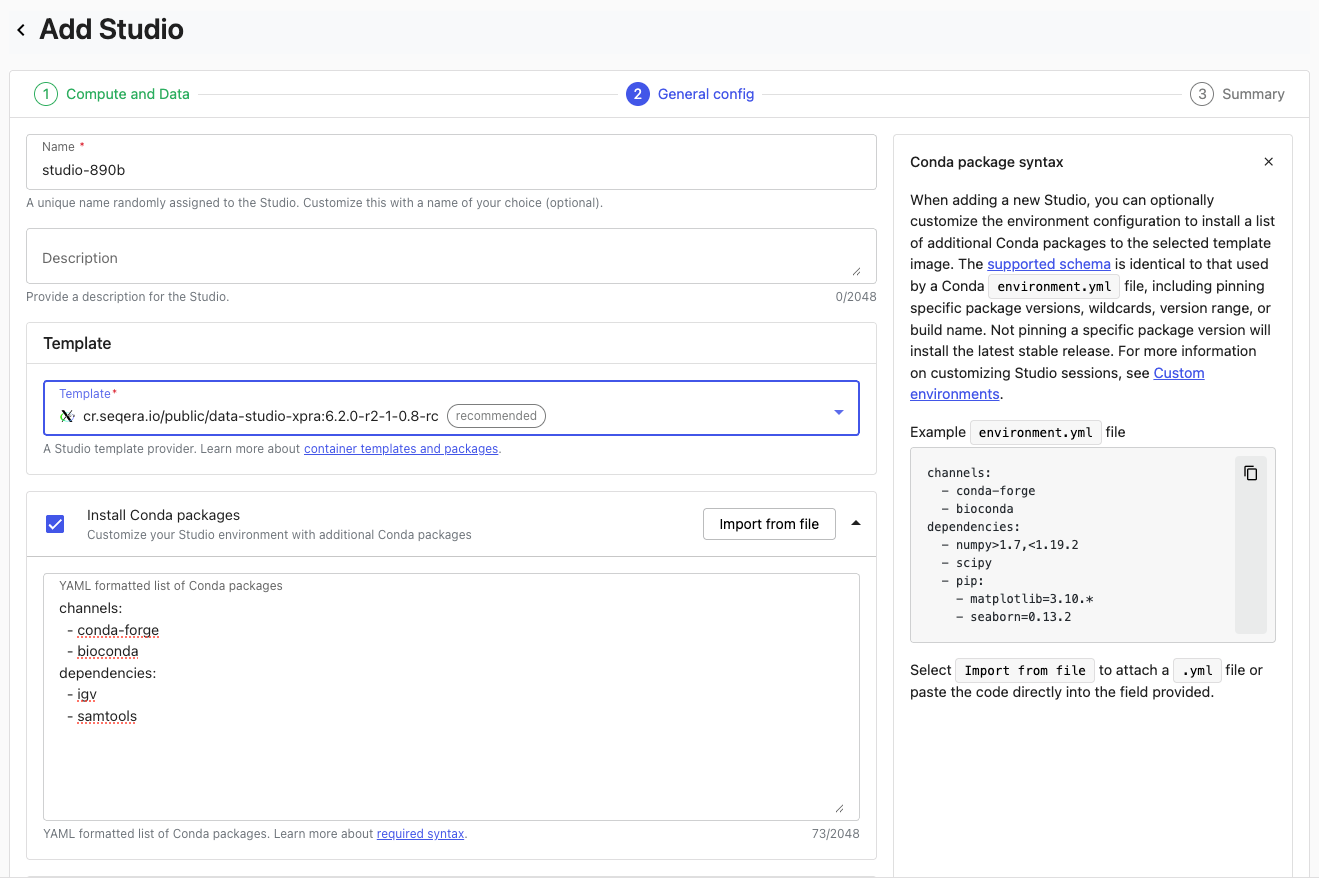
When you build a Studio in this way, Wave is used to provision a new container, with your new dependencies added to the base template.
Option 2: Building Studios for completely new applications
While Studios already offers some of the most popular IDEs and tools for bioinformatics, new applications are being developed every day. For example, you may have a custom tool you want to host and share with colleagues. Building a custom Docker image to use in Studios is relatively straightforward. In the following segment, we will walk you through the steps necessary to build your Docker image for Studios by showing four custom Studios examples: Marimo, Streamlit, CELLxGENE and hosted Shiny applications (outside of R Studio).
General principles: Dockerfile structure
When building the Dockerfile for your custom Studios image, there are several steps that apply regardless of the specific application. With reference to our custom environments documentation, let's review the essential lines required for this process.
1. Use a base image for the connect client
Connect is the software that mediates communication between applications and Seqera Platform. Seqera provides a base image to provision this, and will also contain Fusion, enabling POSIX-like access to any files your application needs on S3. For now, we need to use the base image:
Notice that we’ve also used a build argument (ARG) with a default value to specify the version of Seqera’s Connect client we’ll use when we build the image.
2. Add additional dependencies
Additional lines can then be added to provide the software required by your application. To take the example from the documentation, we could just install Python:
Alternatively, you may find that your chosen application already has a container you can use as a base, which can be used directly without an install command:
💡Note: This won’t work with very stripped-back images lacking ‘apt-get’ or ‘yum’, used by the Connect installation in the next step.
3. Define any environment variables you’ll need (Optional)
Studios has the ability to provide variables to your applications at startup, but you’ll need to define these with default values in your Dockerfile like:
If you define an environment variable during Studio this variable will replace the default in the running Studio. We’ll be using this to supply input files in some of the examples below.
4. Configure the Connect client
We then need to copy out the Connect client from the earlier build stage, and execute the installation command:
5. Set the entrypoint
By setting the Connect client as the entrypoint for the container, this command is run by default when the container starts, ensuring that communications start between the application and Seqera Platform:
6. Run the application
Finally, it’s time to run the command that will start your application and serve its content on the port used by Studios:
This example starts a Python web server. The $CONNECT_TOOL_PORT is important as it is a variable provisioned by Studios that tells the container which port to use at run time.
Building the Dockerfile
For any of these applications, building an image from the Dockerfile is then a matter of running the Docker build command in the correct directory, substituting the appropriate tag name and providing the correct version for Seqera’s Connect client (currently 0.8):
Deploying applications in Studios
Once you have built your image, add it Studios in the following way:
1. Select the Studios tab in your workspace
2. Click Add Studio
3. Configure compute resources in the Compute and Data tab
- →Select your compute environment
- →Adjust CPU, GPU, and memory allocations as needed
- →Mount any required data using the Mount data option
4. In the General config tab:
- →Select Prebuilt container image as the container template
- →Enter your container image URI (e.g.
ghcr.io/seqeralabs/custom-studios-examples/shiny) - →Set a Studio name and optional Description
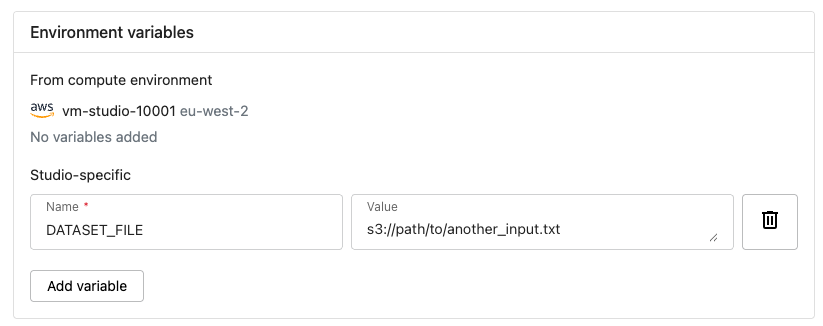
- →Set the values of any environment variables you want to supply to the studio:
5. Review the configuration in the Summary section
6. Click Add and start to create and launch the Studio
Providing files to containers
Providing files at application startup using environment variables
Studios' environment variable functionality allows you to supply files from cloud buckets when running a Studio. When you mount a bucket, the file becomes available at /workspace/data, so an S3 path like s3://bucket_name/input.txt maps to /workspace/data/bucket_name/input.txt. You can configure your containers to automatically translate these cloud storage paths to the correct local paths.
For example, if we had a Python application that took an input file, we could write the relevant part of the Dockerfile like this:
s3://my-bucket/data/file.csv becomes /workspace/data/my-bucket/data/file.csv, which we can supply to the application. Anybody using that application could then supply S3 URIs to the DATASET_FILE environment variable, and as long as they have also mounted the associated bucket, the application will be able to retrieve that file.
Making short cuts to data with data links
If your application has the ability to load data via something like a ‘file -> open’ dialog, you can facilitate that with ‘data links’. Think of data links like symbolic links, or pointers to specific bucket paths in S3. To create a data link in the Platform:
- Go to the Data Explorer tab
- Click ‘Add cloud bucket’
- In ‘bucket path’, enter a path to the directory you want to use in your Studio input
- Add a useful name in the ‘name’ field.
- Click ‘Add’
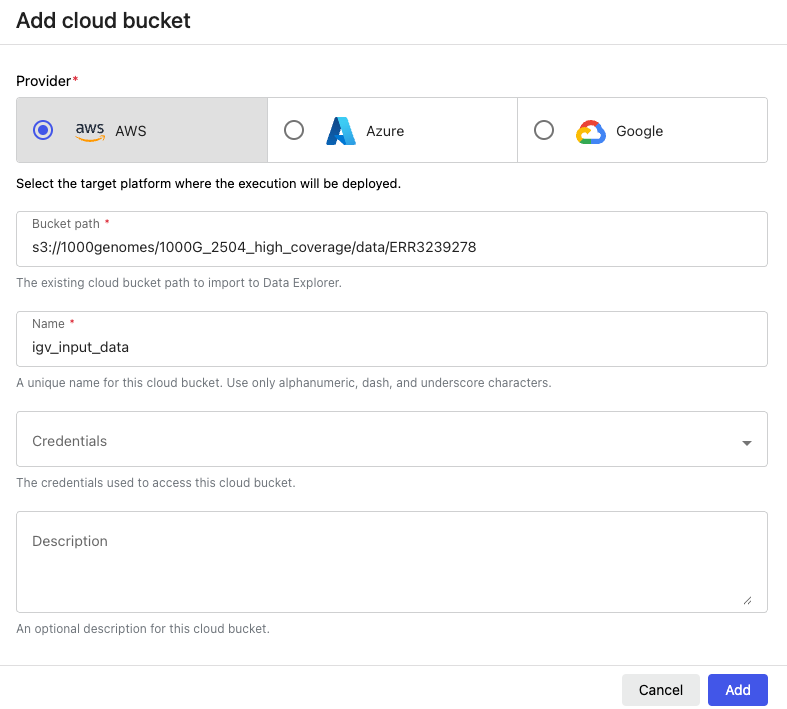
When you link a directory like `igv-input-data`, it will appear in the running Studio environment at the path `/workspace/data/igv-input-data`.
Real-world examples
In the following section, we’ll show you how Studios can work with some popular applications. For all the examples you’ll be able to access both the full Dockerfile and an instance of the image via the companion GitHub repository.
Example 1: Marimo
Marimo is an open-source, reactive Python notebook solution that provides an elegant alternative to traditional notebooks with a focus on reproducibility. What sets Marimo apart is its reactive execution model: cells automatically re-execute when their dependencies change, creating a more intuitive workflow compared to the sequential execution model of traditional notebooks. With built-in SQL support, script execution capabilities, and app sharing features, Marimo offers a modern approach to interactive Python development that's particularly well-suited for data analysis in bioinformatics workflows.
• Dockerfile: https://github.com/seqeralabs/custom-studios-examples/blob/master/marimo/Dockerfile
• Built image: ghcr.io/seqeralabs/custom-studios-examples/marimo:1.1.2
The Dockerfile for our Marimo Studio follows the standard pattern we've established. We start with the connect client base:
For our application base, we're using a slim Python image and adding the innovative uv package manager for faster dependency resolution:
One of the benefits of using uv is its significantly faster installation times compared to pip, which is particularly helpful when building containers. We then install Marimo directly:
After configuring the port and installing the connect client as in our other examples, we set the command to start the Marimo editor:
The --no-token flag ensures we don't need additional authentication when accessing Marimo through Seqera Studios, and as with our other examples, we use the $CONNECT_TOOL_PORT environment variable to ensure proper communication with the Platform.
When you launch a Marimo Studio in the Seqera Platform, you'll be greeted with a clean, modern interface where you can create and edit reactive notebooks. This environment is particularly useful for bioinformatics workflows where you need to iteratively explore and analyze data.
💡Note: One limitation to be aware of: Marimo doesn't support opening the same notebook in multiple tabs to avoid state conflicts. While they've recently added features to address this, we recommend working with one notebook at a time in your Studio environment.
When combined with Seqera's data management capabilities, Marimo becomes a powerful tool for analyzing workflow outputs. You can create data links pointing to your S3 buckets containing workflow results and access them directly in your Marimo notebooks through the /workspace/data path, enabling seamless interaction with your pipeline outputs.
Example 2: Streamlit
Streamlit is a popular open-source Python framework that enables easy creation of interactive web applications. Hosting your Streamlit app with Studios allows direct access for your app to your S3 storage via Fusion, allowing you to write apps that can access data from your cloud storage as if it’s local storage. For our example, we are going to use the demo of MultiQC within Streamlit. MultiQC is a quality control framework developed by Seqera that allows you to get interactive QC reports for your omics operations. This Docker image highlights how file loading functionalities within Streamlit can be leveraged with Fusion to give streamlit access to S3 without any additional app modification.
• Dockerfile: https://github.com/seqeralabs/custom-studios-examples/blob/master/streamlit/Dockerfile
• Built image: ghcr.io/seqeralabs/custom-studios-examples/streamlit:1.1.2
The Dockerfile for a Streamlit application is built using the same pattern as other examples here, we start with the same ‘FROM’ line necessary to get the connect dependencies:
The base image for our second stage in this Dockerfile is python-slim:
That provides us with the Python components we need as we clone our Streamlit example and install its dependencies:
Then, after installing the Connect client and setting our entry point as we covered in ‘General principles’, we can go ahead and start the application:
You can consult the Streamlit documentation to understand what all of those options are, but note the important usage of CONNECT_TOOL_PORT, which will provide that vital line of communication between Studios and your application.
Loading files from S3 via Fusion
The MultiQC Streamlit example supports three ways to load data:
- URL: Load data directly from a web URL
- Local Files: Access files from your local machine
- Server Paths: Load files directly from S3 via Fusion
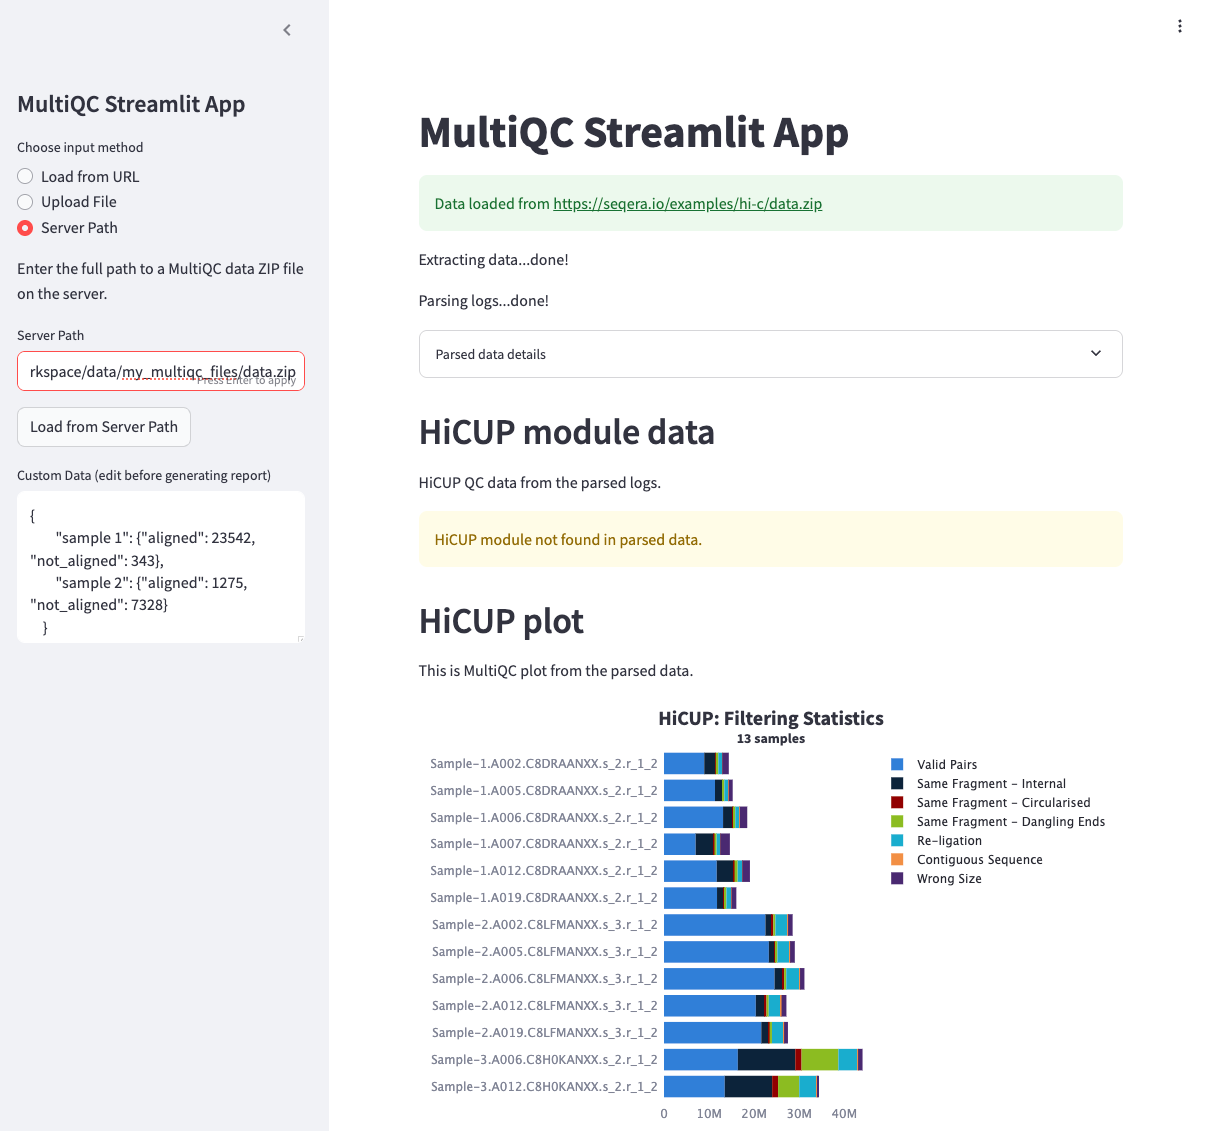
When you create a data link in Seqera Studios, the linked data is automatically mounted at /workspace/data/<data_link_name>. This makes it easy to access your data in the container, for example as follows:
- Upload your MultiQC data (e.g.,
data.zip) to your S3 bucket - In Seqera Studios, create a data link named
my_multiqc_filespointing to that S3 path - The data will be available in the container at
/workspace/data/my_multiqc_files/data.zip - Use this path in the Streamlit app's "Server Path" input field
This seamless integration between Streamlit and Fusion's data mounting means you can build interactive data applications that directly access your S3 data, without the complexity of managing data transfers or URL-based access.
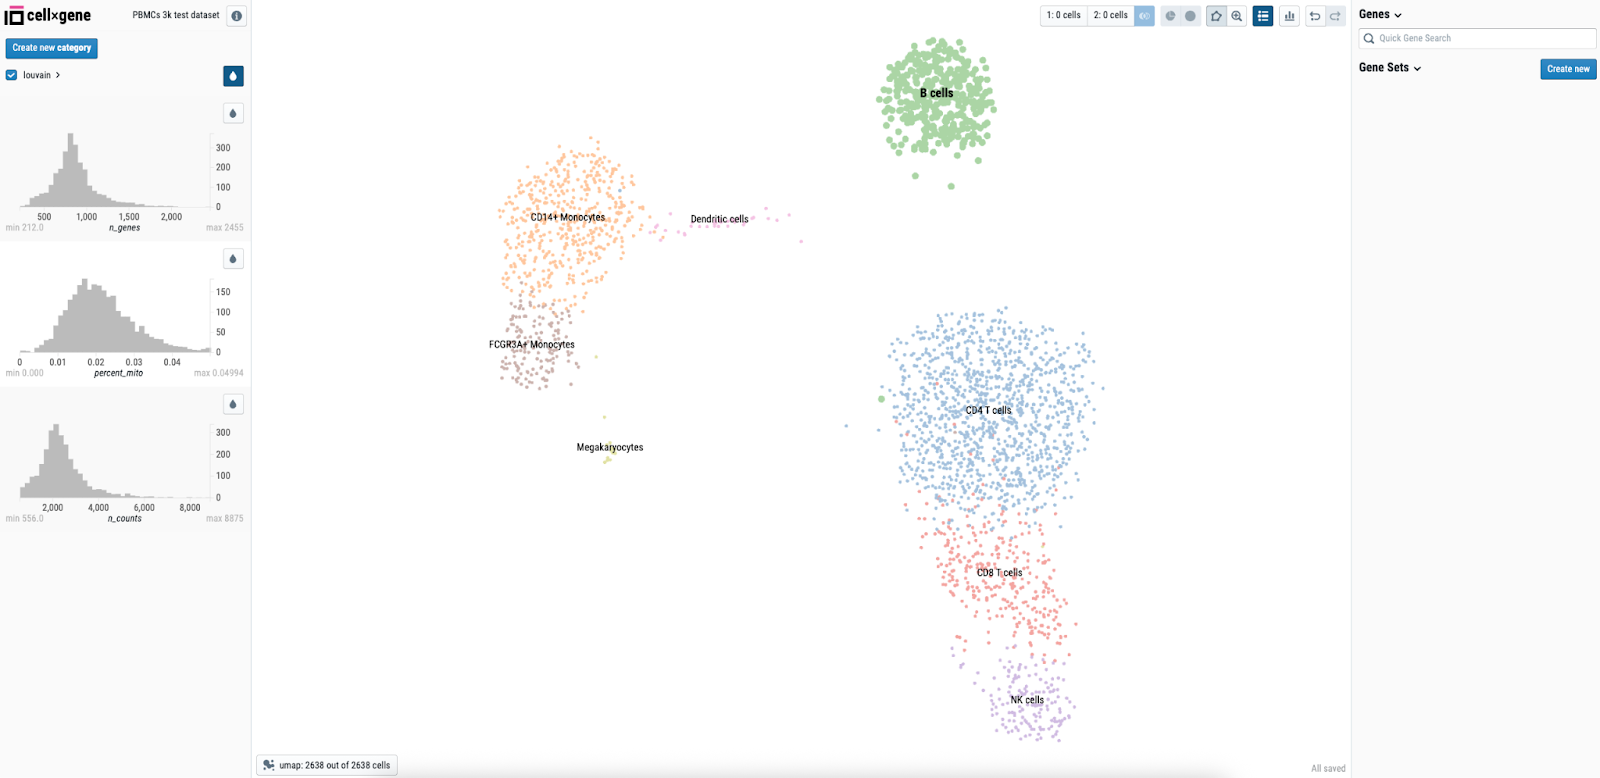
Example 3: CELLxGENE
CELLxGENE is a popular interactive, data visualization tool for single-cell and spatial omics data that allows you to explore, analyze and annotate your single-cell data.
• Dockerfile: https://github.com/seqeralabs/custom-studios-examples/blob/master/cellxgene/Dockerfile
• Built image: ghcr.io/seqeralabs/custom-studios-examples/CELLxGENE:1.1.2
The image for this application starts similarly to Streamlit, with the lines for supplying Connect:
and using the python-slim base image:
Then we supply the install command for the application itself:
Next, we’re going to define a couple of environment variables the user will be able to use to control application behaviour:
We’re going to build the CELLxGENE application so that users can supply their own input files, so we’re going to use that convert_path() trick we discussed earlier. Here’s what the whole command looks like:
This uses a heredoc to provide custom Bash logic in the CMD instruction. The convert_path() function automatically converts cloud storage paths (like s3://my-bucket/data/file.h5ad) to local Studio paths (/workspace/data/my-bucket/data/file.h5ad). Users simply mount their bucket in Studios and provide any S3 URI from that bucket - the function handles the path translation automatically.
Once we define the function we can use it to convert our input bucket URI:
… and then start the application:
Note that we point host to localhost and the port to the CONNECT_TOOL_PORT set by the connect library. Additionally, we provide a directory to write the user generated data and annotations by CELLxGENE. The example points at a default path on the EC2 instance, but we can point at any valid local path or use the same path conversion trick as we used for the input file to output annotations to S3 as well- see the complete example on GitHub. If you want to use a different path on the EC2 instance, don’t forget to first create the path with mkdir:
When we now launch the Studio, we should see CELLxGENE startup with the dataset we specified using the environment variable loaded:
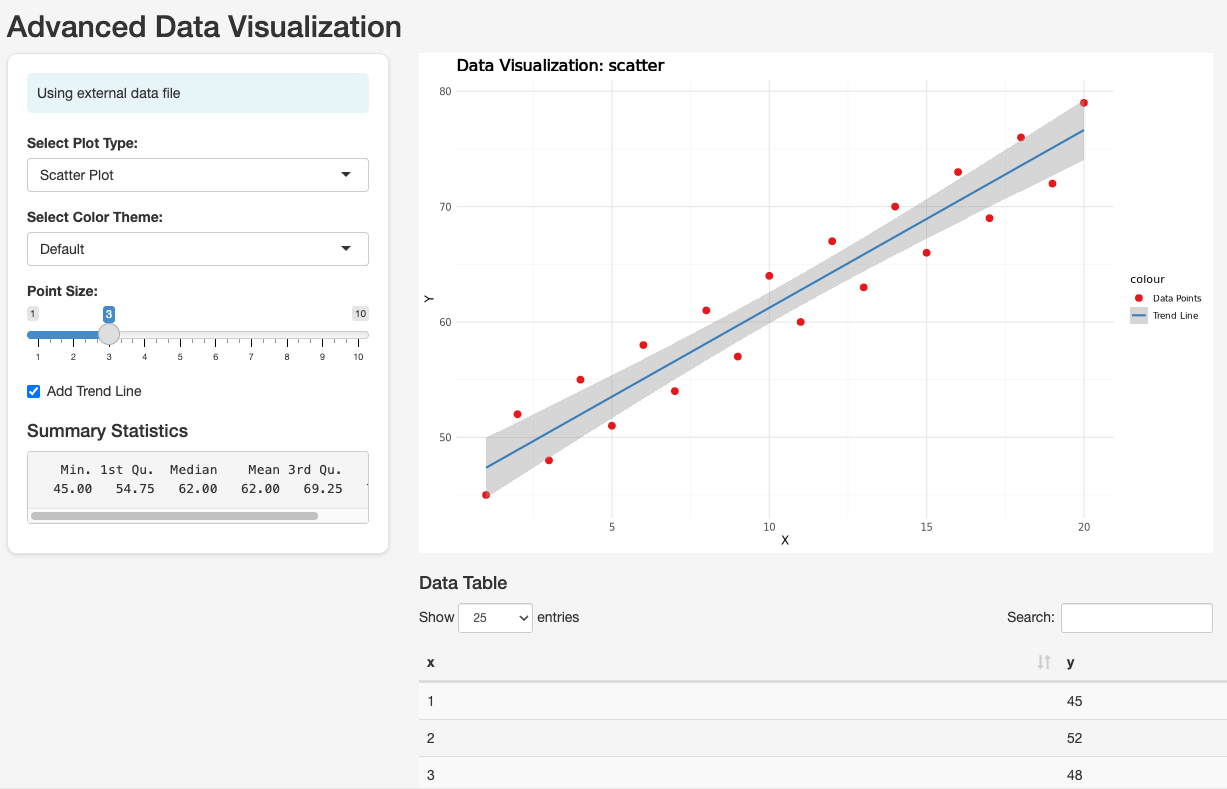
Example 4: Shiny Apps
Shiny is a popular tool for building web applications from R or (more recently) Python. When you run a Shiny application on a host machine, it serves its output over HTTP via a configurable port, making it an ideal Studios candidate. Here, we’ve prepared an example to show how that might work.
• Dockerfile: https://github.com/seqeralabs/custom-studios-examples/tree/master/shiny-simple-example
• Built Image: ghcr.io/seqeralabs/custom-studios-examples/shiny:1.1.2
If you consult the example Dockerfile for this Studio, you’ll see the same preamble where the base container is applied, and we do some standard package updates. Then, we install the Shiny R package, and you’ll notice that we do that with micromamba:
This is usually quicker and less error-prone than using R’s internal package management. After those lines, we initialize Connect as we described earlier.
Now we’re going to set an environment variable again allowing the user to supply an input bucket path:
Then copy the application script into the container:
You can check out the app code here. We’ve written this R app with a something equivalent to the convert_path() Bash function in the apps above:
So users can once again just supply bucket paths as input. Otherwise, it’s doing some simple things familiar to those used to Shiny—generating a plot and an output table.
The app refers directly to a file under /workspace/data, which we will make available using data links, as we discussed earlier. As usual, the Dockerfile must configure the entrypoint:
But the real action happens in the last step, when we actually start the application, and serve it on the port provided to us by Studios:
At runtime, the Shiny application will start, referencing the file provided via a data link. Anyone in the associated Platform workspace can access the application, and will have their own private sessions.
TTYD: Adding a terminal to an arbitrary container
• Dockerfile: https://github.com/seqeralabs/custom-studios-examples/blob/master/ttyd/Dockerfile
• Built image: ghcr.io/seqeralabs/custom-studios-examples/ttyd:1.1.2
Sometimes, you don’t need a fully-featured VS Code interface, all you want is terminal access to an instance of a container with your favourite tool installed. In this example we use a container with the popular bioinformatics tool Samtools as the base, and inject the popular web terminal TTYD:
As we described in ‘General principles’, for this to work the container must provide package management via apt-get or yum, but otherwise this can be a useful shortcut spinning up arbitrary containers in Studios.
Build and deploy the applications you need with Studios
Custom Studios let you bring the tools you need directly into your workflows - whether that’s a lightweight Python notebook, an interactive QC dashboard, or a full-featured R Shiny app. With just a bit of Docker knowledge and some help from Seqera Platform features (e.g. data links and Fusion) you can go from idea to deployed app in no time. We’ve walked through the basics, highlighted some examples, and shown how flexible the system can be. Now it’s your turn to give it a try - what will you build?
💡Interested in learning more about Studios? Visit the product page or request a demo nowRequest a Studios Demo
Resources
All of the Dockerfiles for the custom Studio recipes presented in this blog can be found on the companion GitHub repository, alongside all of the pre-built container images.
Additional information and resources about custom Seqera Studios can be found at:
• https://seqera.io/blog/data-studios-custom-environments/
• https://docs.seqera.io/platform-cloud/studios/custom-envs