
Best Practices for Deploying Pipelines with the Seqera Platform (formerly Nextflow Tower)
Nextflow is a bioinformatics workflow manager that provides a robust command line interface for the management and execution of pipelines. While the typical use of Nextflow is fine for those comfortable with the command line, increasingly, developers are looking for ways to make pipelines accessible to others through intuitive web interfaces.
Building custom web interfaces to launch, monitor, and manage pipelines is time-consuming, tedious, and expensive. A better solution for Nextflow users is to adapt their existing pipelines to use the Seqera Platform, an intuitive, web-based interface for deploying and managing Nextflow pipeline executions. The Platform is useful for launching workflows, monitoring their progression, tracking provenance, and sharing results.
In this article, we introduce the Seqera Platform and provide a step-by-step guide that explains how to deploy pipelines on the Platform using freely available tools from the nf-core framework. This article assumes that readers have a basic knowledge of tools such as Nextflow, Conda, and Git.
The Seqera Platform
The Seqera Platform is an intuitive, centralized command post that enables data analysis at scale. With the Platform, users can easily launch, manage, monitor and scale their Nextflow data analysis pipelines on any of the major cloud providers as well as on-premises HPC environments. Just as tools such as GitHub have made pipeline development collaborative, the Seqera Platform does the same for pipeline users. With the Platform, users can easily share pipelines, Datasets, resources, and prior pipeline runs. The Platform offers several advantages over traditional command line interfaces:
- →Pipelines are made accessible to non-specialists with minimal training.
- →Users can deploy pipelines in existing Compute Environments, both on-premises and in the cloud, without needing to know how the infrastructure has been configured.
- →The intuitive interface prevents pipeline submission errors that can result in costly errors that waste time and precious compute resources.
- →Researchers are made more productive by easily sharing pipeline runs and Datasets so that their colleagues can focus on interpreting results.
Nextflow has been available for almost a decade, and thousands of production pipelines exist. Most of these pipelines were not designed with web interfaces in mind. Fortunately, there is a straightforward way to adapt existing pipelines for use with the Seqera Platform.
Building Platform-ready pipelines
Making Nextflow pipelines Platform-ready will not affect existing functionality. Users can continue to launch pipelines from the command line or leverage in-house developed scripts. With minor additions it is possible to give users the option of launching Nextflow pipelines through the Platform Web UI.
Making a pipeline Platform-ready involves ensuring that two key files exist in the root of the pipeline repository:
- →nextflow_schema.json is a file used to store parameter related information including type, description and help text in a machine readable format. The JSON specification was implemented by the nf-core community and is part of their best practices for developing Nextflow pipelines. This file is used for various purposes including automated parameter validation, help text generation, and interactive parameter form rendering in UI interfaces including the nf-core website and the Seqera Platform.
- →tower.yml is a file that is automatically recognised by the Seqera Platform. It can be used to define specific Reports that can be presented via the Platform Web UI after the pipeline has completed.
Enabling an existing pipeline with the Platform involves the following high-level steps:
- →Download and install nf-core tools
- →Prepare the pipeline to be Platform-ready:
- Create a nextflow_schema.json file by running the nf-core schema build command
- Create a tower.yml file - →Push the changes made to your pipeline to a source code repo such as GitHub, GitLab or BitbucketDeploy and test the pipeline on the Seqera Platform.
The nf-core framework
Nextflow users may already be familiar with nf-core, a community effort to collect a curated set of analysis pipelines built using Nextflow. The framework provides more than just pipelines and reusable modules. It also provides tools and templates to help developers build scalable Nextflow pipelines with minimal effort.
The nf-core community actively develop and maintain a Python package nf-core/tools which is primarily used to automate various aspects of the framework. One of several tools available in nf-core/tools is the nf-core schema tool which automates building the nextflow_schema.json file required by the Platform. Even if you are developing pipelines for your own purposes with no intention of contributing to nf-core, these tools can help streamline pipeline development.
A sample pipeline
To illustrate making a pipeline Platform-ready, we start with a simple RNA sequencing pipeline included in the Nextflow Training materials. Users that wish to follow along can download the pipeline and related training materials as follows:
You will find the pipeline and sample data in the nf-training directory. The RNA sequencing pipeline below is called script7.nf.
Step-by-step Platform integration guide
Download and install nf-core/tools
While it is possible to build the nextflow_schema.json file by hand, it is much easier to use nf-core/tools. The procedure for downloading and installing nf-core/tools is explained in the documentation.
After downloading and installing the nf-core tools, run nf-core -- help to verify that nf-core/tools has been installed and is working correctly:
Prepare the pipeline to be Platform-ready
Before creating the nextflow_schema.json, we need to inspect our pipeline code and ensure that input and output paths are parameterized. Hardcoding paths in pipelines is poor practice because it inhibits pipeline portability.
In Nextflow, the params scope allows developers to define parameters accessible by the pipeline script. Parameterized values can differ depending on the environment, so we would like to expose these parameters through the Platform web UI when launching a pipeline. We can also provide documentation for each parameter to help end users enter appropriate values.
Key parameters for the simple pipeline from the Nextflow training materials are as follows:
Run the nf-core schema build tool
Run the nf-core schema build tool to generate or modify a nextflow_schema.json file. The schema build tool assumes that the top-level file in the pipeline is called main.nf. In our example, we renamed script7.nf to main.nf.
If a nextflow_schema.json file isn’t already present in the root of the pipeline repo then the schema build tool automatically creates one based on the parameters defined in the pipeline. In this example, the schema build tool finds four parameters as expected:
The error message above is expected the first time the command is run because a schema file doesn’t exist. You can ignore the warning messages generated by the tool. For consistency, nf-core pipelines typically have parameters that fall into pre-defined groups, including “reference_genome_options”, “institutional_config_options”, etc. Groups refer to collections of parameters. Our simple pipeline does not have parameters that fit neatly into the categories expected in a typical nf-core pipeline, so the empty groups are removed.
If the nf-core schema build tool detects valid parameters, you will be invited to customize the nextflow_schema.json file using the online nf-core parameter schema builder tool as shown:
After opening the generated URL, developers will be presented with an interactive interface to customize parameters and their associated groups directly in a web browser. Developers can perform a variety of tasks through the web UI:
- →Organize parameters into groups or re-order them using a drag-and-drop interface.
- →Define the types of parameters (String, Number, Integer, or Boolean) that can be used for automated parameter validation.
- →Specify enumerated parameter values or provide regular expressions to validate the input syntax for string expressions. For example, you can validate an e-mail address using the following regular expression:
`"^([a-zA-Z0-9_\\-\\.]+)@([a-zA-Z0-9_\\-\\.]+)\\.([a-zA-Z]{2,5})$"` - →Provide a description and help text in markdown format to explain what each parameter does and when to use it.
- →Provide optional default values for parameters.
- →Make parameters mandatory or optional depending on the requirements of the pipeline.
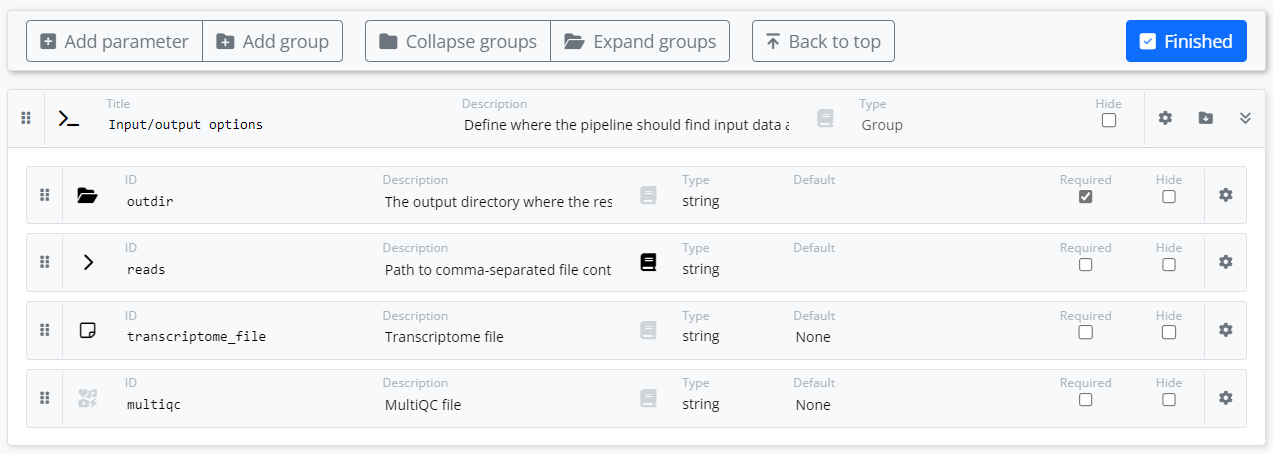
In the simple example below, we have dragged the four parameters associated with our pipeline into the “Input/output options” group created by the tool. We have annotated each parameter with an appropriate graphic icon that will be rendered in the Platform UI when launching the pipeline. We have also provided descriptive text for selected parameters and provided help text for the reads parameter.
We may want to enhance the pipeline so that we use Datasets on the Platform and allow a user to reference a CSV file containing information about multiple samples for the experiment.
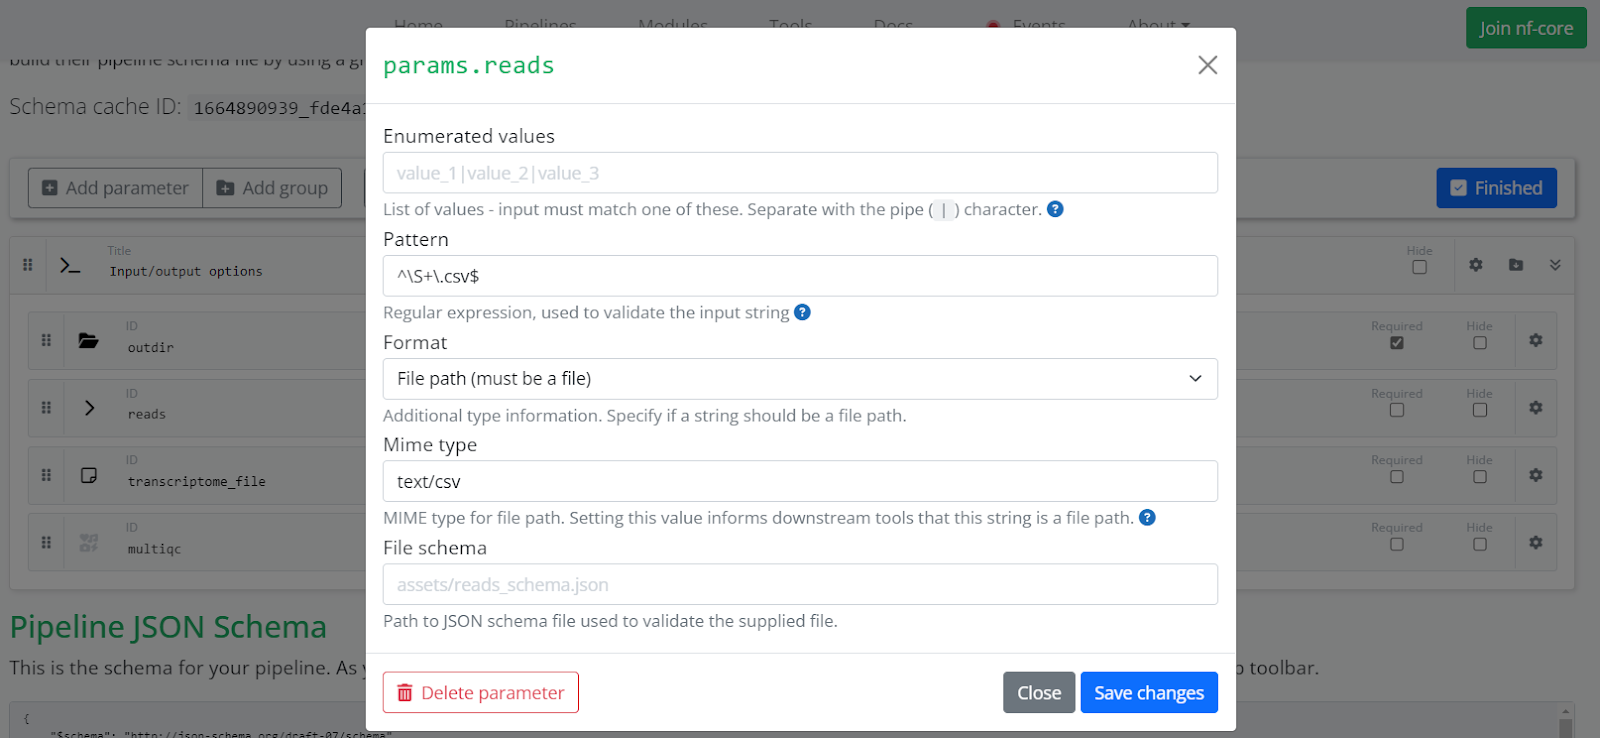
If a parameter specifies a file path (for example, our params.reads will expect a CSV file), set it as a string. Click the settings icon (the gear on the right) to set the Format to File path. This reveals a Mime type field. Set the Mime type to a value appropriate to the file type such as text/csv or text/tsv depending on the input file. Enter a regular expression in the Pattern field to validate the input. Defining these options in this way will instruct the Platform that the reads parameter can be used to select a Dataset in the parameters page when launching the pipeline.
You will see the nextflow_schema.json file being updated dynamically as you make changes through the web interface.
After you have finished editing the parameters, click Finish. The schema build tool will detect that you are done and save the changes to the local nextflow_schema.json file. You can re-run the nf-core schema build command as often as you would like and continue to make refinements to the parameters defined in the schema.
Validate your schema with lint
Like the lint tool commonly used with C and C++, the nf-core community provides linting tools to impose best practice conventions while developing Nextflow pipelines. The lint tool also checks the nextflow_schema.json file and it will fail if any syntax or configuration errors are found. You can validate the schema created in the previous step by running the command below from within the pipeline directory:
Create a tower.yml file
One or more steps in the pipeline may generate reports or results that are useful to view at the end of the pipeline execution. For users' convenience, the Platform allows us to make these reports easily accessible under a Reports tab through the Platform web UI.
To instruct the Platform where to find reports generated by the pipeline, the Platform requires a YAML file tower.yml that contains the locations of the generated reports. In our simple pipeline, the MULTIQC process step generates a MultiQC report file in HTML format.
A sample tower.yml file is below:
More extensive documentation can be found in the Seqera docs for Reports.
Push your code to a source code repo
Now our simple pipeline file has a nextflow_schema.json file and a tower.yml file, as shown below:
To make our pipeline accessible to the Seqera Platform, it must exist in a version controlled hosting service supported by Nextflow. We will use GitHub in this example, but Nextflow also supports BitBucket and GitLab. If you already have a GitHub account, create a new repo for the pipeline. We called the repo simple-pipeline in this example. You can make the repo public or private, depending on your preference.
Once the repo is created, if you have not already done so, initialize the pipeline directory with Git. Next, add the files, and push the changes to GitHub, at which point the pipeline will become accessible to the Platform.
Deploy and test your pipeline on the Platform
The Platform can be installed on-premises or in your preferred cloud. The easiest way to get started with the Platform is to use tower.nf, a hosted version of the Platform provided by Seqera. You can log in to the Platform and try it for free using a GitHub login and password or by supplying an e-mail address.
Once logged into the Platform, navigate to your personal Workspace by selecting the pulldown in the top left area of the screen and selecting the Workspace corresponding to your login name. You can experiment in this private area without your pipelines and runs being visible to other Platform users.
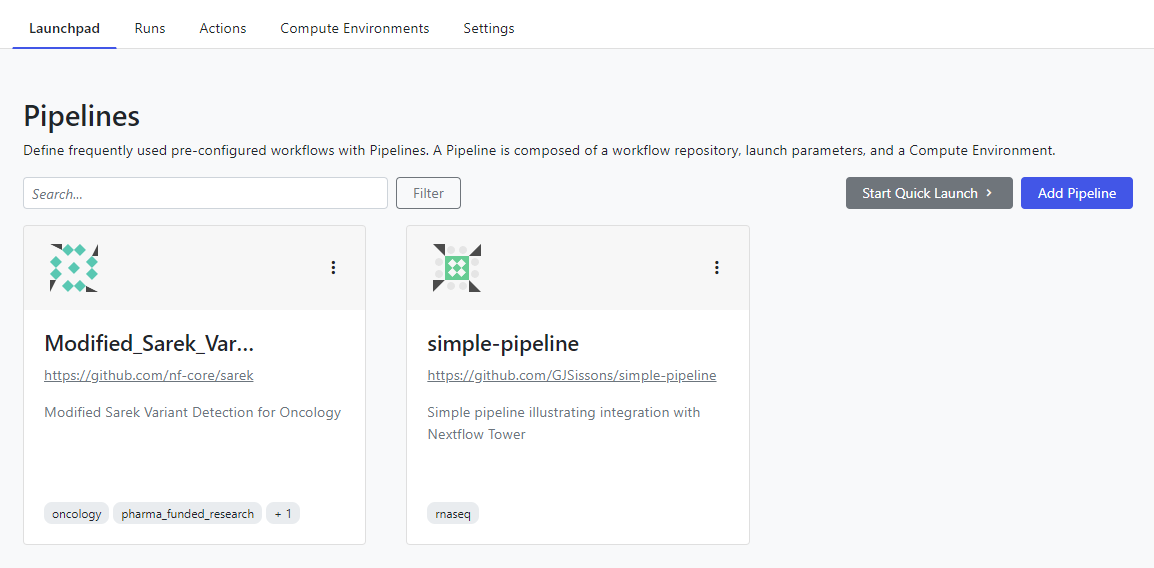
Navigate to the Launchpad tab, select Add Pipeline and fill in the appropriate details. On the Seqera Platform, a pipeline is a bundle that contains workflow code (the repository), a Compute Environment where the pipeline will be run, and optional pre-sets that govern the behavior of the workflow.
You will need to supply the GitHub repository URL for the pipeline i.e. https://github.com/<github-account>/simple-pipeline.git. Before running the pipeline, you will need to define a Compute Environment. If you do not already have a Compute Environment setup, consult the Seqera Platform documentation for information on how to do this. Once you have finished, click Add and you will now see a launch icon for the pipeline in the Launchpad.
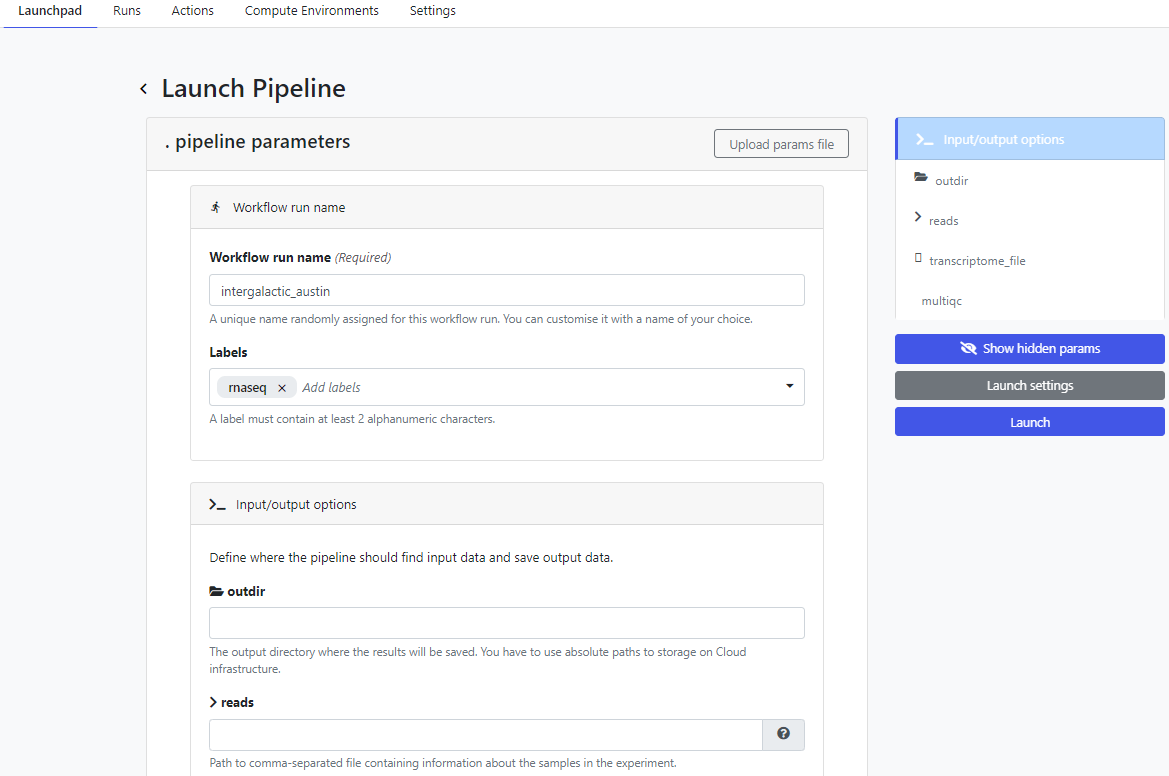
To run the pipeline on the Platform, click on the new simple-pipeline launch icon. The Platform presents the Launch Pipeline interface using the parameters read from the nextflow_schema.json file we created in the previous steps. Note that the four parameters associated with the pipeline are presented as we defined them using the nf-core parameter schema build tool:
Create a Platform-ready pipeline based on a template
We adapted an existing pipeline to work with the Platform in the above example. A better approach for developers rather than writing their Nextflow pipelines from scratch may be to start with the nf-core template pipeline. Details on creating a new nf-core pipeline based on a template are available in the Creating a new pipeline section of the nf-core documentation.
To create a new pipeline, run nf-core create as shown below and provide the appropriate responses to the prompts:
The command above creates a new rna-test pipeline directory and populates it with all the files required for an nf-core pipeline. Developers can read through these files starting with the README.md, which explains how to customize the pipeline. It is recommended to get familiar with the pipeline template because it is built following best practices. Even if you do not use the generated pipeline code and configuration files, the template provides helpful examples that show how to write Nextflow pipelines. These include:
- →Structuring pipelines into modules and subworkflows
- →Using standardised parameter definitions
- →Using profiles to abstract groups of parameters/configuration options
- →Best practices for defining labels and per-process resource limits
- →Best practices for configuring pipelines for automated testing
Developers are welcome to use nf-core/tools to create their own pipelines without feeling obliged to contribute them back to the nf-core community.
Summary
In the examples above, we have highlighted how developers can adapt existing Nextflow pipelines and publish them in repositories for direct execution on the Seqera Platform. This extra bit of effort makes pipelines accessible to those wanting to launch them via a UI rather than the CLI. Among the benefits of deploying pipelines on the Platform are that users can:
- →Launch pipelines using an intuitive web interface that allows you to easily customize parameters.
- →Leverage pre-existing Compute Environments already set up on the Platform, to avoid the hassle of configuring local or cloud-based Compute Environments for individual users.
- →View the progress and summary results of a pipeline run without needing to access the execution environment.
- →Share pipelines with others, enabling real-time pipeline execution monitoring and sharing results of prior runs.
- →Optimizing process resource requirements based on prior pipeline runs to rightsize resource requests resulting in significant cost savings.
You can create an account and test drive the Seqera Platform for free at https://seqera.io/platform/ and learn more about the nf-core framework at https://nf-co.re/.