
Introduction
The last 12 months have been nothing short of a revolution within AI. In particular, the widespread adoption of ChatGPT from OpenAI and the Stable Diffusion models. In January, the AI bot ChatGPT reached an estimated 100 million active monthly users, a mere two months from launch. This made it the fastest-growing consumer application in history. By comparison, TikTok took nine months to reach 100 million monthly users, and Instagram about 2.5 years. The latest GPT-4 model was just released by OpenAI in March of 2023 and continues to generate continued interest and controversy.
Within biology specifically, the AlphaFold release made huge strides forward in the fields of protein structure products. These advances are hard to fathom from my own early experience with ML a decade ago that began from coding up the basic HMM in the Sequence Analysis. These models formed the core of the Pfam/Rfam project in my first real bioinformatics role at Sanger Institute.
From a practitioner's perspective, there is no real technical distinction between core ML/DL workloads and the pipelines developed by bioinformaticians. Both share several common characteristics:
- →High-throughput computation
- →Heterogeneous compute requirements
- →Exotic resources, including GPUs and FPGAs
- →Embarrassingly parallel workloads
- →The need to quickly prototype in development
As it turns out, just as they are ideally suited to bioinformatics, Nextflow and Nextflow Tower are also well suited to compute-intensive model training and inference workloads.
To demonstrate the utility of Nextflow and Tower in running AI-oriented workflows, I decided to mock up a quick example using Stable Diffusion v2 – a popular text-to-image model. My goal was to explain the high-level mechanics and illustrate why expressing AI workflows in Nextflow can be advantageous.
We have seen a significant crossover from Nextflow users applying their knowledge of Nextflow to their own bio-based ML workloads. I wanted to explore developing a workflow for an AI workload unrelated to bioinformatics. The requirements were as follows:
- →A reproducible Nextflow workflow for Stable Diffusion v2.
- →Containerizing all dependencies for maximum portability.
- →Scalable cloud infrastructure, including on-demand GPU compute environments.
- →An API/UI for production monitoring, prompt entry, and display of image results.
About the Stable Diffusion model
Stable Diffusion is a model developed by Robin Rombach and Patrick Esser that can be used to generate and modify images based on text prompts. It is a Latent Diffusion Model that uses a fixed, pre-trained text encoder (OpenCLIP-ViT/H). You can test the model yourself using the hosted inference API maintained by Hugging Face.
For example, we can provide text input such as "The stay-puft marshmallow man from ghostbusters walking in Barcelona, Spain"
After loading the model and spending ~12 seconds computing the result on a high-end GPU, an image similar to the one below is generated.

The resource requirements for training deep learning models can be staggering. So much so, that authors have taken to stating the environmental impact of training their models. For example, training Stable Diffusion v1 required 200,000 hours on a powerful NVIDIA A100 GPU. It had an estimated carbon footprint equivalent to 15,000 kg of CO^2 when run in the AWS cloud.
We didn't want to contribute to global warming just to create a tutorial, so we focused our example on running inference rather than training workloads. While the resource requirements compared to training are trivial, they are still substantial. Each inference job takes 10-20 seconds of compute time on a dedicated NVIDIA A100.
Running the model via a Python script is straightforward. We simply call the script below with three arguments. A prompt describing the image, followed by the desired height and width of the generated image. The sample script is included below.
A quick word about our tutorial
At first glance, some people may look at the tutorial and say, “Wow - that looks like a lot of work!”
It’s important to remember, however, that Tower requires that you to set this up only once for an entire team. A few hours invested in getting the environment configured properly can result in huge time savings and productivity benefits down the line.
Among the advantages of running your AI workflows in Tower are that:
- →Pipelines, past runs, and datasets can be easily shared with colleagues.
- →Compute environments such as AWS Batch are provisioned automatically, and instances are only provisioned when they are required, helping minimize costs in the cloud.
- →You can easily select OnDemand or Spot instances depending on your requirements.
- →Tower enables you to be cloud agnostic — while this example is centered around AWS Batch, it is just as easy to use Azure Batch, Google Cloud Batch, Kubernetes, or a variety of HPC cluster environments with no changes to your code.
- →Nextflow and Tower integrate seamlessly with GitHub and other source code managers as well as popular container managers for a seamless developer experience.
- →Nextflow and Tower supports features such as resuming workflows after a failed step without relaunching the entire flow, saving both time and money.
- →Finally, Tower drastically simplifies debugging by placing the log files associated with containerized execution at your fingertips and allowing you to monitor execution in real time.
Our sample workflow
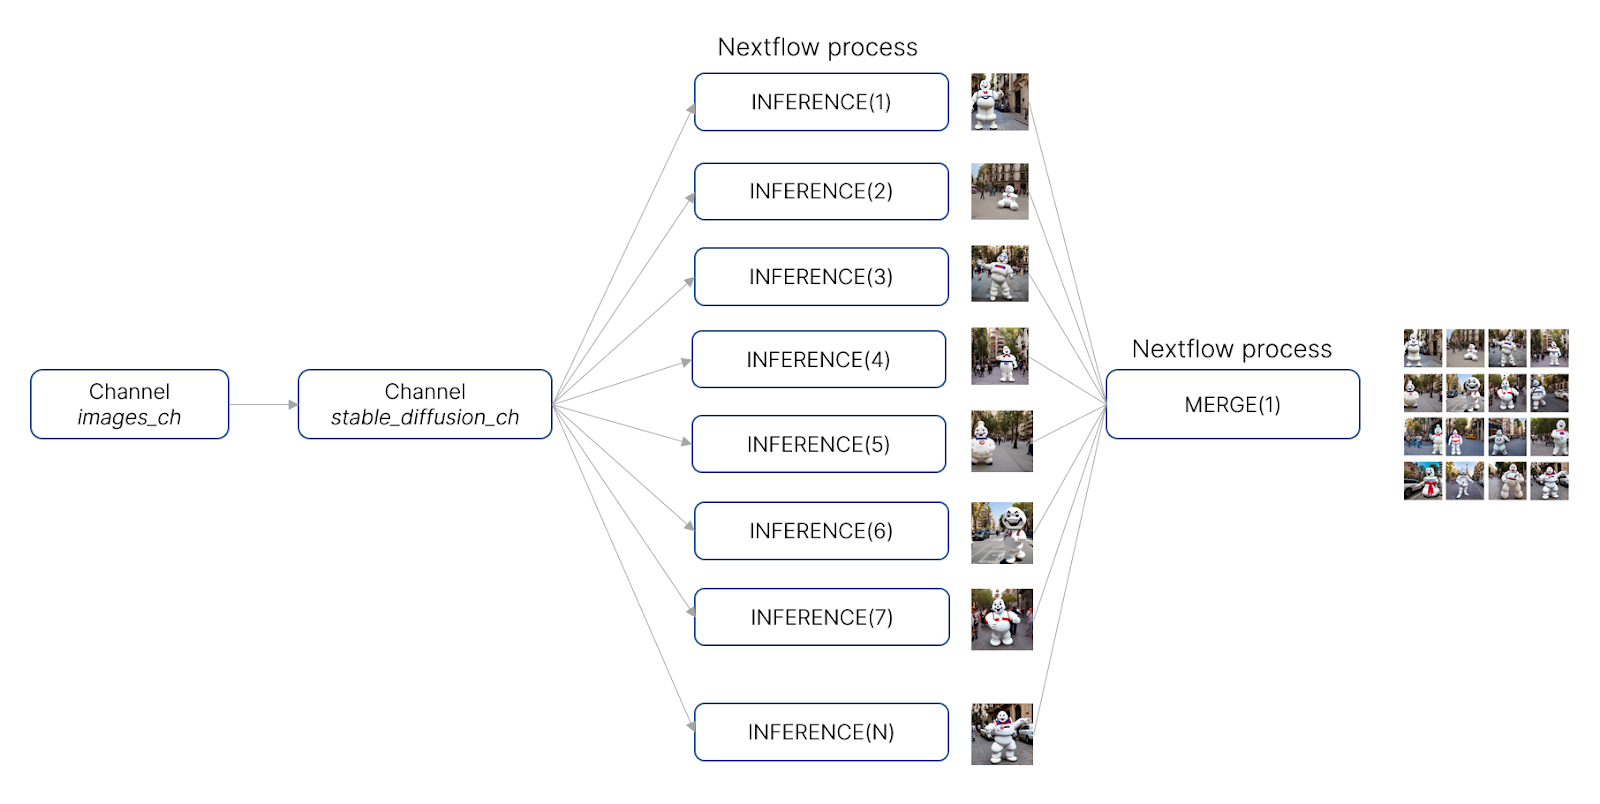
For our tutorial, we’ve created a simple pipeline that generates an arbitrary number of images using the Stable Diffusion model. The pipeline then consolidates the output image files into a “mosaic” using the montage tool included in the open-source Imagemagick distribution. The pipeline includes two processes:
- →INFERENCE(): A Nextflow process that accepts a number of parameters such as an image’s desired dimensions and a text prompt describing the image.
- →MERGE(): A Nextflow process that consolidates all of the images emitted from the various INFERENCE() tasks and that merges them into a single graphic image.
The workflow is illustrated in the diagram below:
For the latest source code, visit the repo at https://github.com/evanfloden/stable-diffusion-nf. The Nextflow pipeline code (main.nf) is reproduced below:
Step-by-step Tutorial
In our example, we use Hugging Face ⎯ a community data science platform that enables developers to build, train, and deploy ML models based on open-source technologies. We use AWS Batch as our compute environment for convenience since Nextflow Tower can deploy AWS Batch compute environments automatically.
An advantage of using Tower with AWS Batch for this type of workload is that we can access expensive GPU resources using EC2 Spot Instances pricing.
Setting up an environment to run the Stable Diffusion model with Nextflow and Tower, requires several steps:
- Obtain a
HUGGINGFACE_HUB_TOKEN. - Setup a dev environment and Nextflow code repository;Build and publish containers to run the workflow steps.
- Create an S3 bucket.
- Configure an AWS IAM user and obtain AWS credentials.
- Obtain a free Tower Cloud account.
- Create an organization in Tower Cloud.
- Configure a Tower secret to store the
HUGGINGFACE_HUB_TOKEN. - Create an AWS Batch compute environment in Tower supporting GPUs.
- Define a workflow in the Tower Launchpad.
- Launch and monitor the workflow.
We explain each step in detail below.
1. Obtain a HUGGINGFACE_HUB_TOKEN
Before using the Hugging Face hosted model and libraries, you must first create a Hugging Face account.
- Visit https://huggingface.com/join and register with your e-mail address and password.
- After validating your e-mail, log in to Hugging Face at https://huggingface.co/login.
- Next, navigate to https://huggingface.co/settings/tokens and create a new access token, as shown below. Since we are not contributing to Hugging Face code repositories in our example, we only need 'read' access.
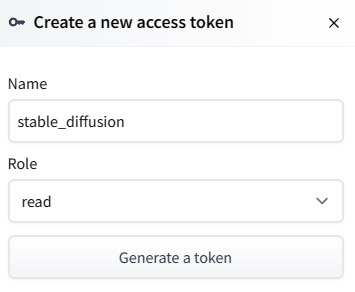
Click Generate a token and save the generated value. You still need this in a later step.
2. Setup a dev environment and Nextflow code repository
A working example of the Stable Diffusion demo with Nextflow and Tower is provided in the GitHub repo https://github.com/evanfloden/stable-diffusion-nf.
While you are welcome to use this repo with Nextflow Tower, it’s a good idea to clone this into your own GitHub repository so you can experiment with the code and make changes.
On a local machine (or cloud instance), clone the most recent dev branch of the repository to create a copy on your own machine:
This will pull all the files down into a local ./stable-diffusion-nf directory.
Next, log in to the GitHub website (or your preferred source code manager) and create a new repo called stable-diffusion-nf. When prompted, create the repo without a license, README, or gitignore files since you will supply these from your local system in the following steps.
From within your local ./stable-diffusion-nf directory containing the cloned repo, run the following commands to initialize git:
Next, from within the same directory, add the files in the local repository as shown, and stage them for an initial commit to the repo you just created in your personal GitHub account:
Now associate your local repo with the GitHub repo you created via the GitHub Web UI using the following commands:
GitHub no longer supports passwords when authenticating from a git client. It now requires that you have a personal access token (PAT). If you don’t already have a personal access token, instructions on creating one can be found in the GitHub documentation.
You will need to store your personal access token in a safe place because you will need it for git to process commands against your repo.
Next, push your initial commit to the main branch of your personal GitHub repo using the following command:
You will be prompted for your GitHub username and personal access token.
After entering your token, all the files will be pushed to your GitHub account in your own stable-diffusion-nf repo.
Now you can experiment locally and make changes to code using your favorite code editor. Suppose you edit the local main.nf file and wish to post the changes to your repo.
Your IDE may have a built-in git integration, but you can commit changes from the command line and push them to GitHub as shown:
3. Build and publish containers to Docker Hub
Before you can run the Stable Diffusion inference code in Nextflow, you need to create a container containing the necessary libraries required to run the model. Similarly, you will need a container with the Imagemagick binaries to support the merge process.
We explain how to build the container for the stable-diffusion container here. You can follow the same process to build and push the Imagemagick container using the Dockerfile contained in the source code repository.
You will find a sample Dockerfile, Makefile and conda.yml file in the project directory ./stable-diffusion-nf/containers/stable-diffusion.
The Dockerfile creates a new image containing Python and various Python libraries required to support the Stable Diffusion project.
The contents of the Dockerfile are shown below:
The shell variable $USER should be set to the local Linux username you will use to execute commands.
If you don’t already have make and docker installed in your local environment, you can install them using the following commands (or similar commands depending on your operating system):
With Docker installed, you can proceed to build a container based on the Dockerfile as shown:
Verify that your container image is available locally:
Now that you’ve prepared your container image, push it to your preferred container registry so that it will be available to Nextflow Tower in later steps. In this example, we are using Docker Hub, although you can use other registries supported by Nextflow as well.
If you do not have a Docker Hub account, visit dockerhub.com to create a free account.
Next, login to Docker Hub and supply your Docker Hub username and password.
Tag your container with your Docker Hub username and push the container to the repository.
For simplicity, set access to “public” within Docker Hub so that the Nextflow pipeline can retrieve the container image without requiring your Docker Hub credentials.
4. Create an S3 bucket to support your pipeline
AWS Batch will use an S3 bucket as a working directory to stage and share data during pipeline execution. You will need to create an S3 bucket by navigating to the Amazon S3 service in the AWS web console. You can optionally create an S3 bucket from the AWS CLI assuming you have it installed on your local machine.
- From the AWS S3 console, select Create bucket.
- Provide a globally unique bucket name.
- Specify the AWS region where your bucket will reside. When you use Nextflow Tower to configure a compute environment, you will want to use the same region for your AWS Batch service that you enter here.
- For purposes of our example, disable the Block all public access checkbox since our bucket will not contain any sensitive information.
- You can accept the rest of the defaults and scroll down to Create bucket.
- Once you have created the bucket, open the bucket and select Create folder and create a directory in the bucket called work.
- Select the Properties tab and make a note of the S3 URI for your bucket and work directory. It will be of the form
s3://<bucket-name>/work.
5. Configure an AWS IAM user and obtain AWS credentials
Before configuring an AWS Batch Environment in Nextflow Tower, we need to create an IAM user or role with sufficient permissions.
You can learn about IAM users and roles in the AWS documentation. The use of IAM roles is optional. If you do not use IAM roles, you must ensure that your IAM user has the minimum permissions required by Tower Launch and Tower Forge described below.
A complete explanation of IAM users, groups, and roles is too involved to cover here, but the high-level steps are as follows:
- From within the AWS console, select IAM.
- Select Users under Access management from the left panel.
- Create a user (for example, nextflow-user)
- Select the Permissions tab to add necessary permissions for the IAM user. The minimum permissions required for Tower are described here. If you are using Tower Forge to create your AWS Batch environment (recommended), you must also add the inline policy file described here. You will need the S3 URI that you created in the previous step to make sure that your IAM user has permission to read and write to the S3 bucket.
- In addition to the IAM permissions documented above, if you are using Secrets in your pipeline (as we do in this guide), you will need to add the AWS permission SecretsManagerReadWrite to the IAM user, group, or role. This is because Nextflow Tower uses AWS Secrets behind the scenes to securely store secrets such as the
HUGGINGFACE_HUB_TOKENcreated in step 1. - Navigate to Security credentials and create an Access key. Make sure that you save the Access key and associated Secret key because you will need these in a later step when you configure a compute environment in Tower.
6. Obtain a free Tower Cloud account
The next step is to obtain a free Tower Cloud account. The process is straightforward. Simply visit https://tower.nf and click Sign In in the upper right corner of the web page. You can sign into Tower Cloud using GitHub, a Google Account, or you can provide an e-mail address and Tower Cloud will authenticate your account by e-mail.
7. Create an Organization and Workspace in Tower Cloud
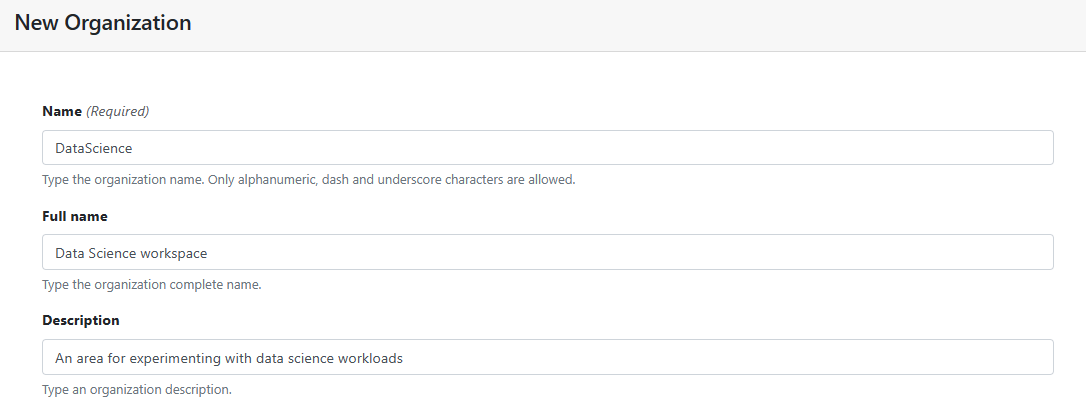
While not strictly necessary, it is a good idea to create an Organization and Workspace in Tower to securely store your pipelines, compute environments and datasets. Doing so enables you to share these resources with others if you choose.
Below we create a new Organization called DataScience.
- Login into your Tower account at https://tower.nf.
- Select Your organizations under the avatar on the top right of the Tower UI.
- Select Add Organization as shown below.
- You can upload an optional graphic icon to represent the organization.
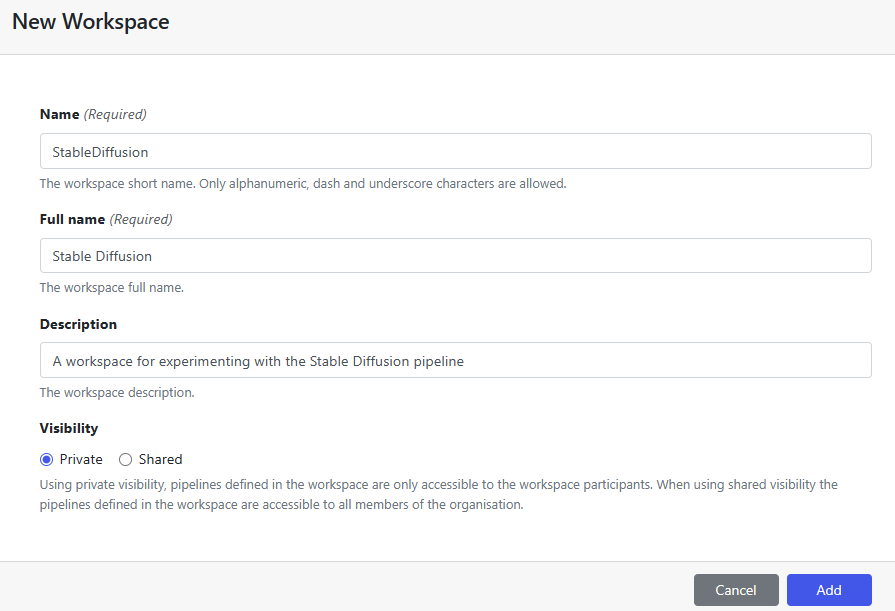
Within your Organization, you can create one or more Workspaces to contain pipelines, Datasets and compute environments. These Workspaces can be shared with colleagues.
Create a new workspace called StableDiffusion in the DataScience organization as shown and click Add.
You can return to the Your Organization option anytime to add or manage new Members, configure Teams, or invite external Collaborators to your Workspace.
- Return to the Tower Launchpad by selecting Launchpad at the top of the Web UI.
- Make StableDiffusion your active workspace by selecting this workspace under your account-name avatar at the top left of the web UI.

Now that you have a Workspace configured, you can proceed to store any secrets required for your workflow, compute environments, and pipelines.
8. Store your HUGGINGFACE_HUB_TOKEN in Tower
- From within the DataScience/StableDiffusion Workspace that you created above, select the Secrets tab
- Select Add Pipeline Secret and store the
HUGGINGFACE_HUB_TOKENthat you obtained in step 1. Your pipeline will require access to this Token at runtime - Once you have entered the Name and Value of the secret as shown below, click Add.
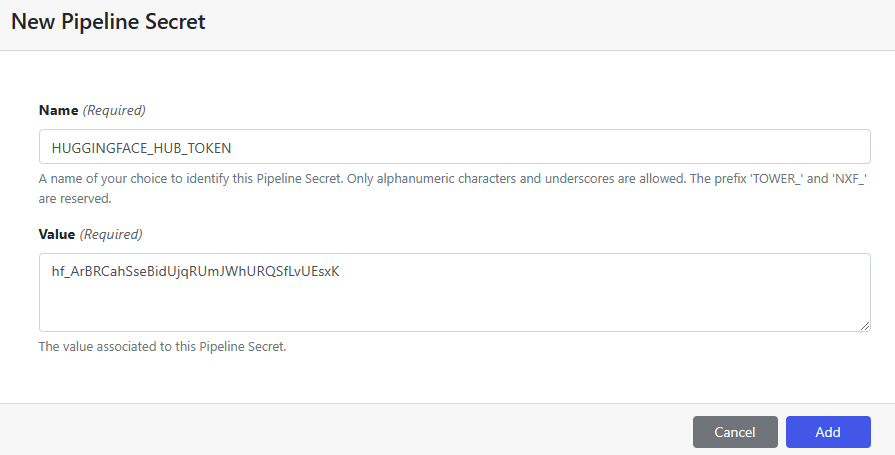
Your secret is now available for use within your Nextflow pipeline code. You can inspect the main.nf file in the project repo to see how the secret is referenced.
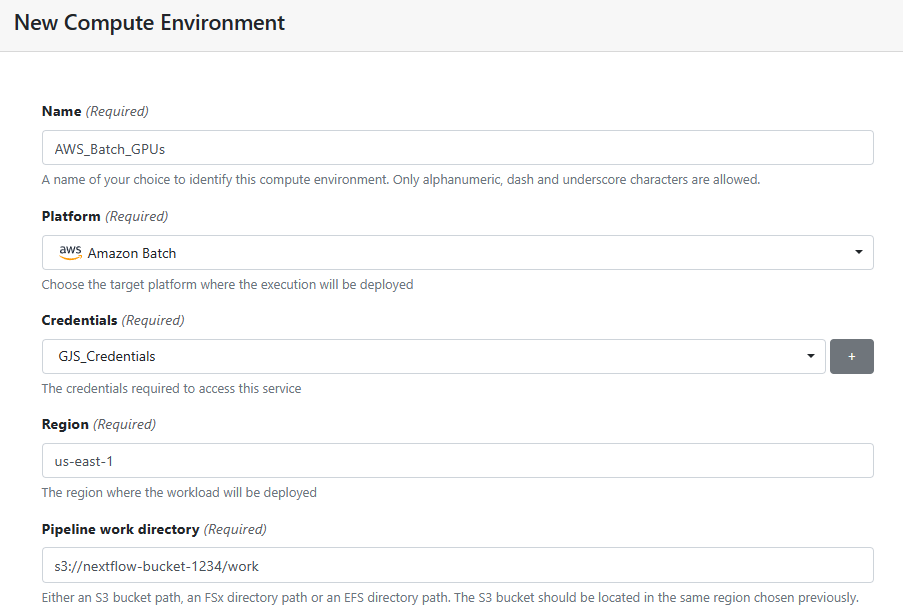
9. Create a Compute Environment in Tower
Now you are ready to create a compute environment. This compute environment will only be available to people that you invite to your workspace.
- Select the Compute Environments tab under the DataScience/StableDiffusion Workspace.
- Select Add Compute Environment.
- Give your Compute Environment a name (AWS_Batch_GPUs in our example) and select Amazon Batch from the list of available compute environments.
- Click the + symbol under Credentials to add the AWS Access key and Secret key associated with the IAM user account that you created in step 5.
- If you created an IAM Role, you can optionally enter it here as well.
- After adding your credentials, select the Region where you want AWS Batch to run your workloads. This should be the same Region where you created your S3 Bucket in step 4.
- Assuming your AWS Credentials are valid, click in the Pipeline work directory, and Tower should automatically retrieve the AWS Bucket that you added in Step 4. Specify the work directory at the end of the bucket name as shown below.
Continue defining your Compute environment, selecting default values unless indicated otherwise.
- →Unless you wish to use an existing AWS Batch Account, selecting Batch Forge for the Config mode is recommended. Batch Forge will automatically set up an AWS Batch environment with separate queues and AWS Batch compute environments according to best practices
- →For the compute tasks, you can decide on a Provisioning model for the underlying AWS Batch resources. Select Spot instances if you want to run at the lowest cost, but can tolerate longer runtimes. Please note that in some regions GPU instances are in high-demand so it is not always possible to get Spot resources quickly. A good practice is to clone your compute environment and create a separate environment that uses on-demand instances in case you find that Spot instances are hard to come by in your cloud region.
- →Nextflow Tower automatically configures the AWS Batch environment to use on-demand instances for the head node job to ensure that execution of the Nextflow pipeline itself is not subject to Spot instances being reclaimed.
- →Enter a value for Max CPUs. This value reflects the maximum number of vCPUs that will be made available in the Batch environment. The higher the value entered here, the more machine instances that can be provisioned and the more tasks that can execute concurrently
- →Select EBS Auto scale so that EBS volumes attached to cloud instances will automatically scale. This is a good practice for models that require the use of local scratch space, as it avoids tasks running out of space during execution
- →Select Enable GPU to have AWS Batch automatically select GPU capable instances.
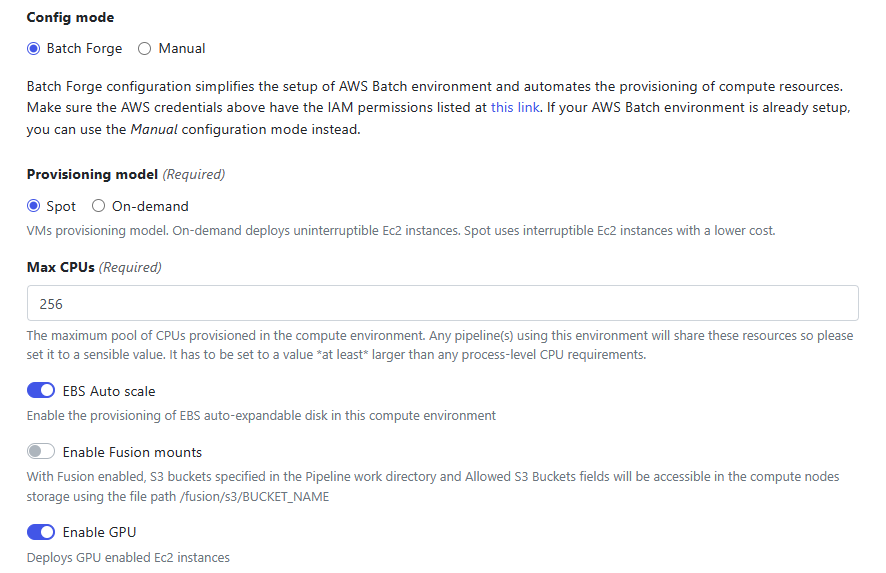
Depending on your version of Nextflow Tower, the Enable GPU switch may have the more descriptive label Use Amazon-recommended GPU-optimized ECS AMI. This is actually what Tower is doing behind the scenes. The GPU-optimized AMI already contains prerequisites such as CUDA libraries and is well-suited to a variety of deep learning frameworks such as Torch.
Customers with specialized needs can choose their own AMI and instance types in the advanced settings when configuring the compute environment, but it is easier to let Tower do the work.
Continue defining the pipeline accepting default values as shown below.
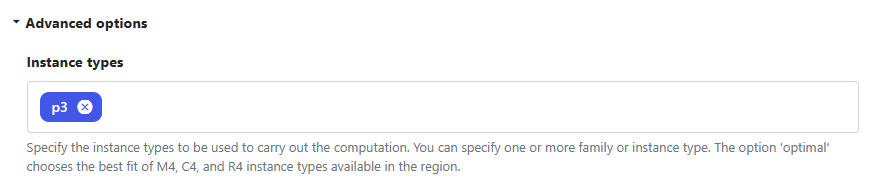
It is a good idea to select Dispose Resources so that Tower will instruct AWS Batch to automatically release expensive GPU instances when they are not in use. The P3 resources required by the Stable Diffusion model can get expensive quickly.
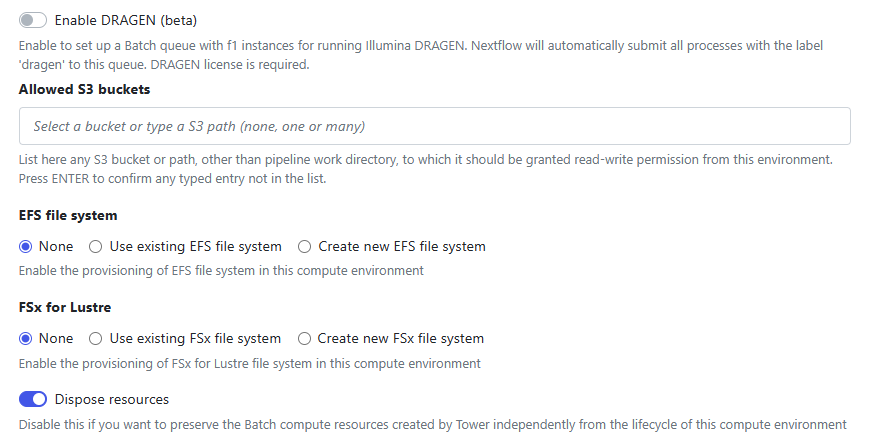
Under Advanced options, select the P3 instance type as shown. Amazon EC2 P3 instances are intended for machine learning and HPC applications. Depending on the instance type selected, instances feature up to 8 NVIDIA® V100 Tensor Core GPUs. To give you an idea of cost, the P3.2xlarge instance type with a single GPU, 8 vCPUs, and 61 GiB of memory costs $3.06 / hr at the time of this writing.
The AWS Batch service will deploy an appropriate number of EC2 P3 instances depending on your workload.
Scroll down to the bottom of the interface and select Add.
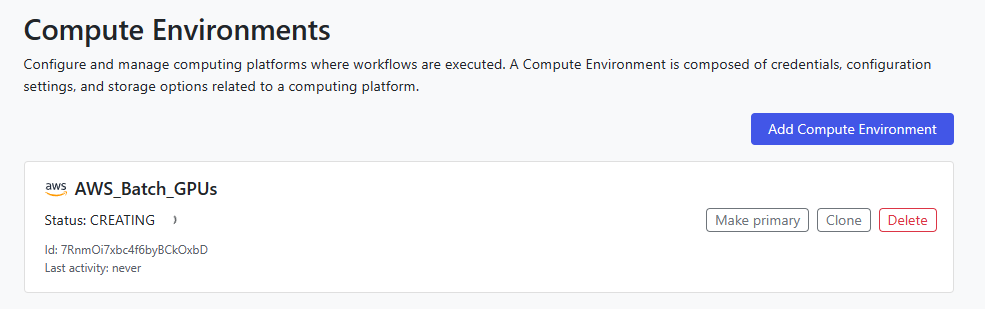
Assuming everything was entered correctly, Tower Forge will automatically create the Compute Environment and configure AWS Batch on your behalf as shown.
10. Define your AI workflow in the Tower Launchpad
Now that the Compute Environment is defined, we can add the Stable Diffusion Nextflow pipeline that resides in our GitHub repo under the Launchpad interface.
- →Select the Launchpad tab under the DataScience/Stable Diffusion Workspace and select Add pipeline.
- →You can optionally add Labels to help organize pipeline runs and make them searchable in environments with many users and pipelines.
- →Select the AWS Batch Compute environment that we created in the previous step.
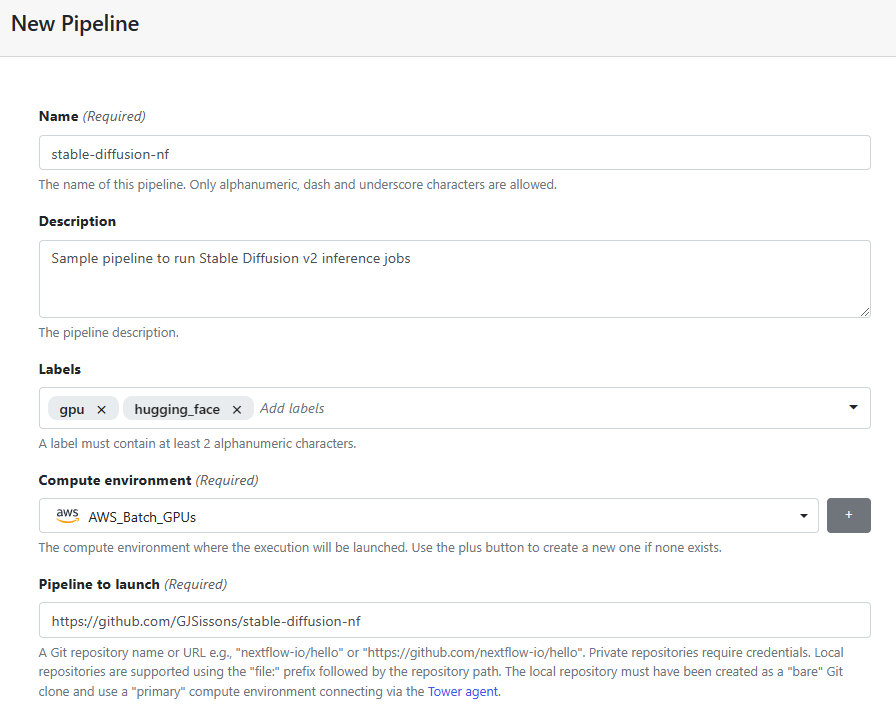
- →Under Pipeline to launch, enter the GitHub repository that you prepared in Step 2 containing your copy of the Stable Diffusion pipeline.
- →Under Revision number, select the branch, commit ID or tag associated with your pipeline. You can click in the field to retrieve available options from GitHub. In step 2 we created a single branch called main.
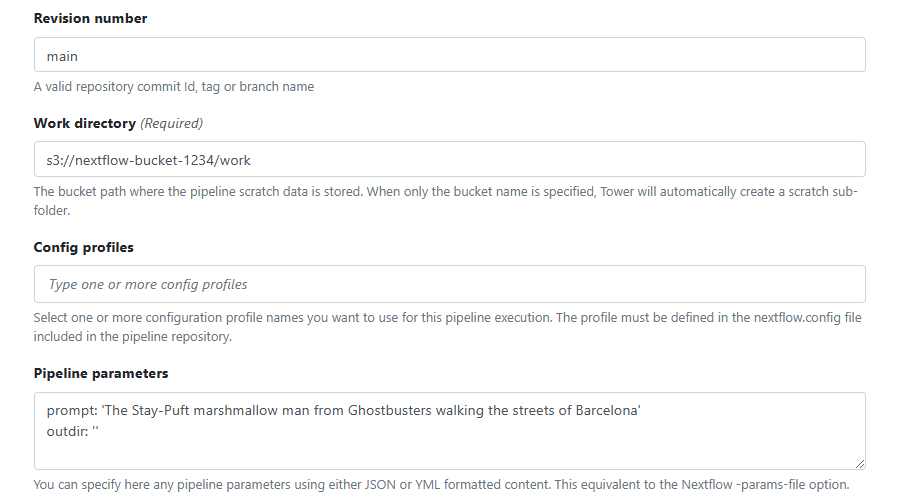
- →Confirm the Work directory where the pipeline will run. The Work directory associated with the compute environment will appear by default.
- →Optionally pass Pipeline parameters to the pipeline as shown in the Pipeline parameters field.
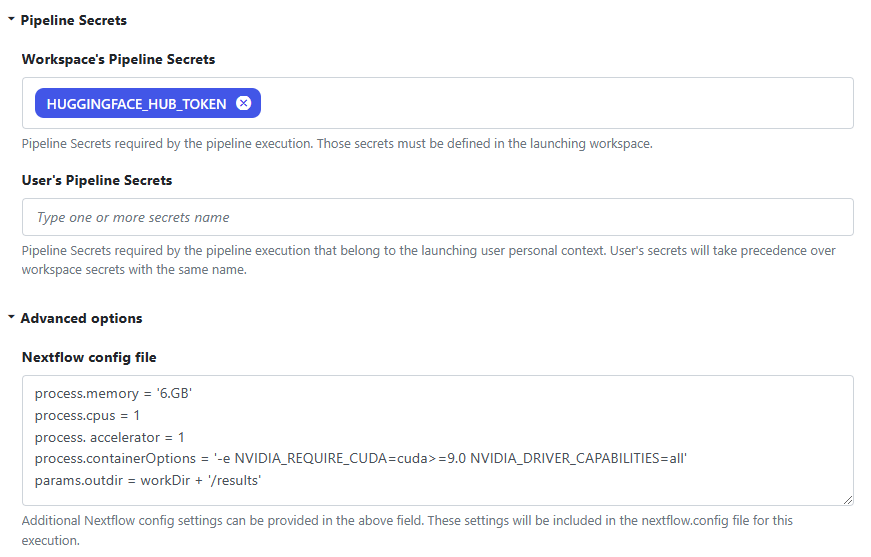
Under Pipeline Secrets, the HUGGINGFACE_HUB_TOKEN secret we defined in Step 8. will be automatically made available to the pipeline.
In the Nextflow config file we indicate resource requirements for each task in the Stable Diffusion inference workflow. Each task will require 6GB of memory and will consume a single vCPU and a GPU accelerator. We also define process.containerOptions to pass the NVIDIA_REQUIRE_CUDA variable into the container.
Select Add once you have finished defining the pipeline.
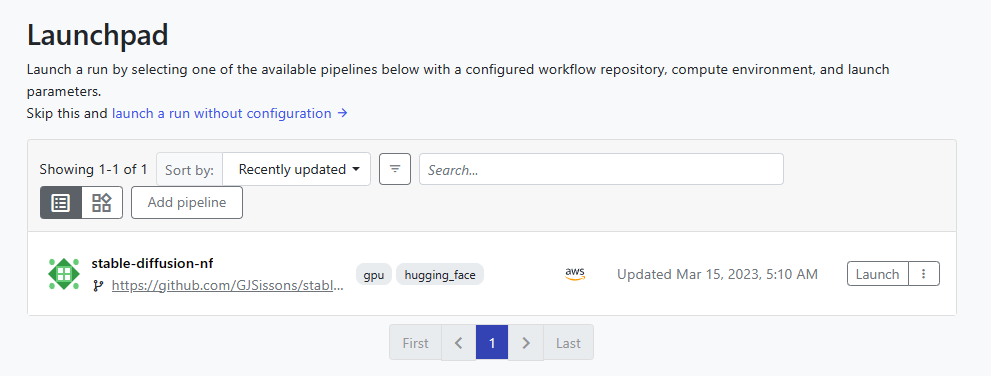
If everything is entered correctly, the pipeline should now be available under the Launchpad interface as shown.
11. Launch and Monitor the workflow in Tower
To launch the workflow, click the Launch button to the right of the stable-diffusion-nf pipeline added in step 10.
On the launch screen, you will be invited to enter parameters for the Stable Diffusion model. These parameters are defined in the nextflow_schema.json file in the GitHub repo.
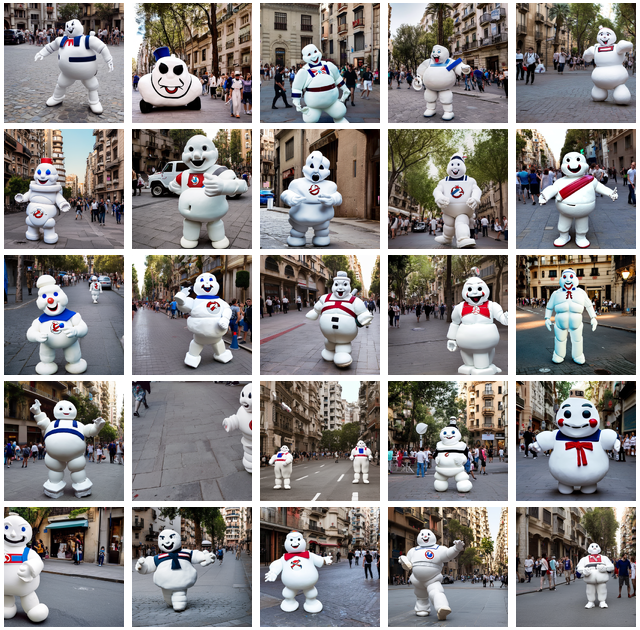
To generate a reasonable workload, we indicate that we want to generate 25 images that will be merged into a single mosaic. For fun, we ask the model to generate pictures of the Stay-Puft marshmallow man, but you can describe any image you would like as input to the stable diffusion model.
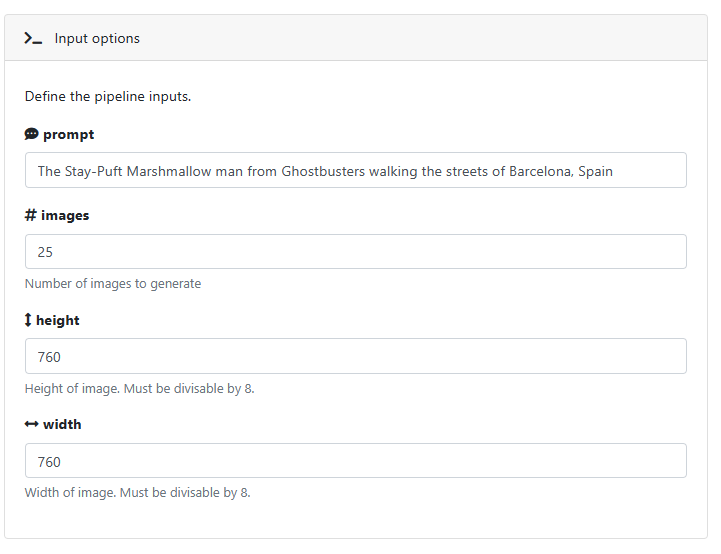
Click Launch after entering the parameters above.
You can monitor execution by clicking on the name of the pipeline under the Runs tab in the Tower interface. It will take a few minutes for the pipeline to get started, because the AWS Batch service needs to provision the P3 machine instances required for our inference workload.
You can optionally monitor progress through the AWS Console as AWS Batch starts EC2 machine instances to support the inference tasks. AWS Batch will start an appropriate number of VMs depending on the number of pending jobs.
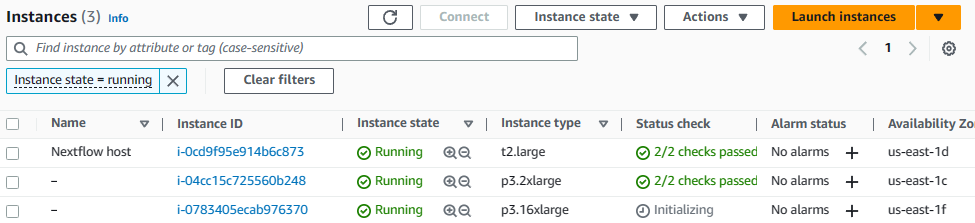
As shown above, AWS Batch starts running the initial tasks on a p3.2xlarge instance, and realizing that several jobs are pending it automatically starts a larger p3.16xlarge with 8 x NVIDIA V100 GPUs instance to complete the workload more quickly.
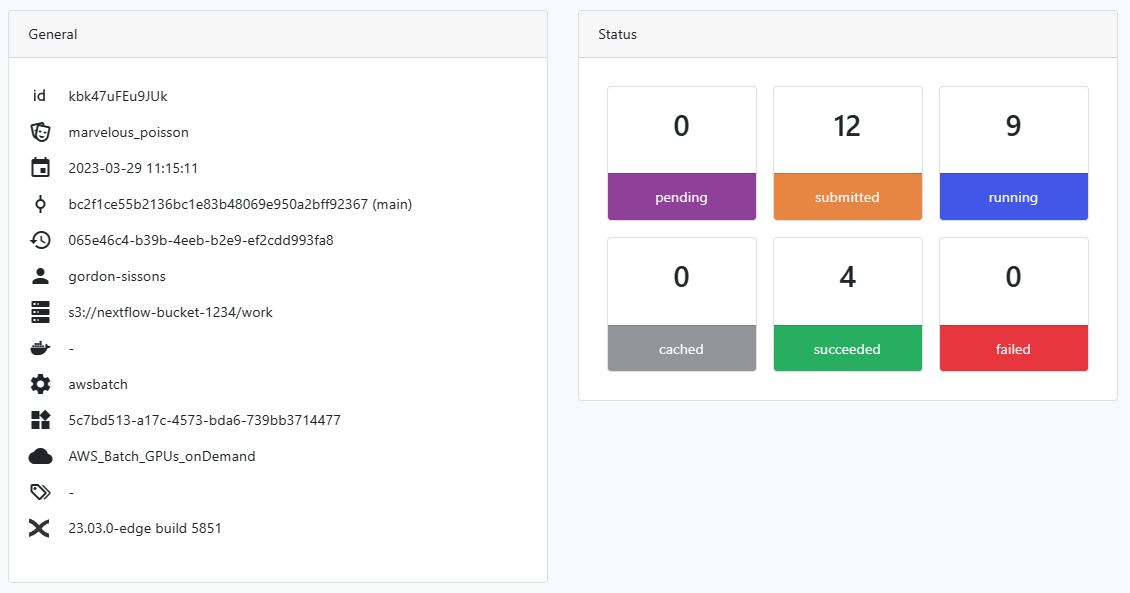
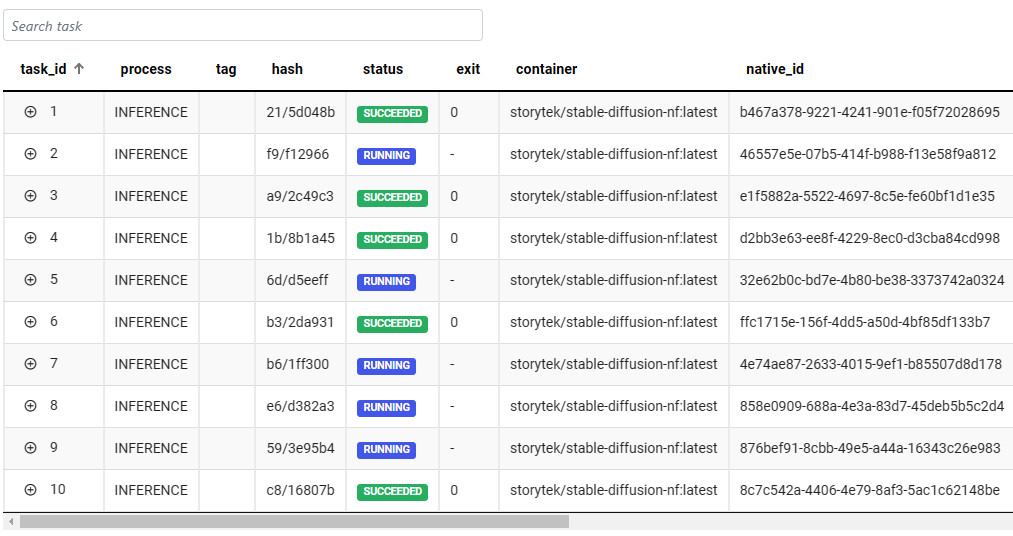
Through the Tower interface, we can monitor execution of all of the inference tasks, and drill into job details to make it easy to troubleshoot.
As each inference job completes, we can view the resulting image using the Reports tab through the Tower interface.
Once all 25 INFERENCE tasks have completed followed by the MERGE task, all files should be available via the Reports tab in Tower.
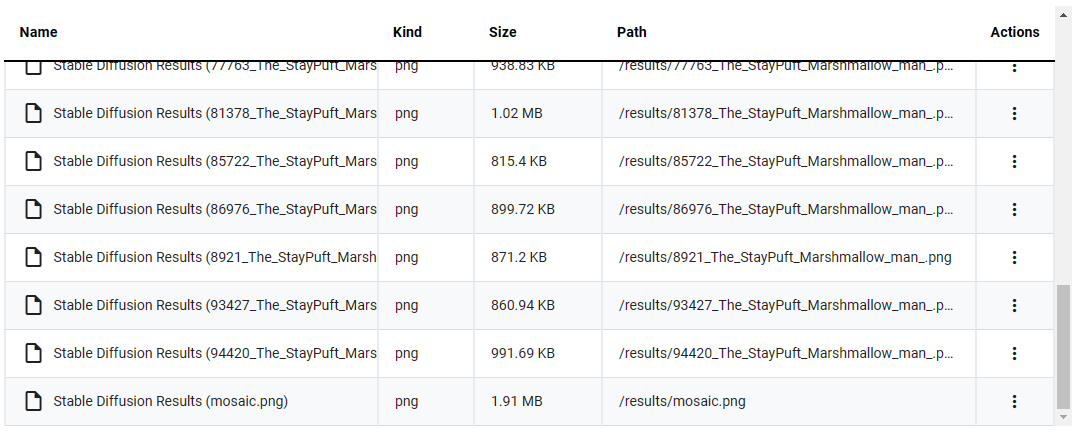
Our pipeline run generated the file mosaic.png pictured below:
Conclusion
As explained earlier, there are many advantages to running complex AI workflows using Nextflow and Tower. Among these reasons are the following:
- →Tower enables workflows, runs, datasets and compute environments to be easily shared with colleagues.
- →Compute environments such as AWS Batch are provisioned automatically, and instances are only provisioned when they are required, helping minimize costs.
- →You can easily select OnDemand or Spot instances depending on your requirements.
- →Tower enables you to be cloud agnostic — while this example is centered around AWS Batch, it is just as easy to use Azure Batch, Google Cloud Batch, or Kubernetes.
- →Nextflow and Tower integrate seamlessly with GitHub and other source code managers as well as popular container managers.
- →Process steps are cached, enabling you to recover workflows during development without need to re-run previously completed steps.
- →Debugging complex pipelines is simplified dramatically with easy access to log files through the Tower Web UI.
To learn more about Nextflow or Tower Cloud visit https://seqera.io. We offer regular free training sessions, and you can join a no obligation group demonstration at any time.