
In the world of container orchestration, Kubernetes has clear momentum. While Kubernetes has long been a hot topic with developers, it is now moving into the IT mainstream as enterprises accelerate their adoption of cloud-native technologies.
Unlike cloud batch services, Kubernetes was not built with scientific workflows in mind, and its complexity has been a barrier to adoption. However, this is beginning to change as Kubernetes distributions mature and organizations gain experience with the platform. Today there are solid reasons to consider Kubernetes as a compute environment for Nextflow:
- →Corporate adoption – As Kubernetes grows in popularity, it’s becoming easier for corporate IT departments to carve out a new tenant on a Kubernetes cluster rather than deploy a traditional HPC cluster.
- →Ubiquity – Cloud batch services are convenient, but they are cloud-specific, and not every cloud provider has one. By contrast, you can spin up a Kubernetes cluster on just about every private and public cloud.
Despite its advantages, Kubernetes can be daunting for first-time users. If you are fortunate enough to have an experienced Kubernetes administrator, they can help you prepare an environment that suits your needs. Otherwise, you may need to deploy a Kubernetes cluster on your own. While there are ways to deploy simple environments locally (e.g. minikube), these environments aren’t practical for production-scale workloads.
In this article, we explain how to configure an Amazon EKS cluster to support Nextflow pipelines.
About Kubernetes
Kubernetes (abbreviated as “K8s”) is an open-source container orchestration platform for automating software deployment, scaling, and management. Kubernetes was initially developed by Google, but the project is now maintained by the Cloud Native Computing Foundation (CNCF).
Today, there are dozens of Kubernetes distributions, and most cloud providers offer Kubernetes-as-a-service. Among the most popular Kubernetes cloud offerings are Amazon EKS, Google GKE, and Azure AKS.
Kubernetes is easily the leading environment for containerized application deployment. A recent survey conducted by the CNCF and released in February 2022 found that 96% of organizations are either using or evaluating Kubernetes – up from 83% in 2020. As enterprise adoption grows, Kubernetes is expected to also become an important platform for scientific workflows.
Nextflow and K8s: A high-level overview
For a long time, the only way to run Nextflow on Kubernetes was to provision a PersistentVolumeClaim (PVC) and launch Nextflow in a “submitter pod” within a cluster, using the PVC to store the work directory shared by Nextflow and its tasks. This setup is challenging because it requires users to know enough about Kubernetes to (1) provision their own storage and submitter pod, and (2) manually transfer input and output data to and from the PVC.
However, we announced a new service in October 2022 which unlocks some interesting possibilities for Nextflow and K8s. Wave is a dynamic container provisioning service – it can, for example, build a Docker image on-the-fly from a Conda recipe file, or augment an existing container with additional functionality.
What does Wave have to do with Kubernetes? Well, one of the main use cases for Wave is to augment task containers on-the-fly with the Fusion file system client, which allows the use of S3 buckets as a local file system in the container. This way, we can store the pipeline work directory in S3, which means (1) we don’t need to provision our own PVC, (2) we don’t have to run Nextflow within the cluster, and (3) we can have Nextflow stage input data from and publish output data to S3, rather than manually transfer files to and from a PVC.
Wave and Fusion greatly simplifies the use of Nextflow with Kubernetes, and it only requires a few lines in the Nextflow configuration. We will use this approach in the following step-by-step guide.
A high-level overview of the integration is illustrated below:
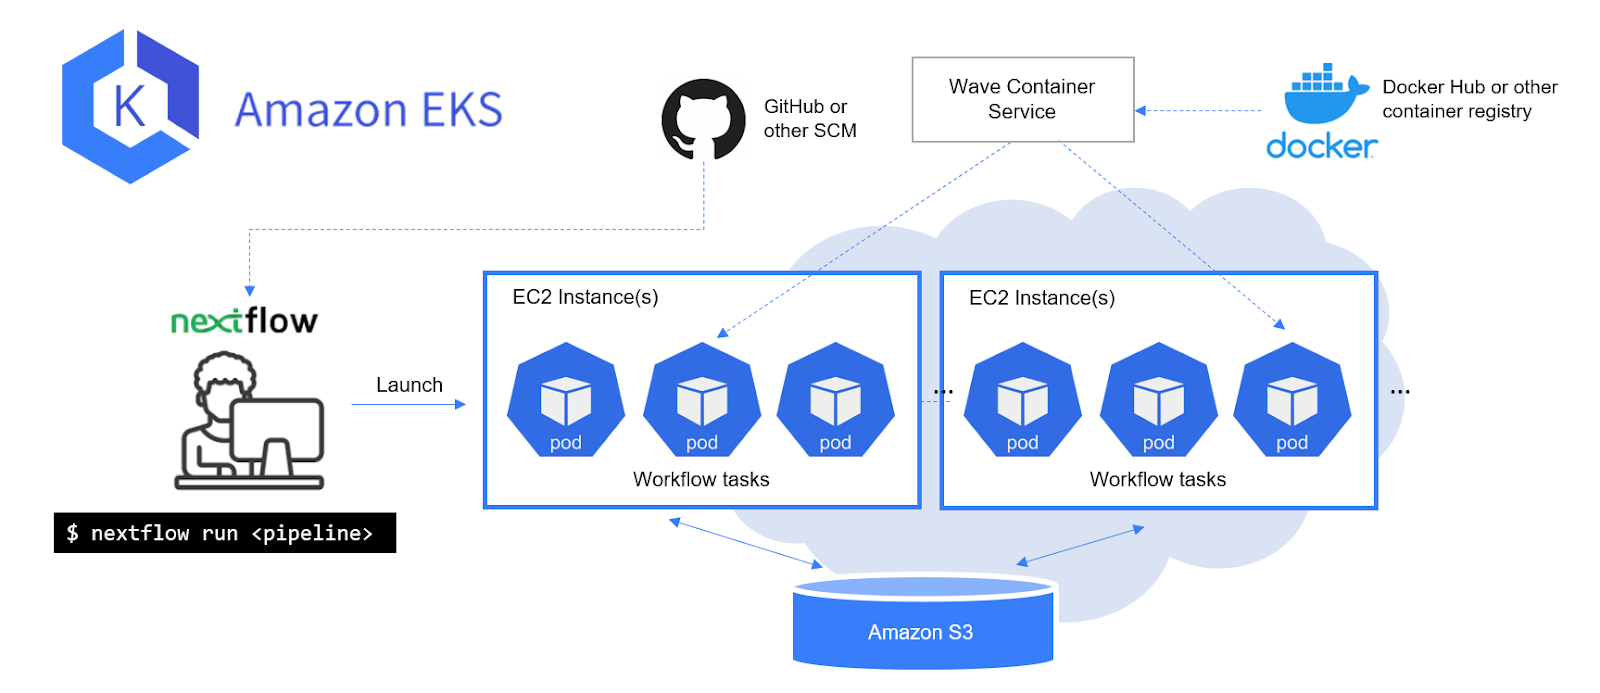
Users launch their pipeline from the command line via nextflow run, and Nextflow uses the user’s Kubernetes config file (normally located at ~/.kube/config) to access the cluster. Nextflow will run the pipeline as normal, and it will submit tasks to the cluster as Pods. When a Pod pulls its container image, it will receive an additional layer from Wave which contains the Fusion client. The task will access its work directory like a regular POSIX directory, but the Fusion client will perform S3 transfers under the hood.
With Wave and Fusion, Nextflow can utilize the power and flexibility of Kubernetes while providing a much more convenient interface (similar to AWS Batch) to the user.
Nextflow and EKS: Step-by-step guide
This guide explains how to run Nextflow pipelines on Amazon EKS. The preferred way to install Amazon EKS is using eksctl, an open-source tool jointly developed by AWS and Weaveworks.
The guide is organized as follows:
- →Prepare a deployment environment and install Amazon EKS
- →Prepare the EKS cluster for Nextflow
- Connect to the cluster
- Create a namespace - →Create a service account
- Enable IAM Roles for Service Accounts (IRSA) on the EKS cluster
- Create an S3 bucket
- Configure your Kubernetes service account to assume an IAM role - →Run a Nextflow pipeline on your EKS cluster
- →Configure Nextflow for Kubernetes
- Run a pipeline
Prepare a deployment environment and install Amazon EKS
We will use command-line tools to accomplish most of the steps in this guide, which means we will need to install these tools in a separate environment, which we will call the “deployment environment”. It can be your local machine or an EC2 instance, depending on where you want to launch your Nextflow pipelines.
In our example, we deployed an EC2 instance to act as our deployment environment. For those new to AWS, the process for launching an EC2 instance is described in the AWS documentation.
You will need to run through the installation process for each of the following tools specific to your deployment environment (in this guide, we are using Ubuntu Linux):
The process of installing a Kubernetes cluster using eksctl is explained in the AWS documentation in Getting started with Amazon EKS – eksctl. You will need to create an IAM user or role with sufficient permissions so that eksctl can deploy the cluster using CloudFormation. See the AWS documentation Enable IAM user and role access to your cluster for instructions on how to do this.
In this guide, we assume that the tools above have been installed and that you have a functional Amazon EKS cluster.
Prepare the EKS cluster for Nextflow
kubectl is a command-line tool that allows you to interact with Kubernetes clusters. Whereas eksctl is used specifically to manage EKS clusters and underlying AWS resources, kubectl works with any Kubernetes cluster and is used to manage Kubernetes resources (e.g. Pods) rather than cloud-specific resources (e.g. EC2 instances).
Connect to the cluster
When eksctl installs your cluster, it automatically creates a ~/.kube/config file containing the cluster’s configuration details. Run the following command to verify that the ~/.kube/config file has been properly configured to access the EKS cluster:
You can also run 'kubectl cluster-info dump' to further debug and diagnose cluster problems.
List the available cluster nodes:
If you made it this far, congratulations! You now have a functional Amazon EKS cluster and are ready to configure it to support Nextflow pipelines.
Create a namespace
In Kubernetes, a namespace is a mechanism for grouping related resources. For example, every user and/or application in a K8s cluster might have their own namespace. Every K8s cluster starts out with a default namespace, but we will create a custom nextflow namespace to keep things organized. This practice will serve you well as your K8s cluster takes on additional workloads and users over time.
Create a namespace:
Configure kubectl to use the nextflow namespace by default:
You can also append -n <namespace> when you run kubectl to target a particular namespace.
Create a service account
Before creating a service account, it is helpful to explain what they are. When a user accesses a Kubernetes cluster (for example, with kubectl), they are authenticated by the Kubernetes API server as a particular user account. In our examples, we’ve been using the nextflow-user IAM user we created in a previous step.
A process running in a Pod can also contact the API server. When it does, it is authenticated as a particular service account. Every namespace has a default service account, but this account has only minimal permissions.
To enable Nextflow to work with Kubernetes, we will create a nextflow-sa service account and empower it with the permissions that Nextflow needs in order to do things like create Pods and mount Volumes.
We will define the service account and associated permissions in a YAML manifest file as shown below. Depending on how you use Nextflow, you may need to adjust the rules defined in nextflow-role, but these permissions should be sufficient for most use cases.
This manifest will perform the following steps:
- →Create a new ServiceAccount called
nextflow - →Create a Role called
nextflow-role - →Create a RoleBinding called
nextflow-rolebindthat associatesnextflow-rolewith thenextflow-saServiceAccount
You can apply this manifest to the cluster as follows:
List the service accounts to verify that the nextflow service account was created:
Enable IAM Roles for Service Accounts (IRSA) on the EKS cluster
A best practice with Amazon EKS is to use IAM Roles for Service Accounts (IRSA) as explained in the Amazon EKS documentation.
Amazon EKS Clusters version 1.14 or later have an OpenID Connect issuer URL associated with them. You can use the following AWS CLI command to retrieve it.
To use IAM roles for service accounts in your cluster, you will need to create an OIDC identity provider as shown using eksctl.
Create an S3 bucket
Normally, at this point we would create a persistent volume claim backed by some kind of storage such as EFS. Thankfully, because we are using Wave to store everything in S3, we can skip this part, and instead we only need an S3 bucket.
If you don’t already have a bucket, it’s very easy to create one:
Bucket names in S3 are globally unique, so you will need to substitute s3://mybucket with your unique bucket name.
Configure your Kubernetes service account to assume an IAM role
In the following steps we will create an IAM role called nextflow-role and associate it with the nextflow-sa service account created in a previous step. For Nextflow to run on Kubernetes, we need to create a security policy that allows Pods running Nextflow to manipulate files in the S3 bucket we created in the previous step. We then attach this policy to our IAM role. If you run into difficulties, you can review the Amazon EKS documentation for additional information. An example of an appropriate Kubernetes configuration is also provided in the Wave Showcase on GitHub.
First, create a nextflow-policy.json file containing the security policy as shown below. You will need to modify the script to reflect your chosen S3 bucket name.
Addendum: What about kuberun?
Experienced Nextflow users may point out that the nextflow kuberun command is another option that makes it easier to use Nextflow with Kubernetes. While kuberun does allow you to launch a pipeline from outside the cluster by automatically creating a submitter Pod for you, it suffers from a number of limitations:
- →You can’t run local pipeline scripts.
- →You can use local config files, but they have limited support — some config features like implicit variables (e.g. `baseDir`) and custom functions simply don’t work and would be difficult to support.
- →You still have to provision your own PVC and manually transfer your data to and from the PVC. Creating and managing this PVC is arguably the most difficult aspect of using Nextflow with Kubernetes.
For these reasons, kuberun has never been a viable solution for running production pipelines on Kubernetes. Instead, we believe the challenges of Nextflow+K8s are more effectively solved by external solutions: a workflow platform (like Tower) to manage the submitter pod, and Wave (which can be used with or without Tower) to provide remote storage.
Conclusion
In this guide, we have taken you step-by-step through the process of deploying an Amazon EKS environment, and using it as a Nextflow compute environment. While deploying and managing Kubernetes clusters can be a bit complicated, for organizations already using Kubernetes, leveraging the same infrastructure for scientific workflows makes perfect sense. New innovations such as Wave and Fusion make running Nextflow on Kubernetes easier than ever before.
We will continue to enhance our support for Kubernetes in Nextflow. To learn more, and keep abreast of the latest developments, check out the Nextflow Kubernetes documentation and the Nextflow blog.